Elkarte is an open-source forum software designed for creating and managing online communities. Based on the Simple Machines Forum (SMF), Elkarte has evolved to include a range of modern features and optimizations, making it an appealing option for those who want to run a discussion forum or online community platform.
Key Features of Elkarte
- Responsive Design: Elkarte is designed with a responsive layout, ensuring that your forum looks and works well on all types of devices, from desktops to mobile phones.
- Customizable Interface: Users can easily customize the look and feel of their forum with themes, allowing them to match their forum’s design to their brand identity or preferences.
- Advanced Security: Elkarte includes security measures like brute force protection and CAPTCHA verification to help protect your forum from malicious activities and unauthorized access.
- User Management and Roles: The platform provides robust tools for managing users, groups, permissions, and roles. You can create custom member groups with different permissions, assign moderators, and control who has access to specific sections of the forum.
- Rich Text Editor: Elkarte comes with a powerful WYSIWYG editor that allows users to create posts and threads easily, including images, videos, and formatted text.
- Social Sharing and Integration: It provides integration with social media platforms, allowing users to share content from the forum, as well as log in using their social media accounts like Google, Twitter, or Facebook.
- Notifications and Alerts: Users can get alerts about new replies, mentions, and other activities directly on the forum, which helps increase engagement within the community.
What is Elkarte Useful For?
Elkarte is useful for creating an online discussion platform or forum that fosters communication between community members. Here are some common use cases:
- Community Forums: Elkarte is ideal for building general discussion forums where members can start conversations, ask questions, and share information.
- Customer Support: Businesses can use Elkarte to create a support forum where users can ask questions about products and services. Community support forums are a great way to provide an additional layer of customer service.
- Knowledge Sharing: Elkarte is useful for building communities around knowledge-sharing on specific topics, such as tech, health, hobbies, and interests. Users can post questions and contribute answers, fostering collaborative learning.
- Private/Internal Forums: Organizations can use Elkarte to set up private forums for internal communication between employees or members, allowing for efficient team discussions and collaboration.
- Fan Clubs: Fan communities for movies, TV shows, music, or sports can use Elkarte to create an environment where fans can gather to discuss, share their favorite moments, and connect with others with similar interests.
What You Can Do with Elkarte
- Create Boards and Categories: You can create multiple boards and categories to organize discussions into specific topics, making it easy for users to find and participate in relevant conversations.
- Custom Themes and Extensions: Elkarte allows you to customize your forum with themes and extend its functionality using add-ons and plugins. This lets you add features like SEO optimizations, spam prevention tools, and analytics tracking.
- Moderation Tools: Forum administrators and moderators have various tools to keep the community under control, such as managing user-generated content, issuing warnings, and banning problematic users.
- Polls and Surveys: You can create polls to gather feedback from your community members or start surveys to understand user preferences and opinions.
- File Attachments: Users can attach files, images, and documents to posts, which can be useful for sharing resources or information directly in a discussion.
- Notifications and Digest Emails: Administrators can set up email notifications and digest summaries to keep members informed about the latest activity in the forum, helping to keep users engaged.
- Multilingual Support: Elkarte has language packs that allow you to create a forum in multiple languages, making it accessible to a global audience.
- Analytics and Reporting: Track user activity, post trends, and engagement to understand how your community is growing and identify areas for improvement.
Elkarte is a robust and modern forum software that provides everything you need to create an active online community. With its rich set of features, customizable options, and focus on ease of use, it is an ideal solution for anyone looking to build a thriving discussion space.
Step 1: Create an Instance
- Access the Dashboard: Log in to your Shape.Host account and navigate to your Dashboard.
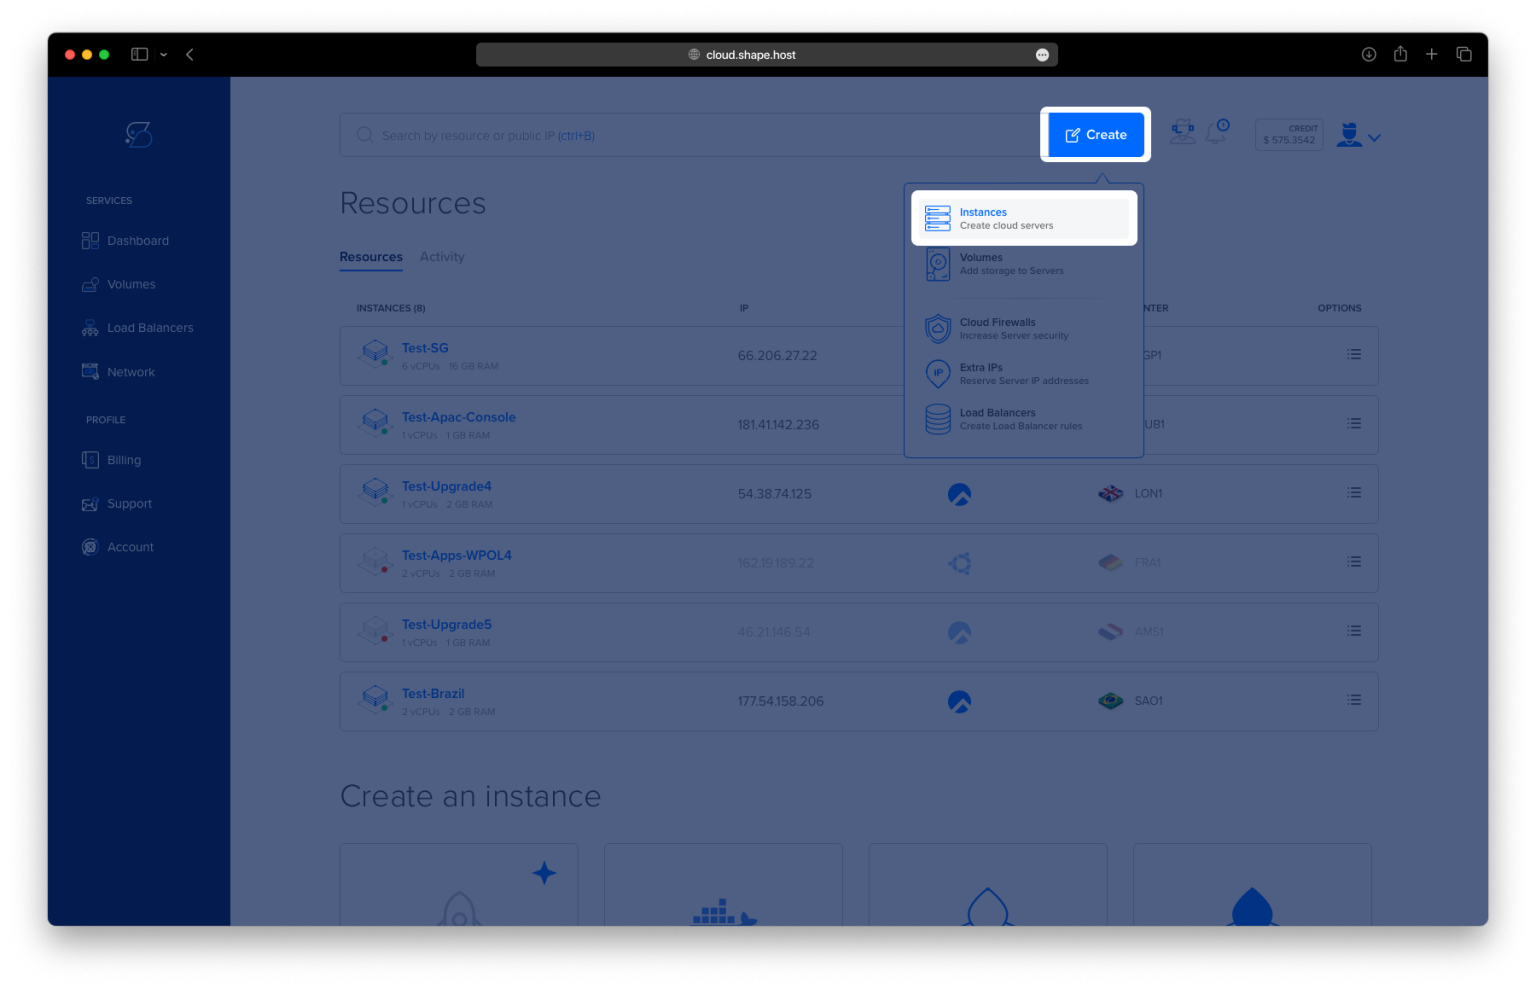
- Click Create: Click on the “Create” button located in the top-right corner.
- Select Instances: From the dropdown menu, choose “Instances” to begin creating a new cloud server.

- Select Location: Choose a data center location for your instance closest to your target audience for optimal performance.

- Choose a Plan: Scroll through the available pricing plans. Select a plan based on your project requirements, such as Standard, CPU-Optimized, or Memory-Optimized.
Choose an Image: Select Ubuntu 24.04 as the operating system for your instance.

- Authentication and Finalize: Choose your authentication method, either via SSH keys or password. Once done, click Create Instance to launch your server.

Obtain IP Address
- Once your instance is created, return to the dashboard.
- Find your instance’s IP address under the Resources section and use it to access your server.

Step 2: Connect to Your Instance
To connect to your instance on Shape.Host, follow these steps:
- Get the Instance IP: After creating your instance, find the public IP address in the Shape.Host dashboard under Resources.
- Open SSH Client: Use an SSH client like Terminal (Linux/macOS) or PuTTY (Windows).
- SSH into the Instance: Run the following command in your terminal:
ssh root@<your-instance-ip>Replace <your-instance-ip> with your actual instance IP address.
- Enter the Password: If prompted, enter your instance’s root password or use your SSH key if configured.
You are now connected to your instance!
Step 3: Update and Upgrade System Packages
Start by updating your package list and upgrading existing packages to the latest versions:
apt update && apt upgrade -y
Step 4: Install Apache Web Server
Install Apache to serve web content:
apt install apache2
Start and enable the Apache service:
systemctl start apache2
systemctl enable apache2
Step 5: Install PHP and Required Extensions
ElkArte requires PHP and several extensions. Install them using the following command:
apt install php libapache2-mod-php php-mysql php-gd php-mbstring php-xml php-curl php-zip -y
Step 6: Install and Configure MariaDB
Install MariaDB to manage the forum database:
apt install mariadb-server
Secure your MariaDB installation:
mysql_secure_installation

Step 7: Create a Database for ElkArte
Log in to the MySQL shell as the root user:
mysql -u root -pOnce logged in, create a new database and user for ElkArte:
CREATE DATABASE elkarte_db;
CREATE USER 'elkarte_user'@'localhost' IDENTIFIED BY 'strong_password';
GRANT ALL PRIVILEGES ON elkarte_db.* TO 'elkarte_user'@'localhost';
FLUSH PRIVILEGES;
EXIT;
Step 8: Download and Set Up ElkArte
Navigate to the web root directory and download the latest version of ElkArte:
cd /var/www/html
wget https://github.com/elkarte/ElkArte/releases/download/v1.1.9/ElkArte_v1-1-9_install.zip
Install the unzip package and extract ElkArte:
apt install unzip
unzip ElkArte_v1-1-9_install.zip -d elkarte

Change the ownership and permissions of the ElkArte directory:
chown -R www-data:www-data /var/www/html/elkarte
chmod -R 755 /var/www/html/elkarte
Step 9: Configure Apache for ElkArte
Create a new Apache virtual host configuration:
nano /etc/apache2/sites-available/elkarte.confAdd the following configuration:
<VirtualHost *:80>
    ServerAdmin admin@example.com
    DocumentRoot /var/www/html/elkarte
    ServerName example.com
    ServerAlias www.example.com

    <Directory /var/www/html/elkarte/>
        Options Indexes FollowSymLinks
        AllowOverride All
        Require all granted
    </Directory>

    ErrorLog ${APACHE_LOG_DIR}/elkarte_error.log
    CustomLog ${APACHE_LOG_DIR}/elkarte_access.log combined
</VirtualHost>
Enable the ElkArte site and Apache rewrite module:
a2ensite elkarte.conf
a2enmod rewrite
Restart Apache to apply the changes:
systemctl restart apache2
Step 10: Finalize Installation
Now that everything is set up, open your web browser and navigate to:
http://your-server-ip/elkarte/install.phpStep 11: ElkArte Installation Steps
Below is a detailed guide for each step of the ElkArte installation process, starting from the initial welcome screen to the completion of your new forum.
Step 1: Welcome Page
- Welcome to ElkArte Installer: This page introduces the ElkArte installation wizard. You will see the steps involved in the installation on the right side. To begin, click on the “Continue” button.
- Note: If you encounter a message that
Settings.phporSettings_bak.phpis missing, ElkArte will try to rename the sample files automatically. If this fails, manually renameSettings.sample.phptoSettings.phpandSettings_bak.sample.phptoSettings_bak.php.

Step 2: Database Server Settings
- Server Configuration: Here, you need to enter your database details.
- Server Name: Enter the server name, usually
localhost. - User Name: Enter the database user, e.g.,
elkarte_user. - Password: Enter the password for your database user.
- Database Name: Specify the name of your ElkArte database, e.g.,
elkarte_db. - Table Prefix: This allows multiple forums to share a database. Default is
elkarte_. - After filling in the details, click “Continue” to move on.

Step 3: Forum Settings
- Forum Configuration: This page requires you to set up basic forum information.
- Forum Name: Enter the name of your forum, e.g.,
Shape Host. - Forum URL: Provide the URL of your forum without a trailing
/. - Gzip Output: Enable gzip compression to save bandwidth.
- Database Sessions: Opt to use the database for storing session data.
- Once configured, click “Continue”.

Step 4: Database Population
- Populating Database: ElkArte is now setting up your database tables and inserting necessary data. In this step, 881 rows have been inserted, as shown in the progress. Once this is done, click “Continue”.

Step 5: Create Admin Account
- Admin Account Setup: Create the main administrator account.
- User Name: Enter a username, e.g.,
andrei. - Password: Provide a strong password and confirm it.
- Email Address: Enter a valid email for forum notifications.
- Database Password: Re-enter the database password for security purposes.
- Click “Continue” to finalize the admin account setup.

Step 6: Forum Homepage
- Installation Complete: The forum is now ready, and you will see the forum homepage.
- General Category: A default category (e.g., General Discussion) is available for initial posts.
- Forum Stats: Displays the initial forum statistics, confirming the successful installation.
You have successfully completed the installation of ElkArte. You can now log in using your admin account and start configuring your forum further, such as adding new categories, changing themes, and managing user permissions.

To finalize the installation, remove the installation script:
rm /var/www/html/elkarte/install.phpFor reliable and scalable hosting solutions, consider using Shape.host services, particularly their Cloud VPS offerings, to host your ElkArte forum. Their services provide excellent performance and flexibility, ensuring your forum runs smoothly.