Spigot on Ubuntu 24.04 – A High-Performance Minecraft Server Platform
Spigot is a high-performance, open-source Minecraft server implementation built on top of CraftBukkit. It provides significant performance optimizations, extensive plugin support, and better resource handling compared to vanilla Minecraft servers. Designed primarily for multiplayer environments, Spigot powers thousands of Minecraft communities worldwide.
Running Spigot on Ubuntu 24.04 “Noble Numbat” provides a stable, secure, and efficient environment—perfect for hosting public or private Minecraft servers with full root control and system tuning options.
What is Spigot?
Spigot is a server software fork of Bukkit, and part of the SpigotMC project. It’s written in Java and acts as a drop-in replacement for Mojang’s official Minecraft server (vanilla), offering:
- Lower CPU and RAM usage with asynchronous and optimized operations
- High plugin compatibility (via Bukkit, Spigot API, or Paper)
- Robust admin tools and world management
- Developer flexibility with powerful event hooks and APIs
- Modular performance tuning, ideal for large player counts
Ubuntu 24.04: A Great Host for Spigot
Ubuntu 24.04 offers a modern server OS with a long-term support cycle (until 2029), updated toolchains, and a focus on performance and security. Key benefits for Minecraft hosting include:
| Feature | Benefit for Spigot |
|---|---|
| OpenJDK 21 | Compatible with Spigot and Minecraft 1.20+ |
| Systemd v253 | Robust service management for auto-start, logging |
| Linux Kernel 6.8+ | Improved I/O and TCP stack performance |
| AppArmor / UFW | Secure Spigot from outside threats |
| Minimal install base | Less overhead = more RAM for Minecraft |
Spigot’s Java-based runtime fits naturally into Ubuntu’s system architecture, allowing smooth integration with monitoring tools, security layers, and automation systems.
Spigot Server Architecture Overview
- Java Virtual Machine (JVM): The runtime that executes the Spigot
.jarfile - Spigot Server Core: Optimized CraftBukkit base with extended APIs
- Plugins (optional): Modular
.jarfiles in the/pluginsdirectory - World Data: Stored in
/world,/world_nether, and/world_the_end - Configuration: Server properties, Spigot config (
spigot.yml), and plugin-specific files
Spigot supports multi-threaded optimizations, asynchronous chunk loading, and network tuning to handle more players with less lag.
Use Cases for Spigot on Ubuntu 24.04
- Multiplayer Survival or Creative Servers
- Custom Minigame Networks
- Educational or School Servers
- Plugin Development / Testing
- Community Hubs with Custom Features
Why Use Spigot Instead of Vanilla Minecraft?
| Feature | Vanilla Minecraft | Spigot |
|---|---|---|
| Performance | Basic | Optimized |
| Plugin Support | None | Extensive (Bukkit/Spigot API) |
| Admin Tools | Minimal | Advanced (timings, events) |
| Configuration Depth | Low | High |
| Customization | Very limited | Extensive (permissions, events, custom blocks) |
Spigot gives server owners the control they need to scale and manage larger or more complex worlds, events, and communities.
Benefits of Running Spigot on Ubuntu 24.04 VPS
- ✅ Full Root Access: Tune JVM flags, allocate RAM, and manage server restarts via systemd
- ✅ Security Layers: Limit SSH and port access with UFW or fail2ban
- ✅ Better Performance: SSD-backed VPS options like Shape.Host significantly reduce world lag
- ✅ Automation Friendly: Use Bash scripts, Ansible, or CRON for updates and backups
- ✅ Plugin Ecosystem: Use Spigot as a base for PaperMC or Purpur if needed
Key Configuration and Optimization Areas
- JVM Flags: Use G1GC and optimized memory settings (e.g.,
-Xms2G -Xmx4G) for smooth performance - View Distance: Reduce
view-distanceinserver.propertiesfor less CPU usage - Entity Tracking: Tweak
spigot.ymlandbukkit.ymlto optimize entity handling - Auto-Restarts: Use
systemdto restart the server automatically on crash - Backups: Use
rsyncor snapshot tools to automate world folder backups
Security Tips
- Use non-root users to run Spigot processes
- Run Spigot in a screen or tmux session to prevent terminal loss
- Use UFW to restrict traffic to only Minecraft and SSH ports
- Keep Java and plugins updated to avoid exploits
- Monitor logs with tools like Logwatch or Fail2Ban
Hosting on Shape.Host with Ubuntu 24.04
Shape.Host Cloud VPS is ideal for hosting Spigot servers on Ubuntu 24.04:
- High-performance VPS plans with SSD storage and scalable RAM
- Full root access to install Java, configure ports, and automate tasks
- Option to run multiple instances or modded forks (e.g., Paper, BungeeCord)
- One-click snapshot and restore features for world backups
Spigot on Ubuntu 24.04 is a rock-solid combination for Minecraft server hosting. Ubuntu’s stable, secure LTS platform complements Spigot’s optimized engine, offering better control, customization, and performance than a vanilla server.
Whether you’re managing a small server for friends or running a professional Minecraft network with 100+ players, Spigot on Ubuntu gives you the flexibility and reliability needed to succeed—especially when deployed on trusted infrastructure like Shape.Host VPS.
Step 1: Set Up a Server Instance on Shape.Host
To host a Minecraft server with Spigot, you’ll first need a robust VPS. Shape.Host offers scalable infrastructure perfect for this.
Go to https://shape.host and log in.
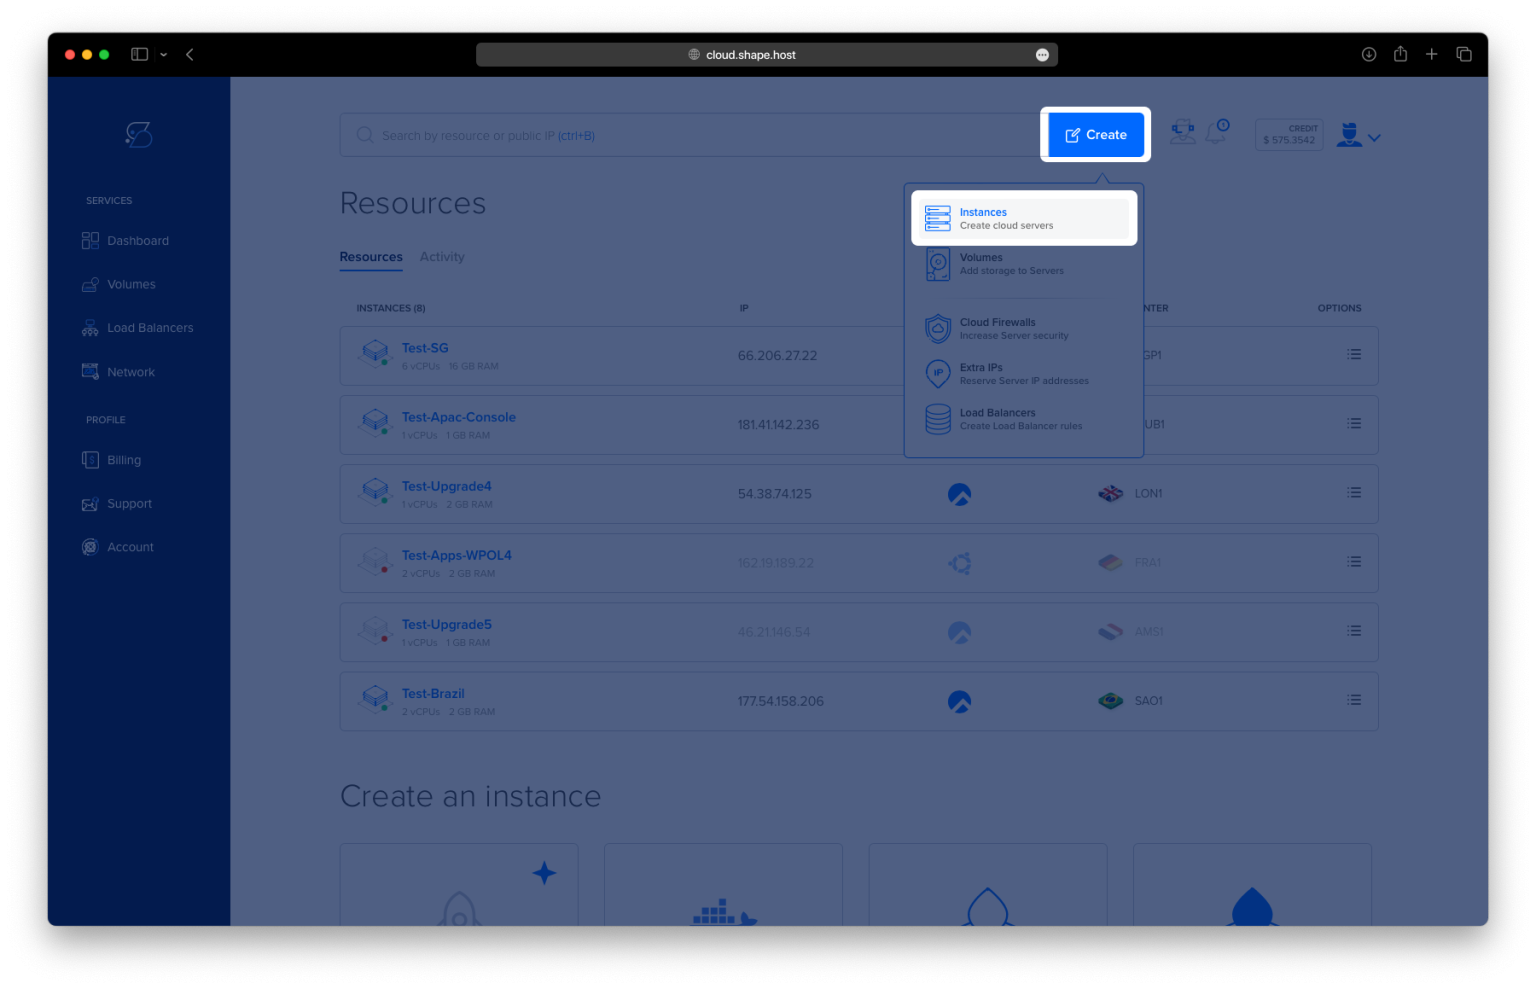
Click “Create” → “Instance.”

Choose the following:
Region: Select a nearby data center.

OS: Select Ubuntu 24.04 (64-bit).
Resources: At minimum, use 2 vCPUs, 4 GB RAM, 40 GB SSD.

Click Create Instance.

Once deployed, copy your IP address from the instance page.

Step 2: Connect to Your Server via SSH
From Linux/macOS:
ssh root@your_server_ip
From Windows (via PuTTY):
- Enter the server IP under “Host Name”
- Click Open, then log in as
root
Step 3: Install Required Packages
Update your package index and install Java 17, Git, and cURL:
apt update
apt install git openjdk-17-jdk curl
Spigot requires Java 17, which is compatible with recent Minecraft versions.


Step 4: Download and Build Spigot
Step 4.1 – Create a Directory for the Build Process
mkdir /opt/spigot
cd /opt/spigot
Step 4.2 – Download BuildTools.jar
curl -o BuildTools.jar https://hub.spigotmc.org/jenkins/job/BuildTools/lastSuccessfulBuild/artifact/target/BuildTools.jar

Step 4.3 – Build Spigot for a Specific Version
java -jar BuildTools.jar --rev 1.20.4
This step downloads and compiles Spigot from source. It may take several minutes and will generate
spigot-1.20.4.jar.

Step 5: Set Up the Spigot Server
Step 5.1 – Create the Server Directory
mkdir /opt/spigot-server
Step 5.2 – Move the Built JAR File
cp spigot-1.20.4.jar /opt/spigot-server/spigot.jar
cd /opt/spigot-server

Step 5.3 – Accept the Minecraft EULA
echo "eula=true" > eula.txt

Step 5.4 – Start the Server
java -Xms1G -Xmx2G -jar spigot.jar nogui
-Xms1Gsets the initial memory to 1GB-Xmx2Gsets the max memory to 2GB
Adjust these values based on your available system resources.
On first launch, the server will generate config files such as server.properties.

Step 6: Configure Your Server
Open the main configuration file:
nano server.properties
Make changes like:
motd=Welcome to my server
max-players=20
online-mode=true
⚠️
online-mode=falseallows cracked clients to connect, which is not recommended for security and legal reasons.

Step 7: Create a systemd Service
This will allow the server to start at boot and be managed as a service.
Step 7.1 – Create the Service File
nano /etc/systemd/system/spigot.service
Paste:
[Unit]
Description=Spigot Minecraft Server
After=network.target

[Service]
WorkingDirectory=/opt/spigot-server
ExecStart=/usr/bin/java -Xms1G -Xmx2G -jar spigot.jar nogui
Restart=on-failure
User=root

[Install]
WantedBy=multi-user.target
Adjust the
User=directive to a non-root user for production environments.

Step 7.2 – Reload systemd and Enable the Service
systemctl daemon-reexec
systemctl enable spigot
systemctl start spigot

Step 8: Connect to Your Server
Open Minecraft and connect using your server’s IP address. Example:
your_server_ip:25565
The default port for Minecraft is 25565, so you may need to open this port in your VPS firewall if necessary.
ufw allow 25565You’ve now installed and configured a Spigot Minecraft server on Ubuntu 24.04. This setup is ideal for running plugins and managing a custom multiplayer environment. Using systemd ensures your server auto-starts and is easy to control.
Ready to build your Minecraft world?
Host it on Shape.Host Cloud VPS for reliable performance and 24/7 uptime.
Get started at https://shape.host