InfluxDB 2 on Ubuntu 24.04 with HTTPS – Secure Time Series Data Platform
InfluxDB 2.x is a unified time series database developed by InfluxData, featuring an integrated UI, a powerful query engine (Flux), task scheduling, alerting, and support for Telegraf, Prometheus remote write, and native dashboards. When deployed on Ubuntu 24.04, it benefits from the latest LTS kernel and long-term system security, while HTTPS support ensures encrypted communication for sensitive monitoring, financial, or telemetry data.
Overview of InfluxDB 2.x Architecture
InfluxDB 2.x introduced major changes from the 1.x series, including:
| Component | Description |
|---|---|
| InfluxDB Engine | Time series database engine optimized for high ingest rates |
| Flux | Query and scripting language replacing InfluxQL |
| Bucket Storage | Multi-tenant-compatible time series storage model |
| Tasks | Scheduled background jobs for transformation and alerts |
| Token-based Auth | Fine-grained access control across organizations and users |
| Dashboards | Built-in UI for visualizing metrics without Grafana |
All components are tightly integrated and accessible via a unified web UI, CLI, or RESTful API.
Why Ubuntu 24.04 Is a Strong Base for InfluxDB 2
Ubuntu 24.04 LTS (Noble Numbat) offers a stable, long-supported platform with updated libraries and systemd features that benefit InfluxDB in performance and service control:
| System Feature | Benefit for InfluxDB |
|---|---|
| Linux Kernel 6.8+ | Improved I/O latency and memory efficiency |
| OpenSSL 3.x | Strong TLS support for secure endpoints |
| Systemd 255+ | Reliable service restarts, hardening, and socket control |
| AppArmor | Optional additional security confinement |
| PostgreSQL-style journal | Log integration with journald for clean diagnostics |
| LTS Security Updates | Support through 2029 (ESM available beyond) |
Ubuntu’s Snap and APT ecosystems also offer multiple ways to deploy InfluxDB (though for 2.x, official binaries or Docker images are typically preferred for compatibility).
Enabling HTTPS for InfluxDB 2 on Ubuntu 24.04
By default, InfluxDB 2 uses HTTP for local development. Enabling HTTPS (TLS) is essential for production, particularly when exposing the API or UI to external clients.
Key aspects of TLS configuration:
| Parameter | Description |
|---|---|
tls-cert | Path to your public certificate (PEM format) |
tls-key | Path to your private key |
https-enabled = true | Forces all REST and UI access over HTTPS |
Optional: tls-min-version | Control minimum TLS version (e.g., 1.2 or 1.3) |
Optional: tls-ca | Custom CA support for mutual TLS (mTLS) setups |
TLS can be configured in either:
- The
influxdb.conffile (if using a config-based install) - Or via environment variables (e.g.,
INFLUXD_TLS_CERT,INFLUXD_TLS_KEY) when launching the binary or systemd unit
Let’s Encrypt or custom CA certificates can be used. In production, an NGINX reverse proxy is commonly used to handle HTTPS termination and enforce HSTS or rate limiting.
Example HTTPS Setup Architecture
[ Client (Browser / API) ]
            |
         HTTPS (TLS)
            |
        [ NGINX Proxy ]
            |
         HTTP (localhost)
            |
       [ InfluxDB 2 Server ]
This approach separates concerns—NGINX handles public traffic, HTTPS certificates, and WebSockets, while InfluxDB listens securely on the internal loopback interface.
Use Cases for InfluxDB 2 + HTTPS
- IoT & Sensor Networks – Secure ingestion of time series data from distributed nodes
- Application Metrics – Protect service monitoring data (Telegraf, Prometheus Remote Write)
- DevOps Monitoring – Safeguard dashboards and system alerts from exposure
- Financial Time Series Analysis – Ensure encrypted access to sensitive data
- Edge & Hybrid Deployments – Use mutual TLS for data sync between sites and cloud
With HTTPS, InfluxDB becomes viable for GDPR-compliant setups, enterprise telemetry, and scenarios with strict data sovereignty requirements.
Security Features on Ubuntu 24.04 with InfluxDB 2
| Feature | Implementation |
|---|---|
| HTTPS (TLS) | Full server-side encryption for REST API and Web UI |
| API Tokens | Scoped tokens for users, buckets, tasks |
| Role-based Access | Control write/read access by resource (via UI or CLI) |
| Audit Logging | Request logs can be captured via NGINX or journald |
| UFW & AppArmor | Lock down server ports and define strict syscall boundaries |
| Fail2Ban / DoS Tools | Optionally protect endpoints from brute force or abuse |
Additionally, InfluxDB supports basic auth over HTTPS, but token-based headers are preferred for automation and API integrations.
Integration with Other Tools (All Over HTTPS)
| Tool/Service | Integration Mode | Use Case |
|---|---|---|
| Grafana | Datasource via HTTPS + Token | Advanced dashboarding and alerting |
| Telegraf | Direct line protocol HTTPS POST | Secure metrics ingestion |
| Kapacitor (1.x only) | Alerting pipeline (deprecated) | Older alert rule support |
| Prometheus | Remote write to InfluxDB 2 | Prometheus-to-Influx migration |
| Influx CLI / API | Fully HTTPS-compliant tools | Administrative scripting, backups, queries |
Deploying InfluxDB 2 on Ubuntu 24.04 with HTTPS gives you:
- A secure, LTS-backed platform for time series data
- Encrypted endpoints for both UI and API usage
- Compatibility with modern TLS certificates and reverse proxies
- Protection against unauthorized data exposure in sensitive workloads
- Integration with observability stacks like Grafana and Telegraf
This setup is ideal for production-grade observability, data collection, or scientific metrics analysis—especially in regulated or multi-tenant environments.
Step 1: Create and Connect to a VPS
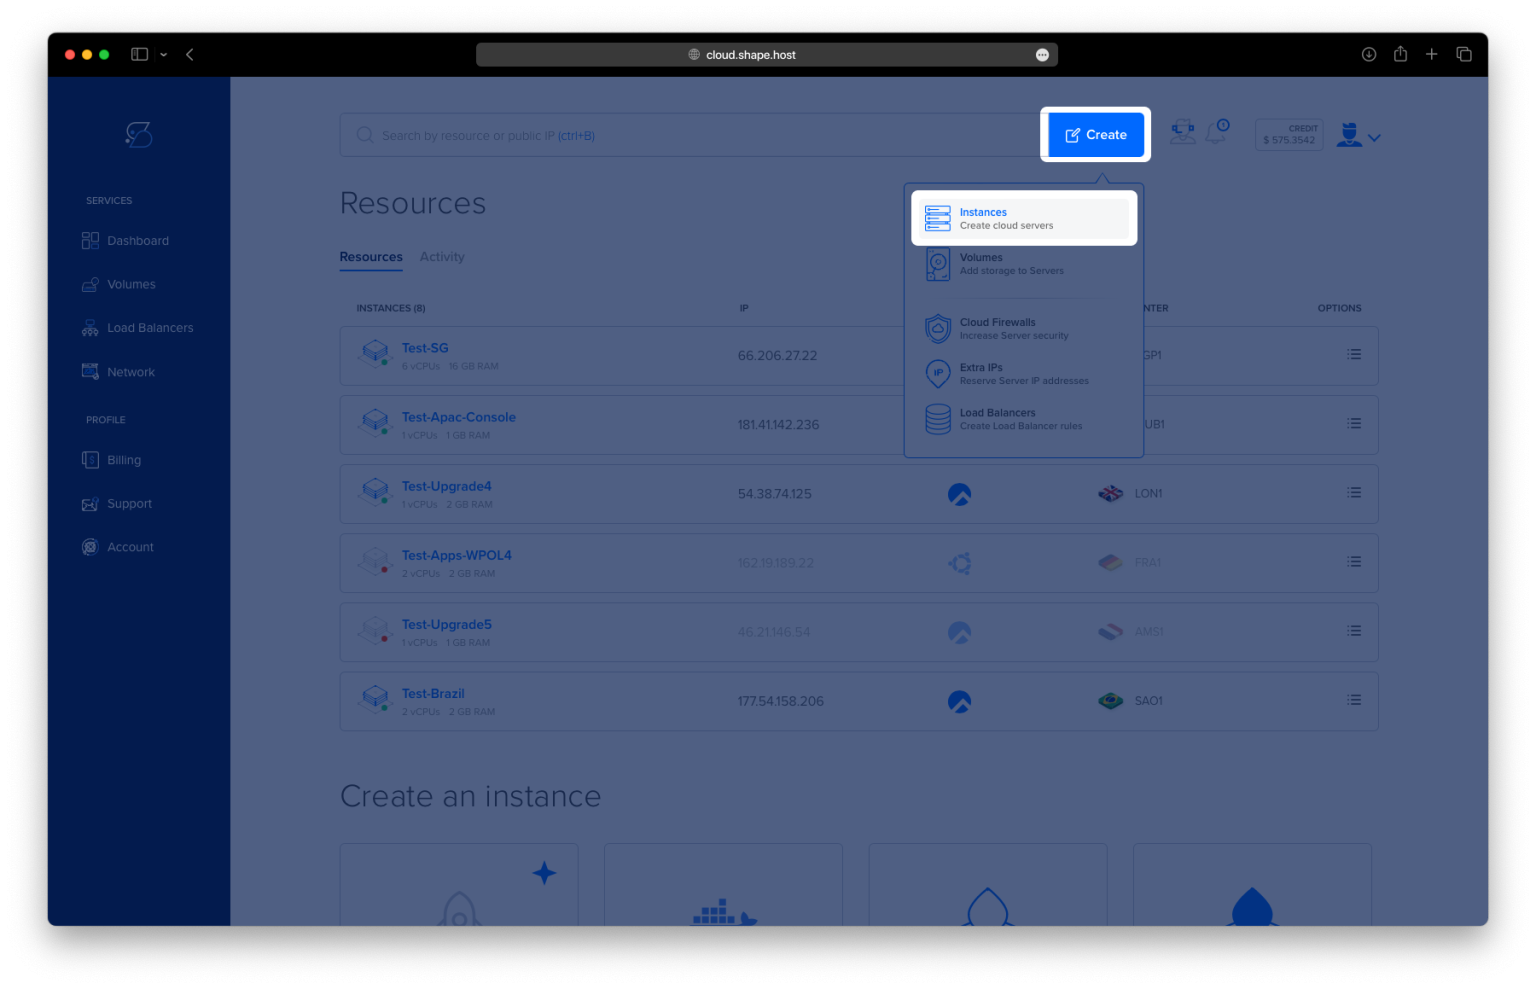
First, create a VPS instance on Shape.Host:
Go to https://shape.host and log in.
Click “Create” → choose “Instance”.

Select the server location closest to your audience.

Select the Ubuntu 24.04 (64-bit) OS.
Choose a plan with at least 1 CPU, 1 GB RAM, and 10 GB SSD.

Click “Create Instance”.

After a few moments, note the instance IP address from the “Resources” section.

Step 2: Connect to Your VPS
Linux/macOS:
Open a terminal and run:
ssh root@your_server_ip
Windows:
Download PuTTY, open it, enter your server’s IP in Host Name, and click Open to connect.
Step 3: Update Your System
Update package lists and upgrade packages:
apt update
apt upgrade -y

Step 4: Install Required Dependencies
Install tools needed to add repositories:
apt install curl gnupg2 ca-certificates lsb-release -y

Step 5: Add InfluxData GPG Key
Download and store the repository’s GPG key securely:
curl -fsSL https://repos.influxdata.com/influxdata-archive_compat.key | gpg --dearmor -o /usr/share/keyrings/influxdata-archive-keyring.gpg
Step 6: Add InfluxDB Repository
Add the official InfluxDB repo:
echo "deb [signed-by=/usr/share/keyrings/influxdata-archive-keyring.gpg] https://repos.influxdata.com/ubuntu jammy stable" > /etc/apt/sources.list.d/influxdb.list
Update your package list again:
apt update

Step 7: Install InfluxDB 2
Install InfluxDB and the CLI tools:
apt install influxdb2 influxdb2-cli -y

Step 8: Enable and Start InfluxDB
Enable and start the service:
systemctl enable influxdb
systemctl start influxdb
Check if it’s running:
systemctl status influxdb

Step 9: Run Initial InfluxDB Setup
Run the initial setup (follow the prompts):
influx setup

Step 10: Install Nginx and Certbot
Install Nginx and Certbot to enable HTTPS:
apt install nginx python3-certbot-nginx -y

Start and enable Nginx:
systemctl enable --now nginx

Step 11: Configure Nginx for InfluxDB
Create an Nginx configuration file for reverse proxy:
nano /etc/nginx/sites-available/influxdb
Paste the following content, replacing your-domain.com:
server {
    listen 80;
    server_name your-domain.com;

    location / {
        proxy_pass http://localhost:8086;
        proxy_set_header Host $host;
        proxy_set_header X-Real-IP $remote_addr;
        proxy_set_header X-Forwarded-For $proxy_add_x_forwarded_for;
        proxy_set_header X-Forwarded-Proto $scheme;
    }
}

Enable the configuration:
ln -s /etc/nginx/sites-available/influxdb /etc/nginx/sites-enabled/
Test and reload Nginx:
nginx -t && systemctl reload nginx

Step 12: Enable HTTPS with Certbot
Obtain and install an SSL certificate (replace with your actual domain):
certbot --nginx -d your-domain.com --redirect

Done!
You can now access your InfluxDB dashboard securely at:
https://your-domain.com


For a secure, high-performance VPS, use Shape.Host Linux SSD VPS. Their fast provisioning and Ubuntu 24.04 support make it perfect for InfluxDB, Docker, and other DevOps tools.