JupyterLab on Debian 12 – Stable Platform for Scientific Computing and Interactive Data Science
JupyterLab is the modern evolution of the classic Jupyter Notebook, offering a modular, extensible interface for interactive computing. When deployed on Debian 12, it benefits from a secure, minimalistic, and predictable Linux environment, making it ideal for research, analytics, and long-term development projects.
What Is JupyterLab?
JupyterLab is a next-generation user interface for Project Jupyter, designed to unify notebooks, code editors, terminals, visualizations, and file management into a single flexible interface. It supports:
- Live coding and interactive notebooks in Python, R, Julia, and more
- Drag-and-drop UI for multiple documents and views
- Data visualization tools like Matplotlib, Plotly, Bokeh, and Vega
- A growing ecosystem of extensions, including Git integration, LSPs, and dashboards
- Real-time collaboration with JupyterHub or JupyterLab RTC extensions
JupyterLab is widely adopted in data science, education, finance, bioinformatics, and AI research.
Advantages of Using Debian 12 for JupyterLab
Debian 12 is a robust, stable base that prioritizes transparency and long-term support. Key advantages include:
- Linux Kernel 6.1 LTS, optimized for stability and hardware compatibility
- Minimal footprint, reducing attack surface and resource usage
- Predictable APT packaging, making deployments reproducible
- Strong security defaults, including AppArmor and Secure Boot support
- Ideal for container-based deployments, such as Singularity, Podman, and Docker
Unlike bleeding-edge distributions, Debian is designed for consistency over time, which is crucial for reproducible research environments and regulated industries.
JupyterLab Architecture in Debian Context
| Component | Role |
|---|---|
| Notebook Server | Hosts the web interface and manages kernel execution |
| Kernels | Language-specific runtimes (e.g., IPython, IRkernel, IJulia) |
| Frontend (UI) | Modular web interface built on React and PhosphorJS |
| Extensions | Plugins for advanced tools like Git, terminals, file viewers, etc. |
These components integrate natively with Debian’s package management, systemd, and networking model, allowing fine-tuned control over performance and access.
Ideal Use Cases on Debian 12
JupyterLab on Debian 12 is well-suited for:
- Research labs with reproducibility and auditability requirements
- Enterprise teams deploying on private infrastructure
- Universities and academic settings offering isolated compute environments
- IoT and edge computing nodes where Debian’s minimalism is key
- Machine learning pipelines involving data preprocessing, visualization, and model prototyping
It also integrates easily with PBS/Slurm job schedulers, HPC clusters, and shared UNIX accounts, common in academic and scientific institutions.
Ecosystem and Language Support
Debian 12 supports a wide range of scientific and programming tools that enhance JupyterLab:
| Language / Tool | Availability in Debian 12 |
|---|---|
| Python 3.11 | Available in main repos; good for modern scientific libs |
| R, Julia, Octave | Installable via APT or external repos |
| LaTeX (TeX Live) | Full suite available for document publishing |
| Git | Version control for notebooks and scripts |
| TensorFlow / PyTorch | Available via Python wheels or conda |
| OpenCV, SciPy, Pandas | Fully supported in Python ecosystem |
Debian’s conservative approach ensures that tools remain stable across project lifecycles, minimizing rework due to upstream changes.
Security and Reliability
Debian 12 offers a security-focused environment for running JupyterLab:
| Security Layer | Relevance to JupyterLab Deployments |
|---|---|
| AppArmor profiles | Constrain notebook process access to sensitive areas |
| Unattended Upgrades | Automate security patches for system libraries |
| UFW / nftables | Control public access to Jupyter HTTP port |
| Token-based Auth | Protect access to notebook server |
| NGINX TLS Reverse Proxy | Enable HTTPS with Let’s Encrypt or custom certs |
| Resource Quotas (systemd) | Prevent runaway kernels or memory overuse |
These tools are standard in most Debian-based systems and integrate seamlessly with JupyterLab.
Service Integration and Deployment
| Deployment Mode | Notes |
|---|---|
| Bare metal or VM | Suitable for personal dev or internal lab servers |
| Systemd service | Run JupyterLab persistently with automatic restarts |
| Docker container | Debian base images available for lightweight images |
| Kubernetes | Use Helm charts or custom manifests |
| JupyterHub | Manage multi-user access for research or classrooms |
Debian also supports singularity for HPC-compatible containerization, which is commonly used to distribute scientific tools in university environments.
Performance and Optimizations
JupyterLab performs efficiently on Debian 12 with the following strategies:
- Use conda or venv to isolate kernel environments
- Enable nbextensions for spellcheck, codefolding, and autosave
- Deploy nbconvert to export notebooks to HTML, PDF, or Markdown
- Integrate dask/distributed for parallel computation
- Apply systemd resource limits to cap memory or CPU per user session
- Use JupyterLab LSP (Language Server Protocol) for enhanced code intelligence
Debian allows predictable tuning of background services, file I/O, and networking—essential for stable scientific workflows.
Comparison: Debian 12 vs Other Platforms for JupyterLab
| Platform | Stability | Ecosystem | Performance | Ideal Use Case |
|---|---|---|---|---|
| Debian 12 | Very High | Moderate | High | Long-term research, HPC, on-premise |
| Ubuntu 24.04 | High | Very High | High | General-purpose dev, GPU use |
| Fedora | Medium | Cutting-edge | High | Testing latest Jupyter features |
| Arch Linux | Low | Bleeding-edge | Medium | Personal experimentation |
Debian 12 is best for longevity, reproducibility, and system integrity—all vital for institutional deployments and shared compute environments.
Deploying JupyterLab on Debian 12 offers a powerful and stable foundation for data-driven computing. Whether used for individual research, collaborative science, or enterprise-grade data platforms, Debian provides the security, reliability, and transparency required for sustained, high-impact development.
Step 1: Create a VPS Instance on Shape.Host
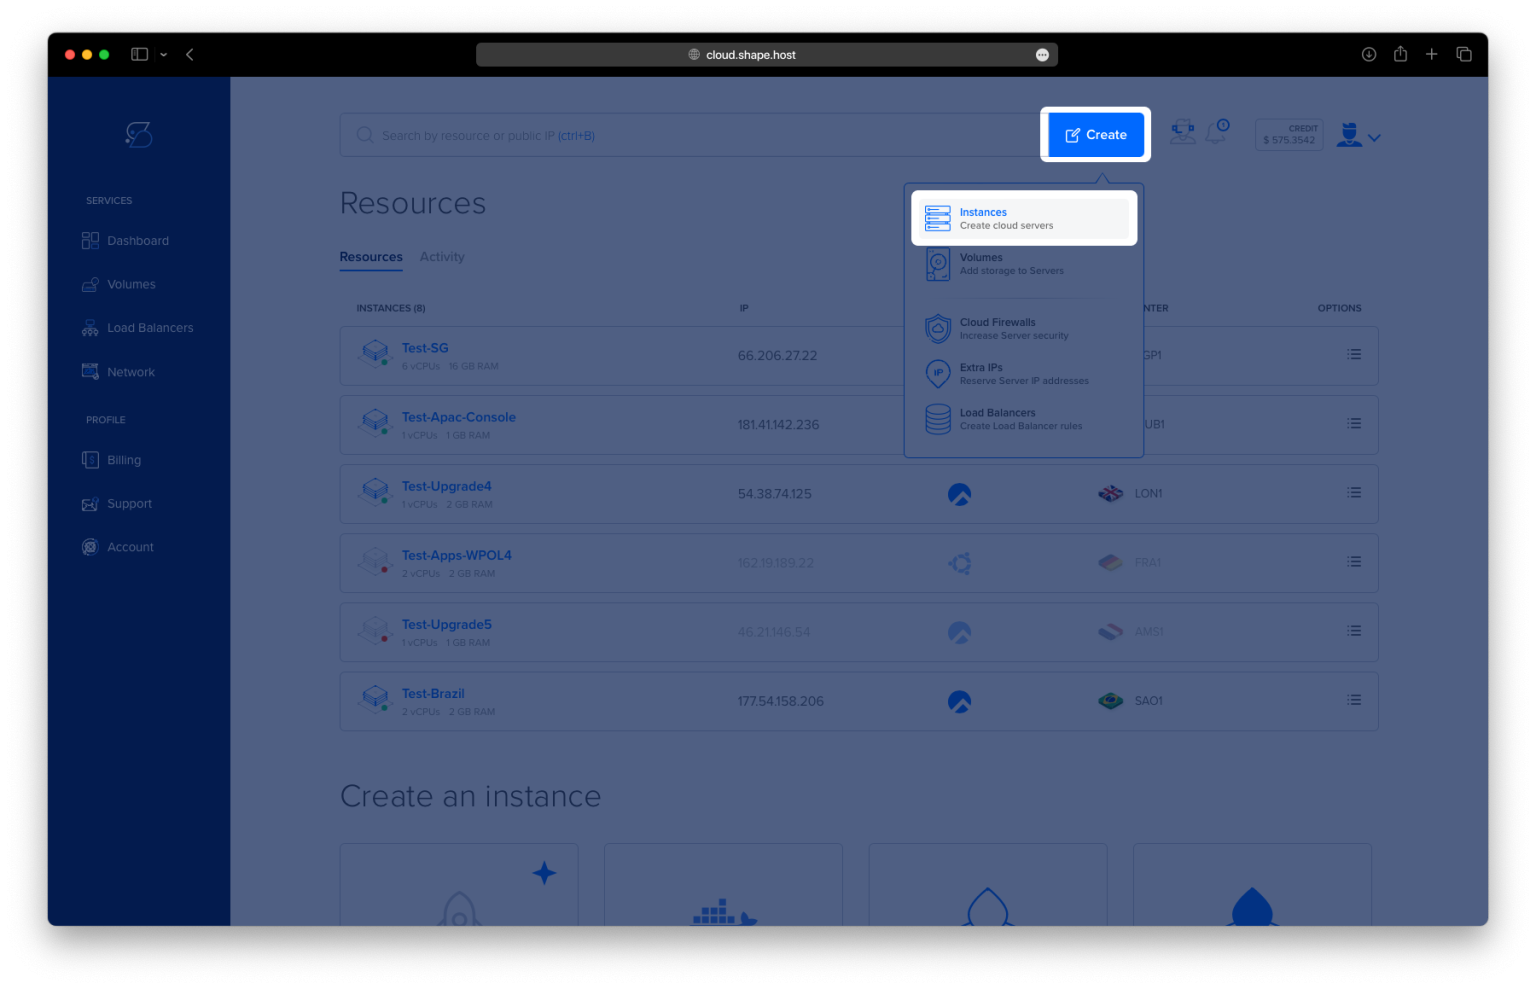
To begin, create a virtual private server (VPS) using Shape.Host:
Visit https://shape.host and log into your account.
Click on “Create” in the dashboard menu.
Select “Instance” as the resource type.

Pick the closest server location to your target audience (e.g., Frankfurt, Dallas, Amsterdam).

Choose Debian 12 (64-bit) as the operating system.
Select a hosting plan with at least 2 CPUs, 4 GB RAM, and 20 GB SSD for good performance.

Click “Create Instance”.

Once provisioned, copy the IP address from the “Resources” section of your dashboard.

Step 2: Connect to Your VPS Instance
From Linux or macOS:
Open a terminal and connect via SSH using:
ssh root@your-server-ip
From Windows:
Use an SSH client like PuTTY:
- Enter your server’s IP address.
- Choose SSH as the connection type.
- Click Open to start the session.
Step 3: Install JupyterLab on Debian 12
Update the system package index:
apt update
This command updates the list of available packages and their versions.

Install Python, pip, venv, and Git:
apt install python3 python3-pip python3-venv git
These are essential packages for Python development and virtual environments.

Create a project directory for JupyterLab:
mkdir -p /opt/jupyterlab
This creates a dedicated folder where JupyterLab will be installed.
Navigate into the project directory:
cd /opt/jupyterlab
Create a virtual Python environment:
python3 -m venv venv
This sets up an isolated environment so JupyterLab dependencies won’t affect system-wide packages.

Activate the virtual environment:
source venv/bin/activate
Upgrade pip:
pip install --upgrade pip
Keeps pip up to date with the latest version.

Install JupyterLab:
pip install jupyterlab
This command installs the full JupyterLab application inside the virtual environment.

Step 4: Create a Systemd Service for JupyterLab
Create the service file:
nano /etc/systemd/system/jupyterlab.service
Paste the following content:
[Unit]
Description=JupyterLab
After=network.target

[Service]
Type=simple
User=root
WorkingDirectory=/opt/jupyterlab
ExecStart=/opt/jupyterlab/venv/bin/jupyter lab --allow-root --ip=0.0.0.0 --port=8888 --no-browser
Restart=always

[Install]
WantedBy=multi-user.target
This service configuration allows JupyterLab to run in the background and automatically start on boot.

Apply and enable the new service:
systemctl daemon-reexec
Reloads the system manager configuration.
systemctl daemon-reload
Detects new or modified unit files.
systemctl enable jupyterlab
Enables the JupyterLab service to start at boot.
systemctl start jupyterlab

Starts the service immediately.
systemctl status jupyterlab
Checks the current status of the service.

Step 5: Secure Your JupyterLab Server
Exit the virtual environment:
deactivate
This brings you back to the main shell outside the virtual environment.
Install and configure UFW (Uncomplicated Firewall):
apt install ufw

Installs the firewall.
ufw allow 22/tcp
Allows SSH access.
ufw allow 8888/tcp
Allows access to the JupyterLab web interface.
ufw enable
Activates the firewall.

Check JupyterLab logs (optional troubleshooting):
journalctl -u jupyterlab -n 50
Displays the last 50 log lines of the JupyterLab service.

Step 6: Access JupyterLab in Your Browser
Open your browser and go to:
http://your-server-ip:8888
You should see the JupyterLab interface. The token or password setup will appear if it’s your first time launching it.


You’ve successfully installed and configured JupyterLab on Debian 12, running as a service and accessible over the web. This setup is excellent for data science, machine learning, or development work in Python.
For reliable and scalable hosting, consider Shape.Host Linux SSD VPS. Their flexible infrastructure is perfect for running JupyterLab and other Python-based applications.