What is ONLYOFFICE Docs?
ONLYOFFICE Docs is an open-source office suite that enables users to view, edit, and collaborate on documents, spreadsheets, and presentations in real-time. It is an alternative to Microsoft Office and Google Docs, offering a self-hosted solution for organizations that prioritize data security and control over their files.
ONLYOFFICE Docs is designed to integrate with various document management systems (DMS), collaboration platforms, and cloud storage solutions such as Nextcloud, ownCloud, Seafile, and more.
Key Features of ONLYOFFICE Docs
1. Document Editing & Collaboration
- Full support for DOCX, XLSX, PPTX formats.
- Real-time collaborative editing with two co-editing modes (Fast & Strict).
- Track changes, version history, and document comparison.
- User comments, mentions, and built-in chat for team collaboration.
2. Integration & Compatibility
- Easily integrates with Nextcloud, ownCloud, Seafile, WordPress, Alfresco, Confluence, and more.
- API support for custom integrations into third-party applications.
- Works with cloud and self-hosted environments.
3. Security & Data Privacy
- Self-hosted deployment ensures full control over documents.
- End-to-end encryption support for sensitive files.
- Document permissions, access restrictions, and password protection.
4. Advanced Editing & Productivity Tools
- Macros and Plugins: Supports JavaScript-based macros for automation.
- Forms & Digital Signatures: Create fillable forms and sign documents electronically.
- PDF Editing: Convert and edit PDFs directly.
5. Multi-Platform Support
- Web-based UI for browser access.
- Mobile apps for Android & iOS.
- Desktop clients for Windows, macOS, and Linux.
ONLYOFFICE Docs vs. Other Office Suites
| Feature | ONLYOFFICE Docs | Microsoft Office | Google Docs | LibreOffice |
|---|---|---|---|---|
| Self-Hosted | ✅ Yes | ❌ No | ❌ No | ✅ Yes |
| Collaboration | ✅ Yes (real-time) | ✅ Yes (Cloud-based) | ✅ Yes | ❌ No (only local) |
| Formats Supported | ✅ DOCX, XLSX, PPTX (native) | ✅ DOCX, XLSX, PPTX | ✅ DOCX, XLSX, PPTX (limited) | ✅ ODT, ODS, ODP (native) |
| Offline Editing | ✅ Yes | ✅ Yes | ❌ No | ✅ Yes |
| Security & Data Privacy | ✅ Full control (self-hosted) | ❌ Microsoft controls data | ❌ Google controls data | ✅ Yes (self-hosted) |
| Integration | ✅ Nextcloud, ownCloud, Seafile, etc. | ✅ Microsoft 365 | ✅ Google Drive | ❌ Limited |
| Plugin Support | ✅ Yes (JS-based) | ✅ Yes (VBA macros) | ❌ No | ✅ Yes (limited) |
Why Choose ONLYOFFICE Docs?
- Best for organizations that need a private, self-hosted office suite with strong integration capabilities.
- More compatible with Microsoft Office formats than LibreOffice.
- Offers better collaboration than LibreOffice while providing more control over data compared to Google Docs.
- Great for businesses, government institutions, and education sectors that prioritize security.
Use Cases of ONLYOFFICE Docs
✅ Businesses & Enterprises – Secure document collaboration and editing within private networks.
✅ Education & Research – Universities and schools can deploy a private office suite.
✅ Cloud Service Providers – Integrate ONLYOFFICE Docs with file-sharing platforms like Nextcloud.
✅ Government & Legal – Ensures compliance with data protection laws while offering powerful document editing.
ONLYOFFICE Docs is an excellent alternative to Microsoft Office and Google Docs, particularly for privacy-conscious users. It provides a self-hosted, secure, and feature-rich online document editing solution with seamless integration into various platforms. For organizations seeking full control over their data, ONLYOFFICE Docs on Debian 12 is a highly recommended choice.
Step 1: Setting Up Your Debian 12 Server
Before installing ONLYOFFICE Docs, you need a Debian 12 server. If you don’t have one yet, follow these easy steps on Shape.Host:
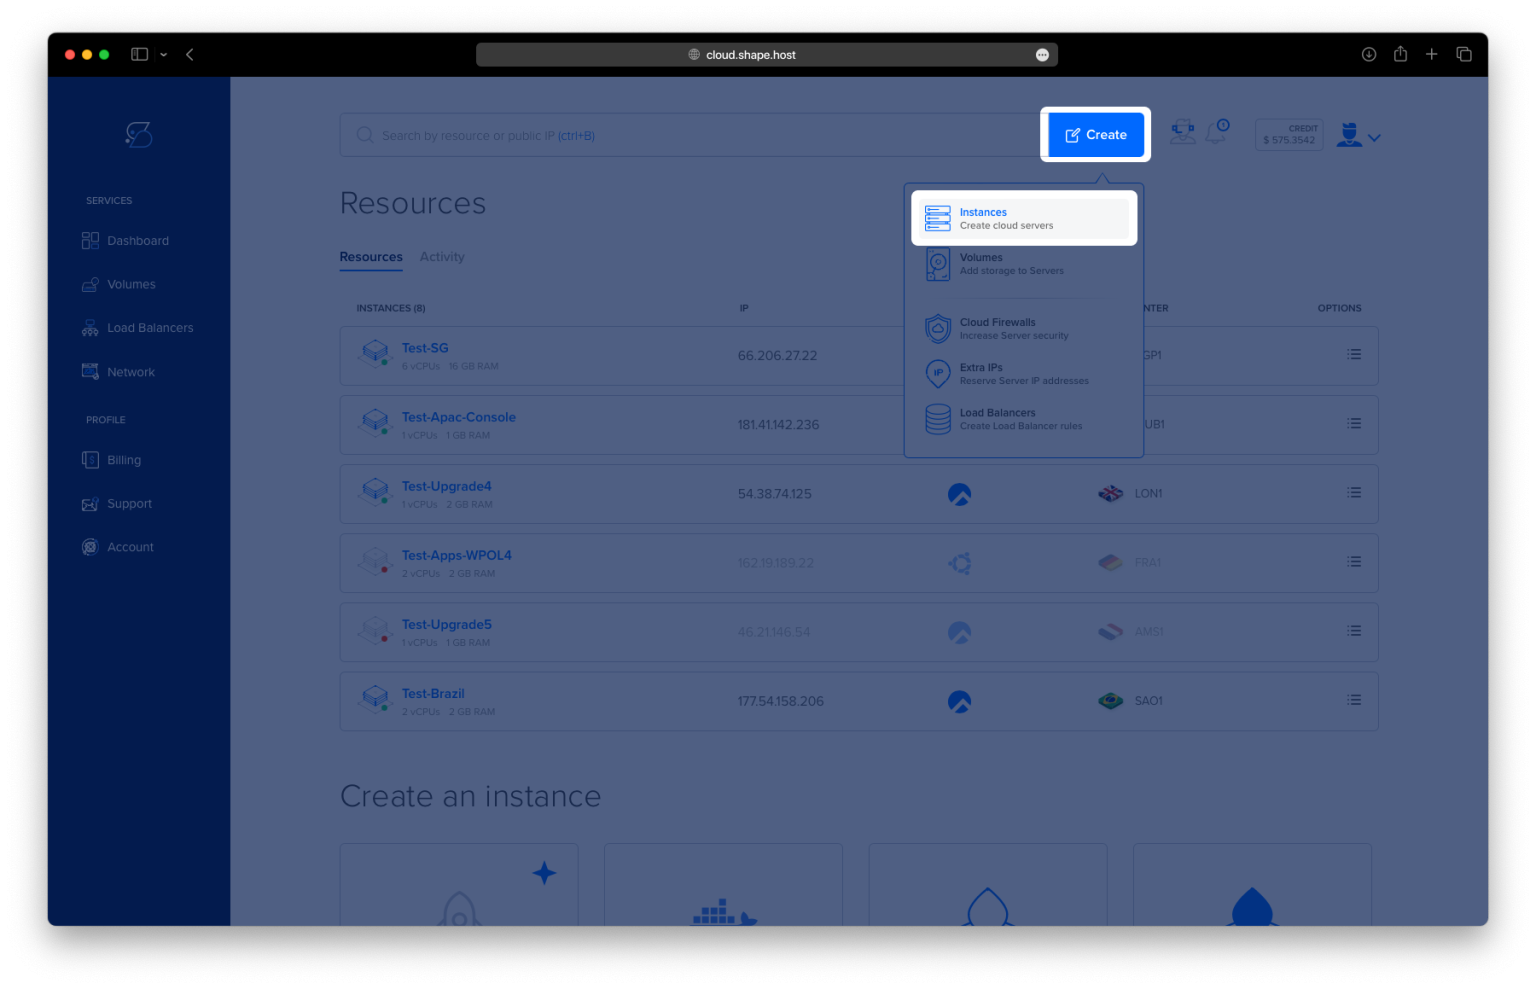
Log in to Shape.Host and navigate to your Dashboard.
Click “Create” to launch a new server setup.
Choose “Instances” to create a new cloud-based server.

Select a Data Center that is geographically close to your users for better performance.

Pick a Hosting Plan that meets your expected workload needs (e.g., Standard, Performance-Optimized).
Set Debian 12 as your operating system and confirm your selection.

Deploy the Server by selecting an authentication method (SSH keys or password authentication) and clicking Create Instance.

Once the instance is created, go to the Resources section to find the public IP address of your instance. You will use this to connect to the instance remotely.

Step 2: Connect to Your Server
Once your server is ready, establish a secure connection using SSH.
For Linux/macOS Users:
ssh root@<your_server_ip>For Windows Users: Use PuTTY, enter your server’s IP address, and click Connect.
Step 3: Update Your System
Before installing any software, it’s important to update your system packages. Run:
apt update -y
This ensures your system is using the latest software versions.

Step 4: Install PostgreSQL and RabbitMQ
Step 4.1: Install PostgreSQL and RabbitMQ
ONLYOFFICE Docs requires PostgreSQL as its database system and RabbitMQ as a message broker. Install both with:
apt install postgresql rabbitmq-server -y

Step 4.2: Check PostgreSQL Status
Ensure PostgreSQL is running correctly:
systemctl is-enabled postgresql
systemctl status postgresql

Step 4.3: Verify RabbitMQ Installation
Make sure RabbitMQ is enabled and running:
systemctl is-enabled rabbitmq-server
systemctl status rabbitmq-server

Step 5: Set Up the ONLYOFFICE Database
Step 5.1: Create a New PostgreSQL User
ONLYOFFICE requires a dedicated database user. Create one by running:
sudo -i -u postgres psql -c "CREATE USER onlyoffice WITH PASSWORD 'onlyoffice';"
Step 5.2: Create a Database for ONLYOFFICE
sudo -i -u postgres psql -c "CREATE DATABASE onlyoffice OWNER onlyoffice;"
Step 5.3: Confirm the New Database and User
To list database users:
sudo -i -u postgres psql -c "\du"

To see available databases:
sudo -i -u postgres psql -c "\l"

Step 6: Install ONLYOFFICE Docs
Step 6.1: Add the GPG Key
To ensure safe package installation, import the GPG key:
apt install gpg -y
curl -fsSL https://download.onlyoffice.com/GPG-KEY-ONLYOFFICE | gpg --dearmor -o /etc/apt/trusted.gpg.d/onlyoffice.gpg
Step 6.2: Add the ONLYOFFICE Repository
To enable ONLYOFFICE package downloads, add the official repository:
echo "deb [signed-by=/etc/apt/trusted.gpg.d/onlyoffice.gpg] https://download.onlyoffice.com/repo/debian squeeze main" | tee /etc/apt/sources.list.d/onlyoffice.list
Step 6.3: Install ONLYOFFICE Document Server
Update the package lists and install ONLYOFFICE Docs:
apt update && apt install onlyoffice-documentserver -y

Step 7: Secure Your ONLYOFFICE Server
To improve security, generate a secure link for your ONLYOFFICE server:
bash /usr/bin/documentserver-update-securelink.sh
Step 8: Accessing ONLYOFFICE Docs
Now that everything is set up, you can access your ONLYOFFICE Docs instance.
Open a web browser.
Enter your server’s IP address:
http://<your_server_ip>/You should see the ONLYOFFICE Docs interface, where you can create, edit, and collaborate on documents.

- Your online document server is now fully functional.
- You can integrate it with Nextcloud, WordPress, or any compatible app for document collaboration.
- For optimized hosting performance, consider deploying ONLYOFFICE Docs on Shape.Host Cloud VPS.
Now you can start creating and editing documents with your team, all while keeping control over your data!