Wiki.js on Ubuntu 24.04 – A Modern, Extensible Wiki Platform for the LTS Generation
Wiki.js is an open-source, Node.js-based wiki platform that prioritizes performance, customizability, and modern collaboration features. When paired with Ubuntu 24.04, an enterprise-grade LTS release supported until 2029, it becomes a reliable and feature-rich solution for teams and organizations seeking a self-hosted documentation platform with a sleek UI and extensive integration capabilities.
What Is Wiki.js?
Wiki.js is designed to be a modern documentation and knowledge base system, ideal for internal wikis, developer documentation, collaborative notes, and public-facing help centers. It features:
- A clean, responsive interface built with Vue.js
- A Markdown-first editor with support for WYSIWYG and HTML blocks
- Real-time collaboration (in active development)
- Authentication integrations (LDAP, OAuth2, SAML, GitHub, etc.)
- Modular architecture with over 30 integrations including Git, S3, Google Drive, Azure
- Built-in versioning, access control, and localization
Ubuntu 24.04 – A Stable Foundation for Wiki.js
Ubuntu 24.04 LTS is a strategic choice for Wiki.js hosting due to its updated packages, long-term support lifecycle, and excellent hardware/software compatibility.
| Feature | Advantage for Wiki.js |
|---|---|
| Linux Kernel 6.8+ | Improved I/O and network stack for backend applications |
| Node.js and NPM support | Up-to-date LTS Node.js versions easily installable via Snap, NVM, or APT |
| PostgreSQL 16 availability | Native support for Wiki.js’ preferred database backend |
| NGINX 1.24+ | Optimal reverse proxy and TLS termination options |
| Systemd 255+ | Advanced process supervision for the Node.js server |
| AppArmor and UFW | Robust access control and firewall configuration |
Ubuntu also benefits from strong community support and active documentation for open-source software, including Wiki.js modules.
System Architecture
Wiki.js on Ubuntu typically involves:
| Component | Technology | Role |
|---|---|---|
| Backend | Node.js | API, authentication, content management |
| Frontend | Vue.js (via Nuxt) | Browser interface, rich editing features |
| Database | PostgreSQL | Stores content, users, settings, and logs |
| Web Server | NGINX or Apache | TLS proxying, routing, caching |
| Optional Auth | LDAP, GitHub, SAML | Centralized user management for teams |
Wiki.js is modular—authentication, storage, backup, notifications, and editor types can all be enabled or replaced via a user-friendly admin interface.
Practical Use Cases
Wiki.js on Ubuntu 24.04 is a great fit for:
- DevOps or engineering teams maintaining infrastructure documentation
- Internal knowledge bases for businesses and academic institutions
- Public documentation sites for open-source or commercial software
- Team onboarding manuals with fine-grained access control
- IT departments with LDAP-backed authentication for internal wikis
- Compliance & SOP repositories where versioning is important
It is also suited for organizations transitioning away from legacy wikis like MediaWiki or Confluence due to its simplicity and Git integration.
Benefits of Ubuntu 24.04 for Wiki.js
| Area | Benefits on Ubuntu 24.04 |
|---|---|
| Node.js Runtime | Supports LTS builds (e.g., 18.x, 20.x) via Snap or NodeSource |
| TLS Setup | Native Certbot (Let’s Encrypt) support with NGINX and systemd timers |
| Package Consistency | APT repository maturity for PostgreSQL, Git, NGINX, etc. |
| Security | Full AppArmor profiles, strong kernel hardening, and UFW firewall |
| Service Management | systemctl integration for persistent Wiki.js process control |
Ubuntu also supports containerized workflows (Docker, LXD) and cloud-native deployments, making it ideal for scalable Wiki.js instances.
Performance Considerations
Wiki.js performs well on modest hardware. A typical medium-scale deployment might include:
- 1 vCPU / 2 GB RAM minimum for small teams
- 300–500 MB RAM for the Node.js process under typical load
- PostgreSQL memory tuning for faster indexing and queries
- Reverse proxy caching (via NGINX) for static assets and Markdown previews
- Optional Git-based syncing, which offloads content versioning to external storage
Ubuntu 24.04’s updated kernel and system libraries provide efficient I/O, memory management, and TLS performance, especially under concurrent sessions.
Git & External Integration Support
One of Wiki.js’s standout features is Git-backed content storage, allowing you to:
- Use GitHub, GitLab, or self-hosted repositories
- Sync Markdown files automatically or on a schedule
- Track changes using Git history
- Enable external CI/CD workflows or static site publishing
Other integrations supported:
- Authentication: LDAP, SAML, Azure AD, GitHub
- Storage: AWS S3, GCP, Dropbox, OneDrive, WebDAV
- Notifications: Email, Slack, Discord, Microsoft Teams
- Backups: Schedule file exports or PostgreSQL dumps
These modules are configurable via a web interface, no code editing required.
Wiki.js vs Other Platforms on Ubuntu 24.04
| Feature | Wiki.js | MediaWiki | BookStack | Confluence (self-hosted) |
|---|---|---|---|---|
| Backend Stack | Node.js + PG | PHP + MySQL | PHP + MySQL | Java + PostgreSQL |
| UI/UX | Modern, clean | Classic | Simple | Enterprise-tier |
| Git Integration | Built-in | Manual plugin | No | Limited |
| Custom Authentication | Full | LDAP optional | Partial | Full |
| Markdown Support | First-class | Poor | Partial | Limited |
| System Requirements | Low to moderate | Low | Low | High |
| Open Source | Yes | Yes | Yes | No |
Running Wiki.js on Ubuntu 24.04 offers a powerful, reliable, and secure solution for knowledge management and documentation systems. Ubuntu’s long-term support, ecosystem richness, and excellent compatibility with open-source tools make it a natural fit for hosting modern Node.js applications like Wiki.js.
Whether you’re setting up a small internal team wiki or scaling to hundreds of users with LDAP and Git integrations, Wiki.js on Ubuntu 24.04 is well-positioned to deliver a performant and future-proof experience.
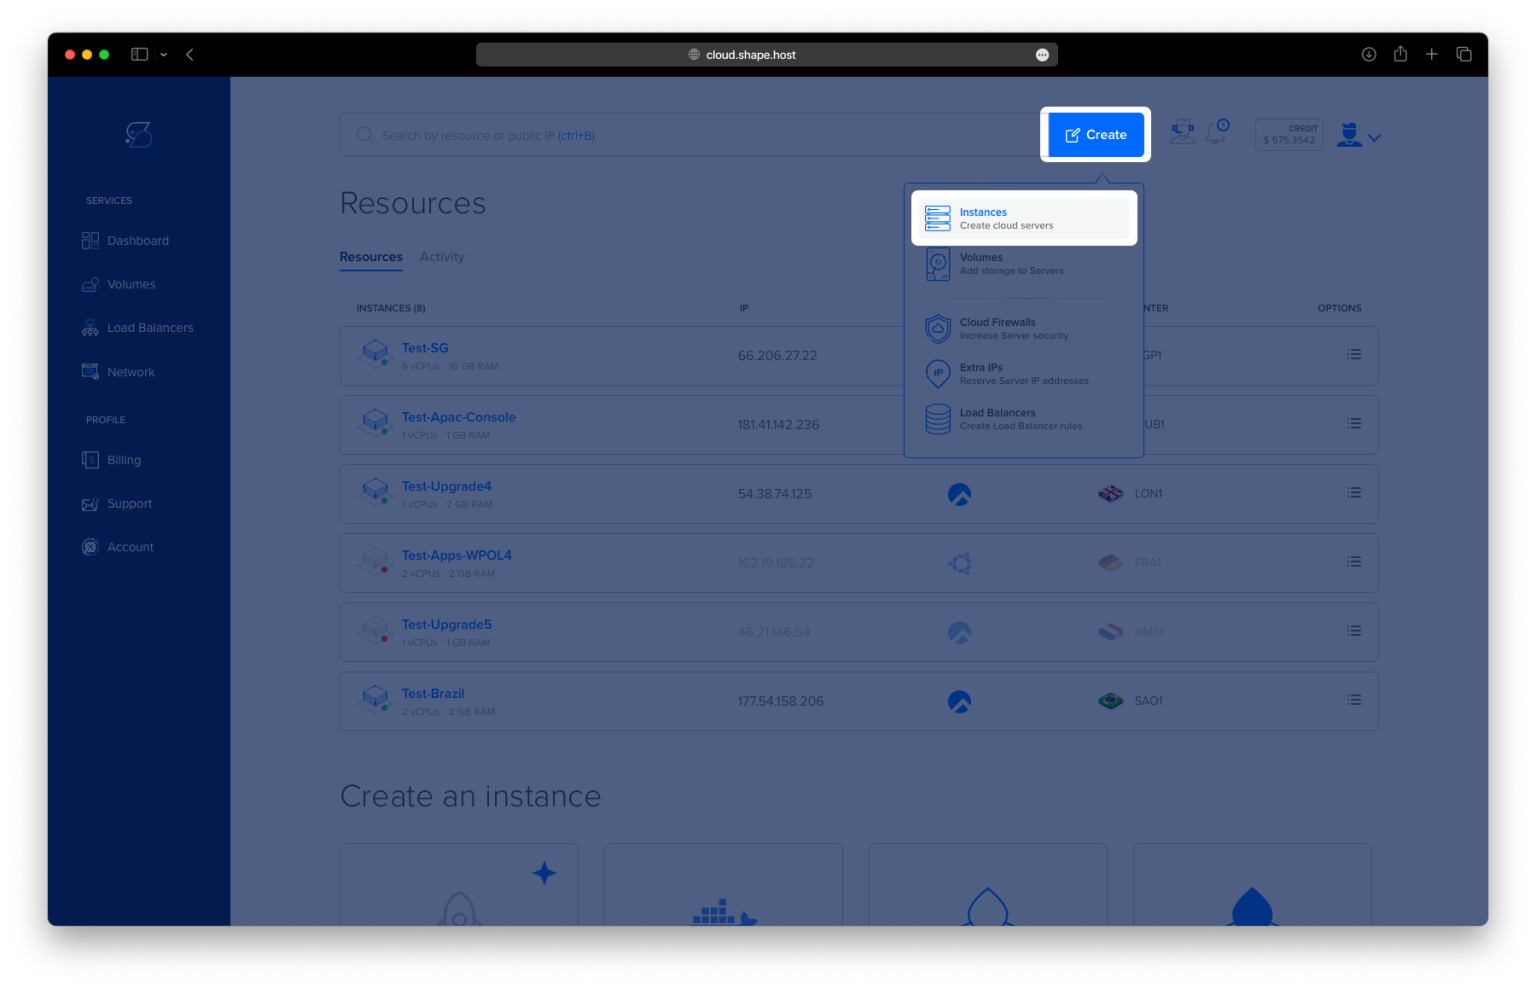
Step 1: Create a Shape.Host VPS instance
Visit https://shape.host and sign in
Click Create → Instance

Choose a server location near you

Select Ubuntu 24.04 (64-bit) as your OS
Choose a plan with minimum 2 CPUs, 2 GB RAM

Click Create Instance

Copy the IP address from the “Resources” section once the instance is ready

Step 2: Connect to your VPS
On Linux/macOS:
ssh root@your_server_ip
On Windows:
- Download and install PuTTY
- Open it, enter
your_server_ipas hostname - Keep port 22, click Open
- Log in with
rootand password
Step 3: Update system packages
apt update

Step 4: Install required packages
apt install -y curl gnupg2 ca-certificates software-properties-common apt-transport-https unzip wget nginx nodejs npm postgresql
Installs Node.js, Nginx, PostgreSQL, and dependencies needed by Wiki.js.

Step 5: Set up PostgreSQL for Wiki.js
Create the database user and the database:
su - postgres -c "psql -c \"CREATE USER wikijs WITH PASSWORD 'StrongPasswordHere';\""
su - postgres -c "psql -c \"CREATE DATABASE wikijs OWNER wikijs;\""
(Optional: Test DB connection)
psql -U wikijs -d wikijs -h localhost -W

Step 6: Create a system user for Wiki.js
useradd -r -m -d /opt/wikijs -s /usr/sbin/nologin wikijs
Step 7: Download Wiki.js
mkdir -p /opt/wikijs
cd /opt/wikijs
wget https://github.com/Requarks/wiki/releases/latest/download/wiki-js.tar.gz
tar -xzf wiki-js.tar.gz
chown -R wikijs:wikijs /opt/wikijs


Step 8: Configure Wiki.js
Copy and edit the config file:
cp config.sample.yml config.yml
nano config.yml

Update the following section:
db:
  type: postgres
  host: localhost
  port: 5432
  user: wikijs
  pass: StrongPasswordHere
  db: wikijs
  ssl: false

bindIP: 127.0.0.1
port: 3000

Step 9: Create a systemd service for Wiki.js
nano /etc/systemd/system/wikijs.service
Paste:
[Unit]
Description=Wiki.js
After=network.target postgresql.service

[Service]
Type=simple
User=wikijs
WorkingDirectory=/opt/wikijs
ExecStart=/usr/bin/node server
Restart=always
Environment=NODE_ENV=production

[Install]
WantedBy=multi-user.target

Step 10: Enable and start Wiki.js
systemctl daemon-reexec
systemctl daemon-reload
systemctl enable --now wikijs

Step 11: Configure Nginx reverse proxy
nano /etc/nginx/sites-available/wikijs
Paste:
server {
    listen 80;
    server_name wiki.example.com;

    access_log /var/log/nginx/wikijs.access.log;
    error_log  /var/log/nginx/wikijs.error.log;

    location / {
        proxy_pass http://127.0.0.1:3000;
        proxy_http_version 1.1;
        proxy_set_header Upgrade $http_upgrade;
        proxy_set_header Connection "upgrade";
        proxy_set_header Host $host;
        proxy_set_header X-Real-IP $remote_addr;
        proxy_set_header X-Forwarded-For $proxy_add_x_forwarded_for;
        proxy_set_header X-Forwarded-Proto $scheme;
    }
}

Then enable the config:
ln -s /etc/nginx/sites-available/wikijs /etc/nginx/sites-enabled/
nginx -t
systemctl reload nginx

Step 12: Enable HTTPS with Let’s Encrypt
apt install certbot python3-certbot-nginx
certbot --nginx -d wiki.example.com --redirect --agree-tos --email you@example.com
Make sure DNS is pointing to your server IP before running the command.


Step 13: Access Wiki.js
Now open:
http://wiki.example.com- or
https://wiki.example.comif SSL is enabled
Now create the administrator user for Wiki.js and input your email address and password. Then, click INSTALL to confirm the installation.

Once the installation is finished, you should be redirected to your Wiki.js login page. Input your admin email address and password, then click LOGIN.

If your installation is successful, you should see the welcome page of Wiki.js. From here, you can create a new home page or access the Wiki.js administration dashboard.

If you click the ADMINISTRATION, you should see the Wiki.js administration page like this:

This guide was tested on a Shape.Host Linux SSD VPS, offering fast and reliable servers ideal for Wiki.js.
Start with Shape.Host today and deploy in minutes!