Paperless-ngx on AlmaLinux 9 (Docker Compose + PostgreSQL + Redis + Nginx + SSL)
Paperless-ngx is a powerful, open-source document management system (DMS) that helps you scan, organize, and search digital documents in a private, self-hosted environment. It automatically processes and indexes files using OCR (Optical Character Recognition), allowing you to find documents instantly by content. With support for multi-user access, email imports, tags, and cloud storage integration, Paperless-ngx transforms your workflow into a fully digital archive with complete control over your data.
Running Paperless-ngx on AlmaLinux 9, a RHEL-compatible enterprise-grade operating system, ensures stability, long-term support, and strong security for production use. Combined with Docker Compose, PostgreSQL, Redis, and Nginx + SSL, this setup provides a scalable and resilient document management platform suitable for both personal and professional environments.
Architecture Overview
| Layer | Component | Role |
|---|---|---|
| OS | AlmaLinux 9 | RHEL-compatible enterprise Linux distribution |
| Container Runtime | Docker Engine + Compose | Orchestrates Paperless-ngx and its dependent services |
| Application | Paperless-ngx (Django) | Core web interface and backend document management logic |
| Database | PostgreSQL 15 | Stores metadata, user information, and tags |
| Cache/Queue | Redis | Manages background processing, caching, and async task queues |
| Reverse Proxy | Nginx | Handles HTTPS termination, routing, and compression |
| TLS | Let’s Encrypt / PKI | Provides secure HTTPS encryption |
Why Use Paperless-ngx?
- Automated OCR processing – converts scanned PDFs and images into searchable text.
- Smart document categorization – auto-tags and sorts files based on rules.
- Full-text search – find any document in seconds.
- Email and folder import – ingest documents automatically from multiple sources.
- Multi-user system – ideal for families, offices, or enterprise setups.
- Web-based UI – intuitive, responsive, and optimized for all devices.
- Open-source and self-hosted – keep full control of your data and privacy.
Paperless-ngx vs Other Document Management Solutions
| Feature/Capability | Paperless-ngx (Self-hosted) | Mayan EDMS | Nextcloud | Zoho WorkDrive |
|---|---|---|---|---|
| Hosting | Self-hosted / Docker | Self-hosted | Cloud / Self-hosted | Cloud only |
| OCR Support | ✅ Yes | ✅ Yes | ❌ No | ❌ No |
| Tagging & Filters | ✅ Yes | ✅ Partial | ❌ No | ✅ Partial |
| Multi-user Support | ✅ Yes | ✅ Yes | ✅ Yes | ✅ Yes |
| Privacy | 100% local control | 100% local | Partial | Cloud only |
| Cost | Free, open-source | Free | Free/Paid | Paid |
Paperless-ngx delivers enterprise-level capabilities with the freedom of open source, making it the top choice for organizations and users seeking a private, cost-effective DMS.
Security & Best Practices
- Deploy behind Nginx with HTTPS (Let’s Encrypt or corporate SSL).
- Store credentials securely in
.envor Docker secrets. - Limit PostgreSQL and Redis to internal Docker networks.
- Enable SELinux enforcing and allow only ports 80/443 through
firewalld. - Keep AlmaLinux, Docker, and Paperless-ngx images regularly updated.
- Automate SSL renewals using Certbot or Traefik ACME.
- Schedule PostgreSQL and media backups for disaster recovery.
- Apply strict file permissions to upload and consumption directories.
- Use strong passwords and rotate secret keys periodically.
Typical Use Cases
- Personal DMS – organize and search personal bills, receipts, and letters.
- Small businesses – manage contracts, invoices, and reports efficiently.
- Law offices & accountants – create searchable, secure client document repositories.
- Educational institutions – maintain academic and administrative records.
- Healthcare and NGOs – archive sensitive documents with compliance in mind.
- Remote or hybrid teams – share and access documents securely from anywhere.
Deploying Paperless-ngx on AlmaLinux 9 with Docker Compose, PostgreSQL, Redis, and Nginx provides a robust, scalable, and private document management platform — turning piles of paper into a searchable, structured, and accessible digital archive that grows with your organization.
Create a Cloud Server Instance on Shape.Host
Before beginning the installation, you need a fresh AlmaLinux 9 server.
Follow these steps to deploy one on Shape.Host Cloud VPS:
Visit https://shape.host and log into your account.
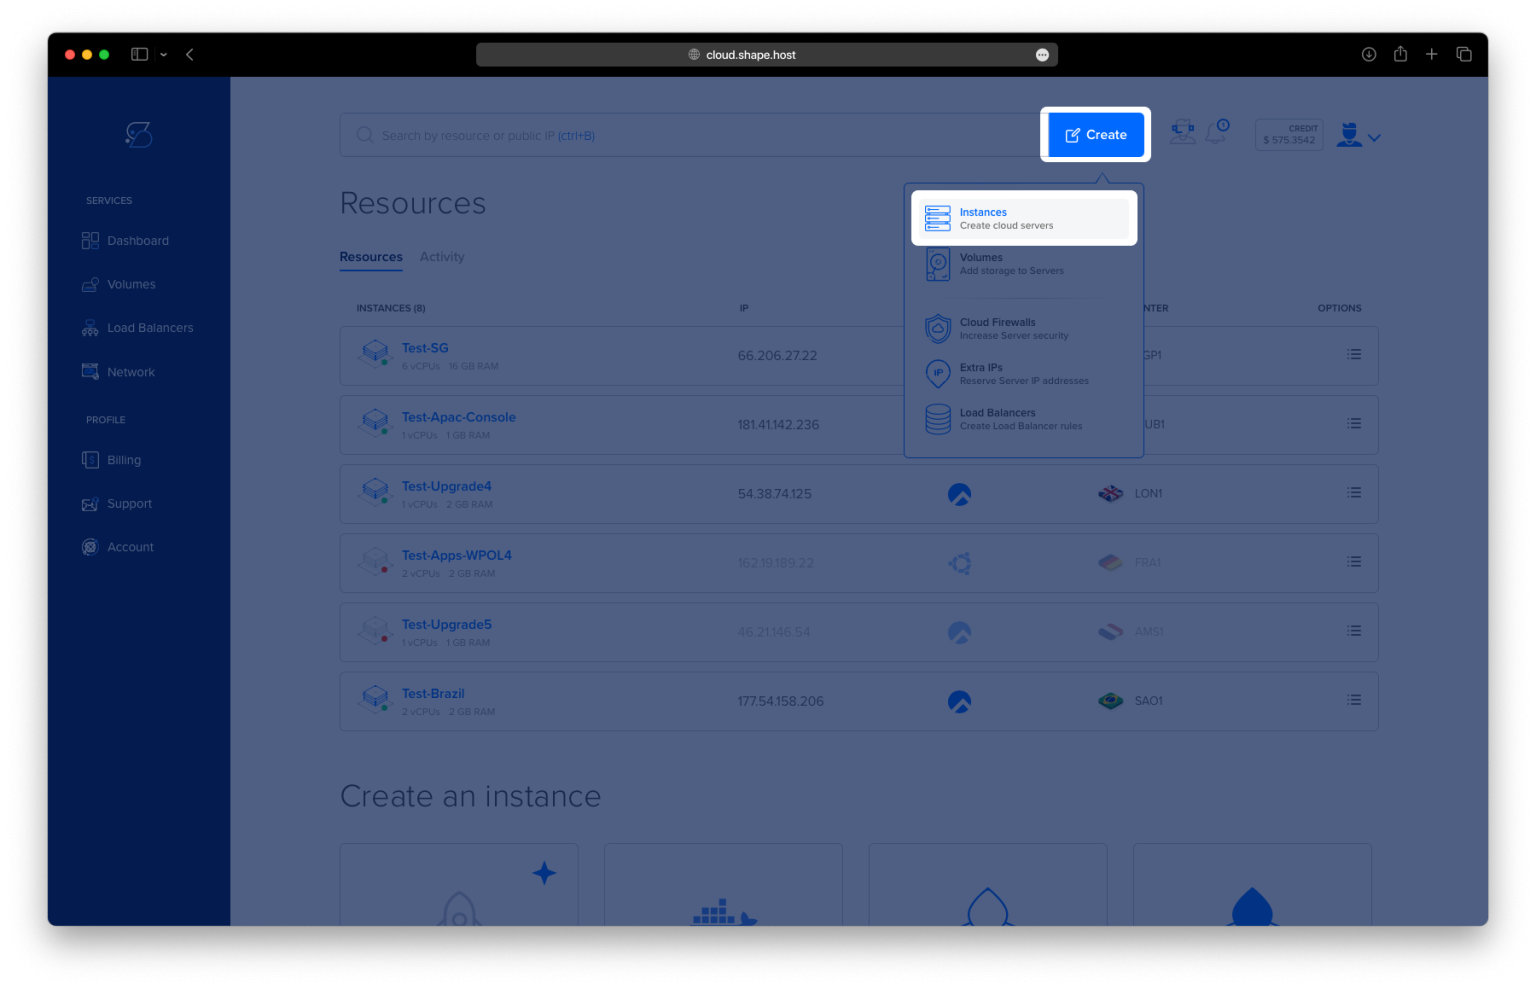
Click “Create” in the top-right corner.
Choose “Instance” from the menu.

Select a server location close to you or your users.

Under Operating System, select AlmaLinux 9 (64-bit).
Choose a hosting plan — recommended minimum:
2 vCPUs
4 GB RAM
20 GB NVMe/SSD storage

Click Create Instance.
Wait ~30 seconds for deployment.

Copy the server’s public IP address from the dashboard.
You now have an AlmaLinux 9 server ready for installation.

Step 1: Update System Packages
dnf update
This ensures your AlmaLinux system is up to date with the latest security patches and software versions.

Step 2: Install Required Tools
dnf install curl git tar
These tools are needed for downloading files, cloning repositories, and extracting packages.
- curl → downloads files from the internet
- git → version control tool (useful for future updates)
- tar → extracts archives

Step 3: Add Docker CE Repository
dnf config-manager --add-repo https://download.docker.com/linux/centos/docker-ce.repo
This adds the official Docker repository so you can install the latest stable version of Docker on AlmaLinux.
Step 4: Install Docker Engine + Docker Compose
dnf install docker-ce docker-ce-cli containerd.io docker-buildx-plugin docker-compose-plugin
This installs:
- Docker Engine (core container runtime)
- Docker CLI tools (
docker) - containerd (container runtime backend)
- Buildx plugin
- Docker Compose v2 (enables
docker compose)

Step 5: Enable Docker on Boot
systemctl enable docker
This ensures Docker starts automatically every time the server boots.
Step 6: Start Docker
systemctl start docker
Starts the Docker service immediately.
Step 7: Check Docker Compose Version
docker compose version
If this returns a version number, Docker Compose is installed correctly.
Step 8: Create Paperless-ngx Directory
mkdir -p /opt/paperless
cd /opt/paperless
This creates a new folder for all Paperless-ngx files and navigates into it.

Step 9: Generate a Secret Key
openssl rand -base64 32
This generates a secure SECRET_KEY required by Paperless-ngx.
Copy it — you will paste it into the Docker Compose file.

Step 10: Create the Docker Compose Configuration
nano /opt/paperless/docker-compose.yml
Paste your exact configuration:
services:

  redis:
    image: redis:7
    container_name: paperless_redis
    restart: unless-stopped

  db:
    image: postgres:15
    container_name: paperless_db
    restart: unless-stopped
    environment:
      POSTGRES_DB: paperless
      POSTGRES_USER: paperless
      POSTGRES_PASSWORD: strongpassword
    volumes:
      - db-data:/var/lib/postgresql/data

  webserver:
    image: ghcr.io/paperless-ngx/paperless-ngx:latest
    container_name: paperless_web
    depends_on:
      - db
      - redis
    ports:
      - "8000:8000"
    restart: unless-stopped
    environment:
      PAPERLESS_REDIS: redis://redis:6379
      PAPERLESS_DBHOST: db
      PAPERLESS_DBNAME: paperless
      PAPERLESS_DBUSER: paperless
      PAPERLESS_DBPASS: strongpassword
      PAPERLESS_SECRET_KEY: "PASTE_YOUR_SECRET_KEY_HERE"
      PAPERLESS_URL: "https://your-domain.com"
      PAPERLESS_TIME_ZONE: "Europe/Bucharest"
    volumes:
      - data:/usr/src/paperless/data
      - media:/usr/src/paperless/media
      - consume:/usr/src/paperless/consume

volumes:
  db-data:
  data:
  media:
  consume:
What each service does:
- redis → handles task queues
- db (PostgreSQL) → stores metadata and document information
- webserver → the main Paperless-ngx application
- volumes → persistent storage for DB, media, and ingested files
Save & exit:
CTRL + O → ENTER → CTRL + X

Step 11: Launch Paperless-ngx
docker compose up -d
This downloads the required images and starts all containers in the background.

Step 12: Verify Running Containers
docker ps
You should see:
paperless_webpaperless_dbpaperless_redis
with “Up” status.

Step 13: Access Paperless-ngx
Open your browser and visit:
http://YOUR_SERVER_IP:8000
Paperless-ngx is now running successfully!


You now have a fully operational Paperless-ngx setup on AlmaLinux 9 using Docker.
This setup is production-ready, easy to maintain, and ideal for document automation and archiving.
For hosting production applications like Paperless-ngx, a reliable VPS platform is essential.
Shape.Host provides:
- High-performance NVMe storage
- Fast deployment times
- Global data center locations
- Clean, minimal OS images ideal for Docker
- Affordable pricing for both small and large deployments
Whether you’re self-hosting productivity tools, automation systems, or business applications, Shape.Host Linux SSD VPS is optimized for secure and scalable deployments.