Resilio Sync is a peer-to-peer file synchronization software that allows users to sync files across multiple devices without relying on centralized cloud storage. It is designed to provide fast, secure, and private file transfer by leveraging a modified version of the BitTorrent protocol to enable direct device-to-device connections.
Key Features of Resilio Sync
- Peer-to-Peer File Transfer: Unlike cloud-based services, Resilio Sync uses peer-to-peer technology to transfer files directly between devices. This means there is no intermediary server, resulting in faster file transfers and better data privacy.
- Cross-Platform Compatibility: Resilio Sync is available for multiple operating systems, including Windows, macOS, Linux, Android, and iOS. This makes it easy to synchronize files across a variety of devices, whether they’re desktops, laptops, or mobile devices.
- Selective Sync: This feature allows users to choose specific files or folders to sync, rather than syncing everything. This helps conserve local storage while still giving access to the complete file structure.
- End-to-End Encryption: All data transferred using Resilio Sync is encrypted, ensuring the privacy and security of your files during the transfer. This level of security is particularly useful when sharing sensitive documents.
- No Storage Limits: Since Resilio Sync is not based on a centralized server, there are no restrictions on the amount of data that can be transferred or stored. Users are only limited by the storage capacity of their own devices.
- Bandwidth Control: Resilio Sync allows users to set limits on upload and download bandwidth to manage network usage more effectively, preventing synchronization activities from interfering with other network operations.
- Real-Time Synchronization: Resilio Sync continuously monitors and synchronizes files, ensuring that changes are instantly reflected across all connected devices. This is beneficial for users who need up-to-date access to shared content.
Use Cases for Resilio Sync
- Personal File Backup and Synchronization: Individuals can use Resilio Sync to keep personal files such as photos, videos, and documents synchronized between their devices. It can also be used as an alternative to cloud storage for backup purposes, ensuring that data is always in sync without monthly fees or third-party cloud involvement.
- Collaboration and Team File Sharing: Teams can share and work on files together in real-time, with updates instantly syncing across all members’ devices. Since it is not dependent on cloud servers, file sharing is fast, and there are no concerns about privacy breaches through a third-party provider.
- Remote Work and File Access: Resilio Sync allows remote workers to access their files from anywhere, provided they have an internet connection. The peer-to-peer transfer ensures that they always have the latest version of their files without depending on traditional cloud storage solutions.
- Backup Solution: The software can be configured to create backups of important folders automatically by syncing them with another device. This provides redundancy and protects against data loss, since data is distributed across multiple devices.
- Large File Transfer: With no file size restrictions, Resilio Sync is ideal for transferring large files or media, such as video footage, directly between users. The direct connection method ensures that file transfers are quick and efficient compared to uploading and downloading from the cloud.
Advantages of Resilio Sync
- Speed: Because files are synced directly between devices, transfer speeds are typically faster, especially on local networks. There’s no need to wait for files to upload to or download from a remote cloud server.
- Privacy: Since files are not stored on a third-party cloud, users have full control over their data. All transfers are encrypted, ensuring that data remains secure during transmission.
- Scalability: Resilio Sync can handle small-scale personal file sharing to larger, enterprise-level deployments involving many devices.
Limitations
- Requires All Devices to Be Online: Since the software uses a direct peer-to-peer model, all devices involved in the synchronization need to be online at the same time for syncing to occur. This could be inconvenient in some situations.
- No Cloud Storage: Resilio Sync does not provide cloud storage for access when devices are offline, which means it’s not a replacement for traditional cloud storage solutions but rather an alternative syncing method.
Resilio Sync is a versatile and powerful tool for managing file synchronization across devices. By avoiding the cloud and using a peer-to-peer network, it offers a unique blend of speed, security, and scalability, making it a great choice for individuals and organizations that prioritize privacy and efficient data sharing.
Step 1: Create an Instance
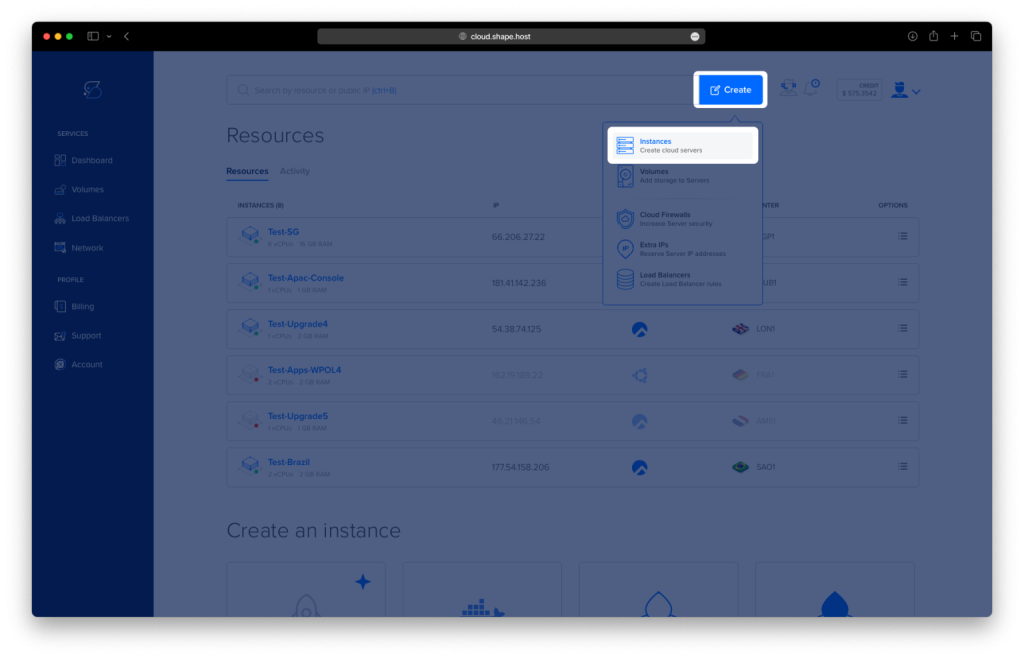
- Access the Dashboard: Log in to your Shape.Host account and navigate to your Dashboard.
- Click Create: Click on the “Create” button located in the top-right corner.
- Select Instances: From the dropdown menu, choose “Instances” to begin creating a new cloud server.
- Select Location: Choose a data center location for your instance closest to your target audience for optimal performance.
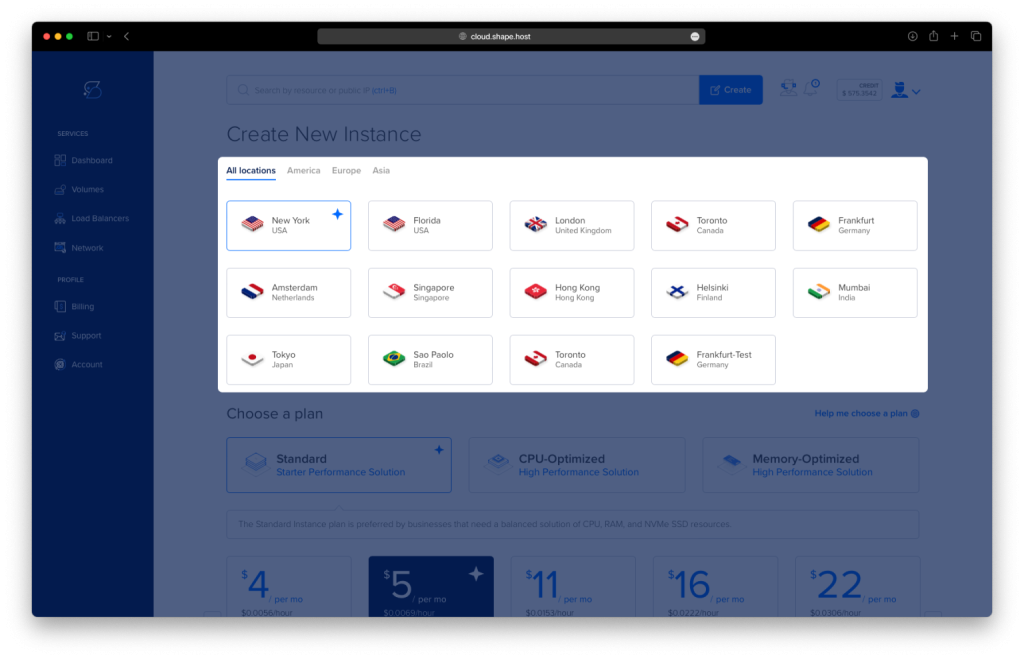
- Choose a Plan: Scroll through the available pricing plans. Select a plan based on your project requirements, such as Standard, CPU-Optimized, or Memory-Optimized.
- Choose an Image: Select Ubuntu 24.04 as the operating system for your instance.
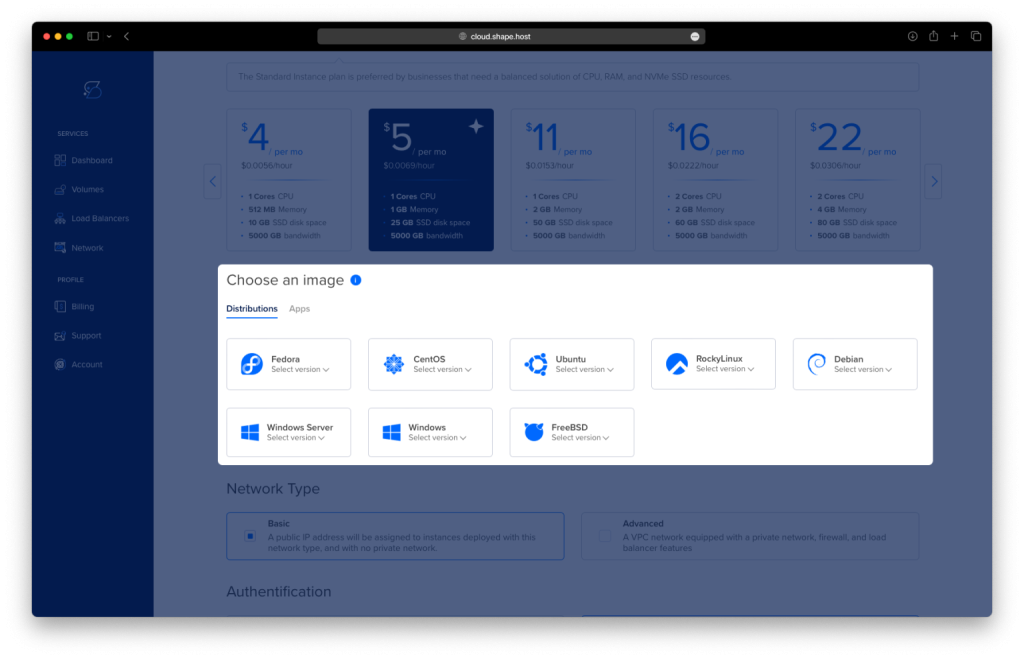
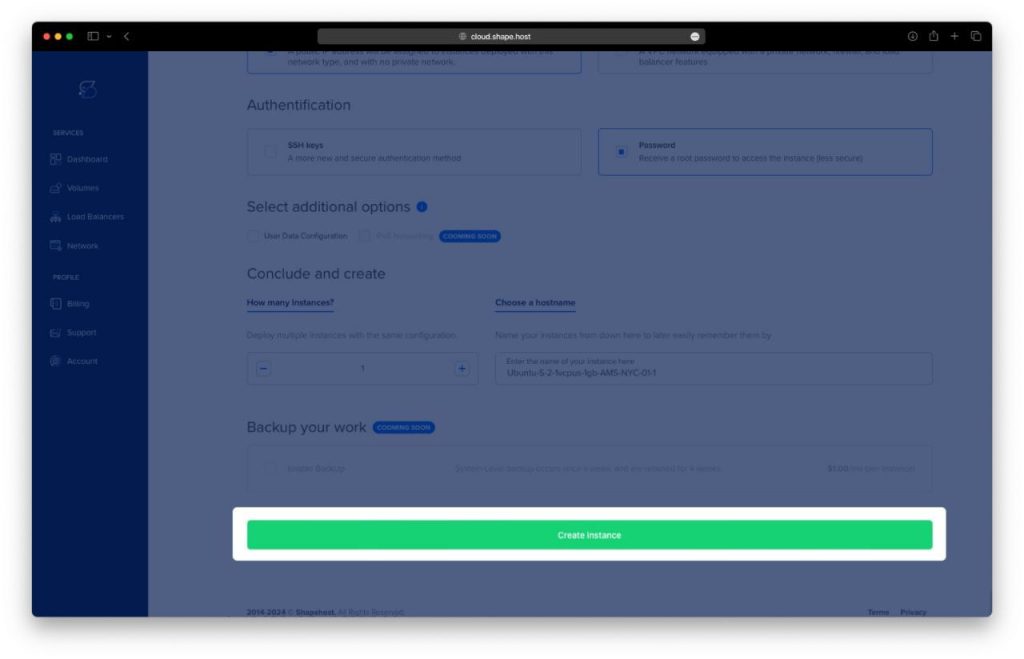
- Authentication and Finalize: Choose your authentication method, either via SSH keys or password. Once done, click Create Instance to launch your server.
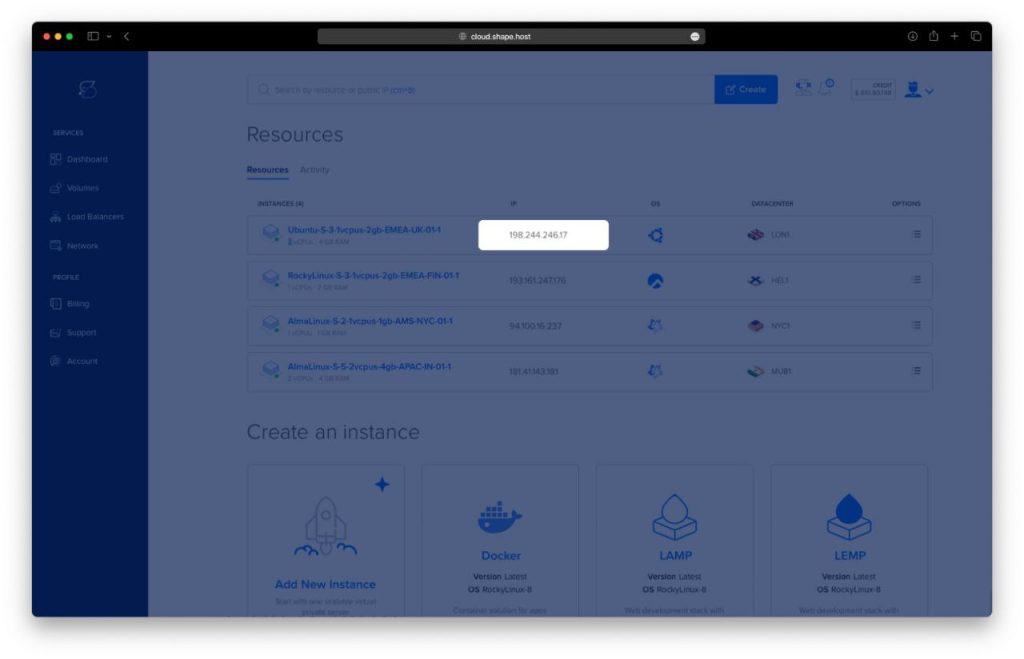
- Obtain IP Address
- Once your instance is created, return to the dashboard.
- Find your instance’s IP address under the Resources section and use it to access your server.
Connect to Your Instance
To connect to your instance on Shape.Host, follow these steps:
- Get the Instance IP: After creating your instance, find the public IP address in the Shape.Host dashboard under Resources.
- Open SSH Client: Use an SSH client like Terminal (Linux/macOS) or PuTTY (Windows).
- SSH into the Instance: Run the following command in your terminal:
ssh root@<your-instance-ip>Replace <your-instance-ip> with your actual instance IP address.
- Enter the Password: If prompted, enter your instance’s root password or use your SSH key if configured.
You are now connected to your instance.
Step 2: Update and Upgrade System Packages
Update and upgrade your system package list to ensure all packages are up to date:
apt update && apt upgrade -y
Step 3: Install Required Packages
Install required packages such as curl, gnupg2, and software-properties-common:
apt install curl gnupg2 software-properties-common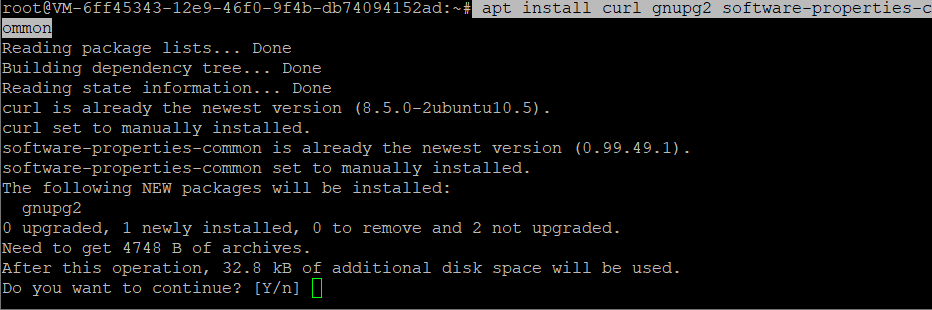
Step 4: Add Resilio Sync Repository
Add the Resilio Sync repository key:
curl -sL https://linux-packages.resilio.com/resilio-sync/key.asc | gpg --dearmor -o /usr/share/keyrings/resilio-sync-keyring.gpgAdd the Resilio Sync repository:
echo "deb [arch=amd64 signed-by=/usr/share/keyrings/resilio-sync-keyring.gpg] https://linux-packages.resilio.com/resilio-sync/deb resilio-sync non-free" > /etc/apt/sources.list.d/resilio-sync.list
Step 5: Install Resilio Sync
Update the package list and install Resilio Sync:
apt update
apt install resilio-sync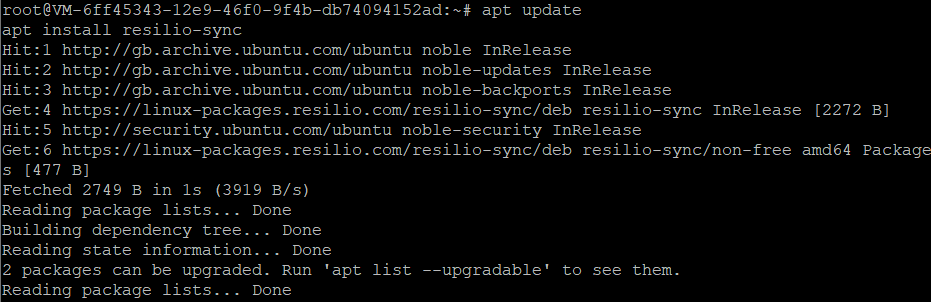
Step 6: Enable and Start Resilio Sync
Enable Resilio Sync to start automatically at boot and start the service:
systemctl enable resilio-sync
systemctl start resilio-sync
Step 7: Update Resilio Sync Configuration
Open the Resilio Sync configuration file to allow the web interface to listen on all interfaces:
nano /etc/resilio-sync/config.jsonUpdate the “webui” section as follows:
"webui" : {
    "listen" : "0.0.0.0:8888"
}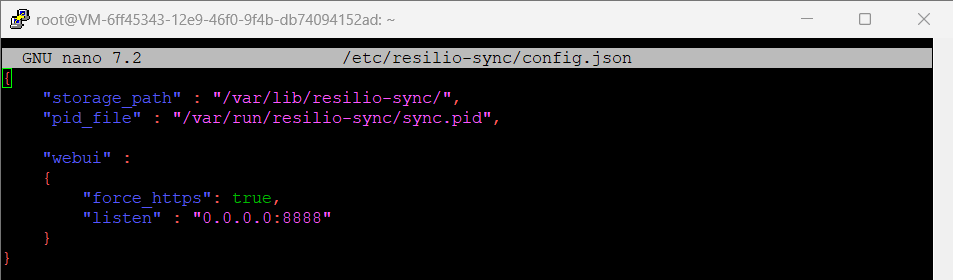
Save the file and exit the editor (press CTRL + O to save, then CTRL + X to exit).
Step 8: Restart Resilio Sync
Restart the Resilio Sync service to apply the changes:
systemctl restart resilio-syncStep 9: Configure Firewall
Allow access to the Resilio Sync web interface port (8888) and enable the firewall:
ufw allow 8888/tcp
ufw allow ssh
ufw enable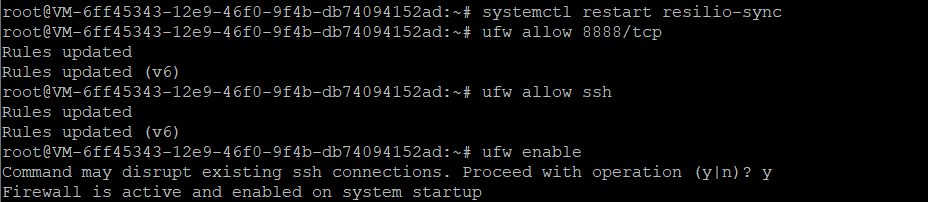
Step 10: Access the Resilio Sync Web Interface
By default, the web interface listens on 127.0.0.1:8888. To access from the same machine, open a browser and navigate to:
http://127.0.0.1:8888If you have configured it to listen on all interfaces, replace 127.0.0.1 with your server IP address.
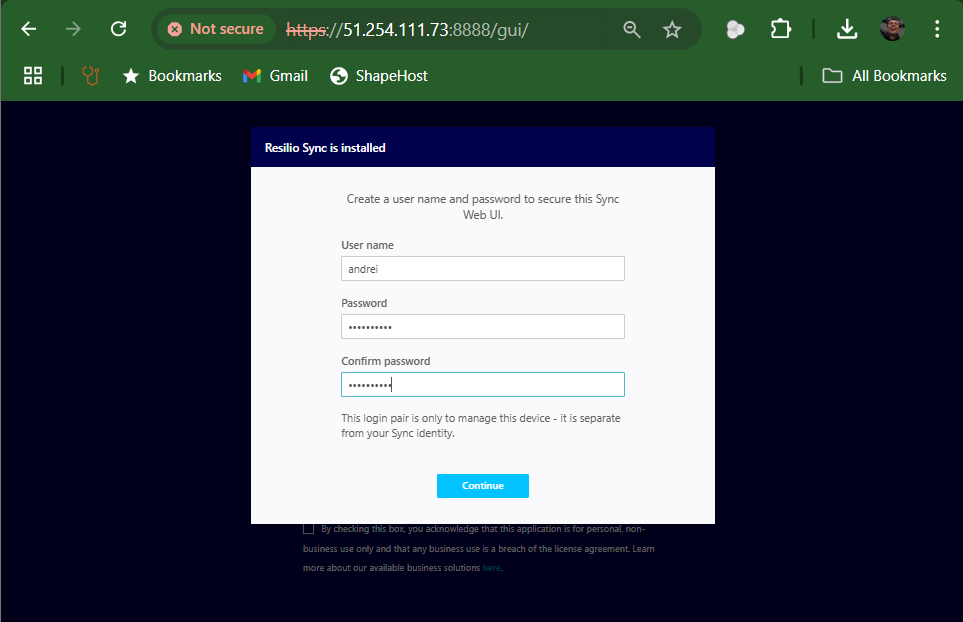
Step 11: Secure Your Sync Web UI
After installing Resilio Sync, the next step is to secure the Web UI by creating login credentials.
- Create a Username and Password:
- Enter a Username of your choice. This will be used to access the Resilio Sync Web UI.
- Create a Password that is strong and unique. Re-enter the password in the Confirm Password field to ensure there are no typos.
- Purpose of This Login:
- Note that this login is only for managing this device through the Web UI. It is not linked to your Sync identity, which means it provides local administrative access.
- Continue to Proceed:
- Click the Continue button to save the credentials and move on to the next step of the setup.
This setup is important for security purposes, preventing unauthorized access to your device’s synchronization settings.
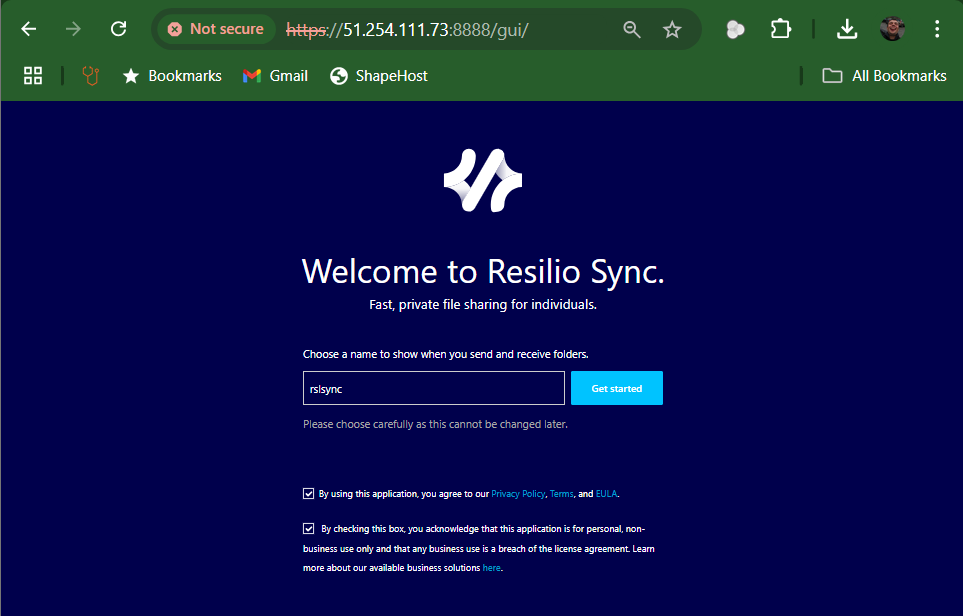
Step 12: Welcome to Resilio Sync
You are now ready to personalize your Resilio Sync experience. This page introduces you to the service and lets you set up a name for your instance.
- Choose a Name:
- Enter a Name in the text box. This will be the name that other users see when you send and receive folders.
- Note: This name cannot be changed later, so pick a name that you want to use long-term.
- Accept the Terms:
- There are two checkboxes below the input field:
- Privacy Policy, Terms, and EULA: By checking this box, you agree to the terms of usage.
- Non-Business Use Agreement: Check this box if you are using Resilio Sync for personal purposes and not for business.
- There are two checkboxes below the input field:
- Get Started:
- Once you’ve set your name and agreed to the terms, click the Get started button to proceed.
This setup step is essential for defining how you are identified in the Resilio Sync network.
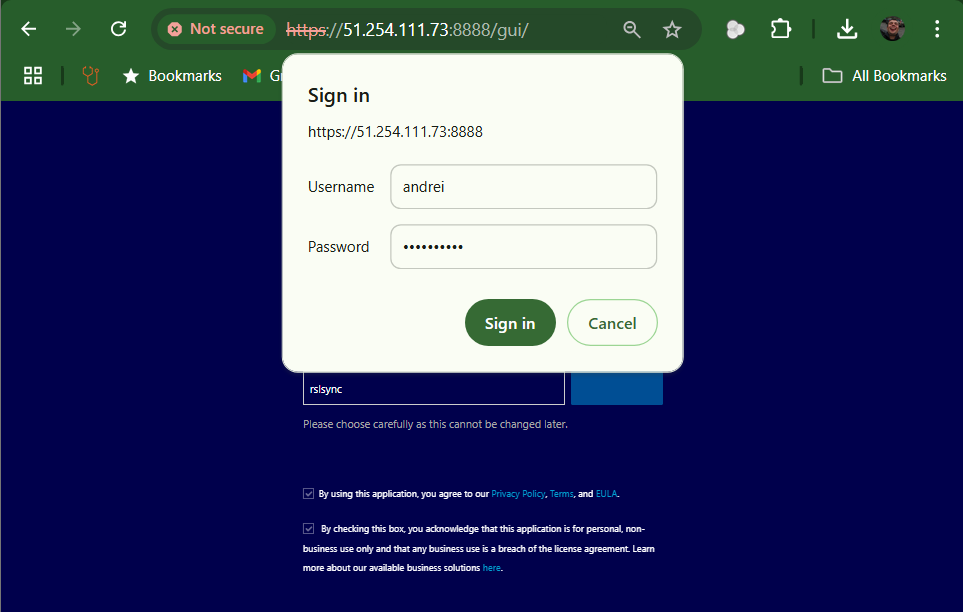
Step 13: Sign In to the Resilio Sync Web UI
Now that you have configured your Resilio Sync setup, it is time to log in to the Web UI using the credentials you created earlier.
- Sign In Prompt:
- The Sign In popup appears, requiring you to enter your username and password.
- Enter Credentials:
- Enter the Username and Password that you set up in the previous steps.
- Make sure the information is correct to avoid login issues.
- Access the Web UI:
- Click the Sign In button to proceed.
- This will allow you to access and manage Resilio Sync settings for your device.
If you need to make changes or check your sync status, this Web UI will be your go-to interface for controlling and managing synchronization.
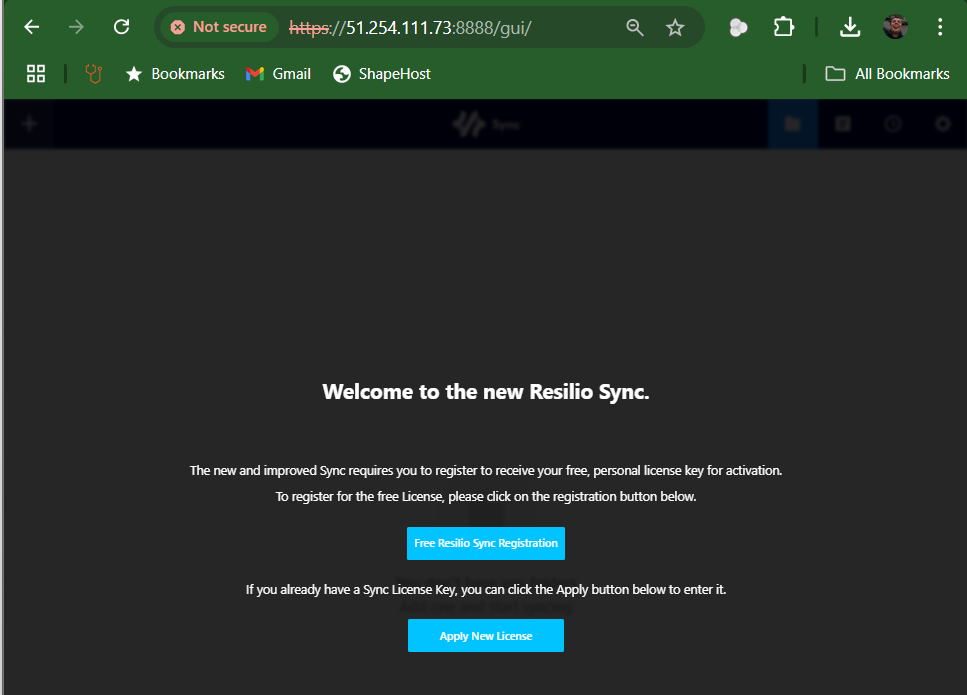
Step 14: Register or Apply License for Resilio Sync
After logging in, you are prompted to register or apply a license key for Resilio Sync. This step is necessary to activate the application for use.
- Welcome Screen:
- You are greeted with a message titled “Welcome to the new Resilio Sync“.
- The message explains that you need to register for a license in order to proceed with using Resilio Sync.
- Free License Registration:
- If you are a new user or do not already have a license key, click the “Free Resilio Sync Registration” button.
- This will take you through the process of obtaining a free personal license key to activate the application.
- Apply Existing License:
- If you already have a license key, click on the “Apply New License” button.
- You can then enter your existing license key to activate Resilio Sync on your device.
Once you complete this step, you will be ready to use all the features of Resilio Sync for file sharing and synchronization.
By following these steps, you should have Resilio Sync successfully installed and running on your Ubuntu 24.04 server. You can now use the web interface to configure synchronization tasks across your devices. If you found this guide helpful, consider exploring other Shape.Host Cloud VPS options to further enhance your server infrastructure.