GlitchTip (Sentry Alternative) on Rocky Linux 9 (Docker Compose + Nginx + SSL)
GlitchTip is an open-source error tracking, performance monitoring, and observability platform built as a lightweight alternative to Sentry. It offers comprehensive monitoring for frontend and backend applications, providing crash analytics, event grouping, performance tracking, and alerting — all under your full control. GlitchTip is compatible with Sentry SDKs, allowing effortless migration from Sentry Cloud or on-premise setups.
Running GlitchTip on Rocky Linux 9, a RHEL-compatible enterprise-grade operating system, provides stability, long-term support, and security for production environments. With SELinux enforcement, systemd 252, OpenSSL 3, and modern Docker Compose support, Rocky Linux 9 is ideal for deploying GlitchTip using PostgreSQL, Redis, Nginx, and SSL encryption.
Architecture Overview
| Layer | Component | Role |
|---|---|---|
| OS | Rocky Linux 9 | Enterprise-grade, RHEL-compatible base |
| Container Runtime | Docker Engine + Compose | Orchestrates GlitchTip and its dependencies |
| Application | GlitchTip (Django) | Web dashboard and backend for event tracking |
| Database | PostgreSQL 15 | Stores events, users, organizations, and configuration data |
| Cache/Queue | Redis | Handles asynchronous tasks and background jobs |
| Reverse Proxy | Nginx | Terminates HTTPS, routes traffic, and adds compression |
| TLS | Let’s Encrypt / PKI | Provides HTTPS for web interface and API |
Why Use GlitchTip?
- Open-source alternative to Sentry – identical client SDK support and similar feature set.
- Self-hosted observability – retain full control over logs and performance data.
- Privacy and compliance – host within your infrastructure (GDPR/HIPAA ready).
- Lightweight and efficient – minimal resource usage with Docker Compose.
- Team collaboration – role-based access and multi-project support.
- Performance monitoring – identify bottlenecks and latency issues easily.
- Alerting via email or integrations – stay informed on real-time issues.
GlitchTip vs Other Error Monitoring Tools
| Feature/Capability | GlitchTip (Self-hosted) | Sentry (Cloud/Self-hosted) | LogRocket | Elastic APM |
|---|---|---|---|---|
| Hosting | Self-hosted / Cloud | Cloud / Self-hosted | Cloud only | Self-hosted / Cloud |
| Database | PostgreSQL | PostgreSQL | Proprietary | Elasticsearch |
| SDK compatibility | Sentry SDKs supported | Native | No | Partial |
| Source availability | 100% open-source | Partially open-source | No | Yes |
| Cost | Free | Subscription / Tiered | Subscription | License-based |
| Ideal for | Developers / SMBs | Enterprises | Frontend apps | Large infrastructures |
GlitchTip gives teams Sentry-level monitoring power without vendor dependence, making it the best option for developers and DevOps teams who value data privacy, transparency, and control.
Security & Best Practices
- Run GlitchTip behind Nginx or Traefik with HTTPS.
- Store environment variables and credentials in .env files or Docker secrets.
- Limit PostgreSQL and Redis to the internal Docker network.
- Enable SELinux enforcement and open only required ports (80, 443).
- Keep Docker images and Rocky Linux packages up to date.
- Configure SMTP for alert notifications.
- Automate SSL renewals with Certbot or Traefik ACME.
- Schedule PostgreSQL backups with rotation policies.
- Implement fail2ban for brute-force protection on login endpoints.
Typical Use Cases
- Error monitoring for web and backend applications.
- Performance analysis for slow queries or high-latency requests.
- Release tracking – link errors to specific software versions.
- Frontend monitoring using Sentry SDKs for JS and React apps.
- Internal observability for microservices or private APIs.
- Self-hosted Sentry alternative for teams under compliance restrictions.
Deploying GlitchTip on Rocky Linux 9 with Docker Compose and Nginx delivers a secure, scalable, and fully open-source monitoring platform — ideal for organizations that need Sentry-grade error tracking, performance insights, and privacy without cloud dependence.
Step 1: Set Up a Server Instance
To begin, you’ll need a reliable server to host GlitchTip. The easiest way to set up your environment is with a Shape.Host Cloud VPS, which provides powerful cloud infrastructure with full root access.
Log in to your Shape.Host account.
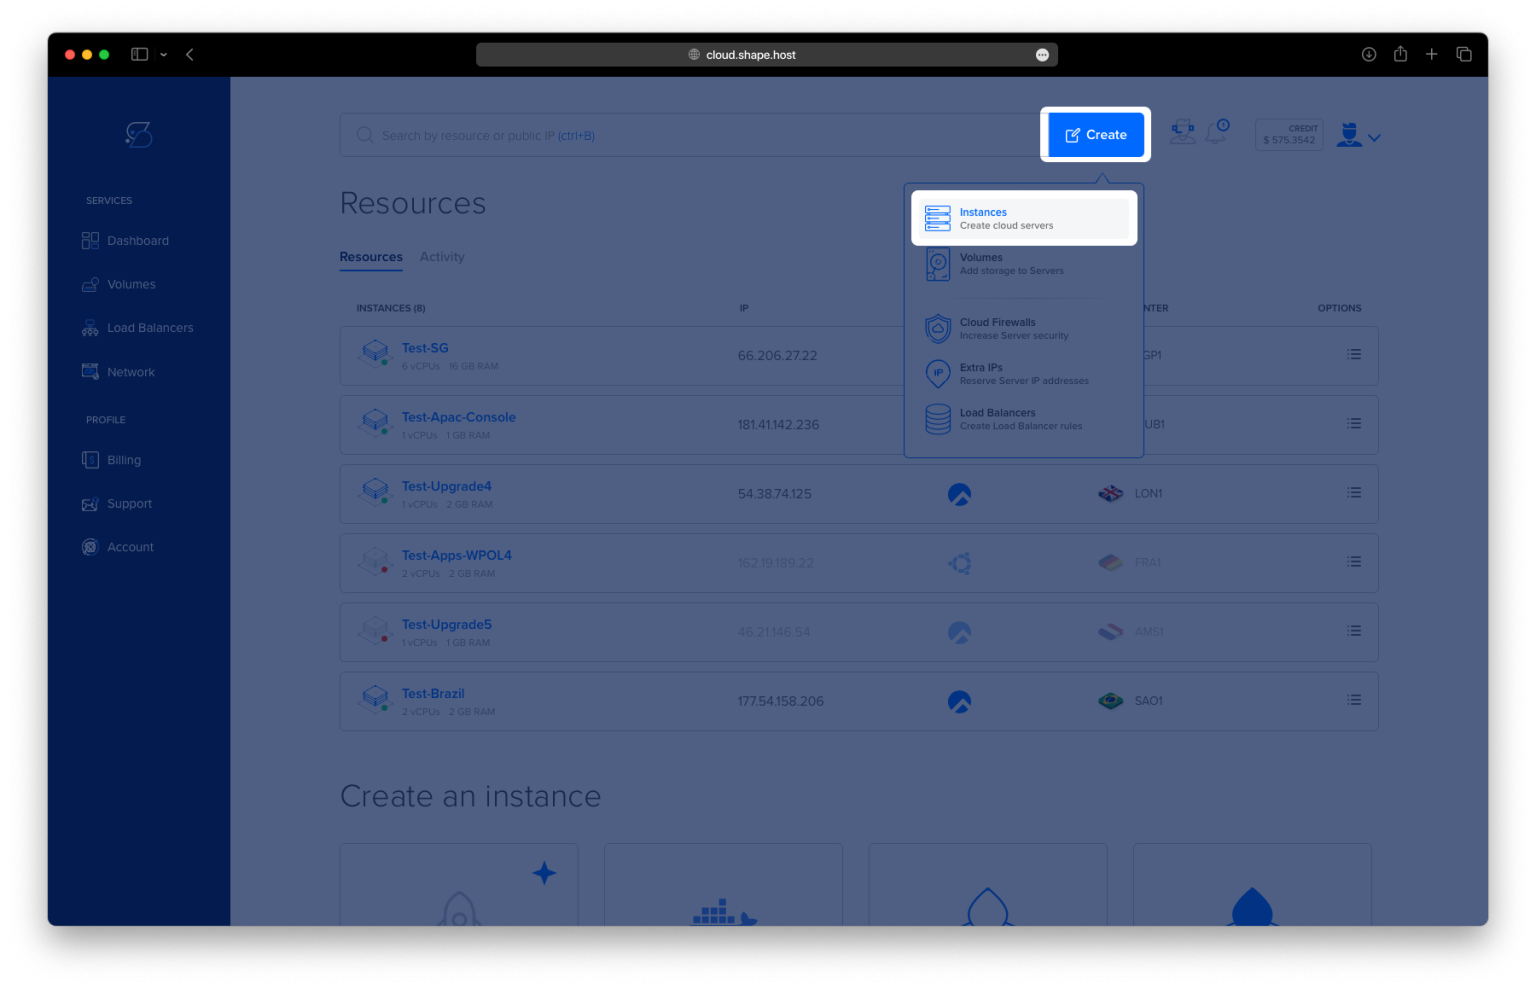
From the dashboard, click “Create”, then select “Instance.”

Choose a data center location closest to your users for optimal performance.

Select a plan that includes at least 2 CPUs, 4 GB RAM, and 20 GB SSD storage.
Under Operating System, choose Rocky Linux 9 (64-bit).

Confirm your configuration and click “Create Instance.”

Wait a few moments until your instance is ready. You’ll find the public IP address listed under the “Resources” section in your dashboard.
Once the instance is active, you’re ready to connect and begin the installation.

Step 2: Connect to Your Instance
Use SSH to access your new Rocky Linux 9 server.
For Linux/macOS:
ssh root@your_server_ip
Replace your_server_ip with the actual IP address of your instance.
For Windows:
- Download and open PuTTY.
- Enter your server’s IP address.
- Log in as root and provide your password when prompted.
Once connected, you’ll have full control of the terminal to proceed with the installation.
Step 3: Installation Steps
Below are the exact commands (and configurations) to install GlitchTip on Rocky Linux 9. Follow each step carefully.
Update System Packages
dnf update
This updates your package lists and ensures you have the latest security patches.

Install Required Dependencies
dnf install curl ca-certificates gnupg2 yum-utils
These utilities are required to manage repositories and secure communication with remote servers.

Add the Docker Repository
dnf config-manager --add-repo https://download.docker.com/linux/centos/docker-ce.repo
This command adds Docker’s official repository to your system so you can install the latest version.

Install Docker and Docker Compose Plugin
dnf install docker-ce docker-ce-cli containerd.io docker-compose-plugin -y
This installs Docker Engine and Docker Compose, which will be used to run GlitchTip containers.

Enable and Start Docker
systemctl enable --now docker
This ensures Docker starts automatically on boot and is running now.
Verify Docker Installation
docker --version
docker compose version
These commands confirm that Docker and Docker Compose are installed correctly.
Create the GlitchTip Directory
mkdir -p /opt/glitchtip
cd /opt/glitchtip
This creates a dedicated folder for GlitchTip’s configuration files and navigates into it.

Create the Docker Compose File
nano docker-compose.yml
Paste the following configuration:
services:
  postgres:
    image: postgres:15
    container_name: glitchtip_postgres
    restart: always
    environment:
      POSTGRES_DB: glitchtip
      POSTGRES_USER: glitchtip
      POSTGRES_PASSWORD: strongpassword
    volumes:
      - ./postgres-data:/var/lib/postgresql/data

  redis:
    image: redis:7
    container_name: glitchtip_redis
    restart: always

  glitchtip:
    image: glitchtip/glitchtip:latest
    container_name: glitchtip_app
    depends_on:
      - postgres
      - redis
    environment:
      DATABASE_URL: postgres://glitchtip:strongpassword@postgres:5432/glitchtip
      SECRET_KEY: changethiskeytoarandomstring
      EMAIL_URL: smtp://smtp.example.com:587
      DEFAULT_FROM_EMAIL: noreply@example.com
      CELERY_BROKER_URL: redis://redis:6379/0
      ENABLE_SIGNUPS: "True"
      GLITCHTIP_DOMAIN: https://glitchtip.example.com
    ports:
      - "8000:8080"
    volumes:
      - ./uploads:/app/uploads
    restart: always
Save and close the file (CTRL+O, ENTER, CTRL+X).

Start GlitchTip Containers
docker compose up -d
This command downloads the required Docker images and starts all containers in detached mode.

Check Running Containers
docker ps
It lists all active containers, confirming that GlitchTip, PostgreSQL, and Redis are running.

Initialize the Database and Create Admin User
docker compose exec glitchtip python3 manage.py migrate
Runs database migrations for GlitchTip.

docker compose exec glitchtip python3 manage.py createsuperuser
Creates an administrator account for the GlitchTip web interface.

Step 4: Configure Nginx as a Reverse Proxy
Install Nginx
dnf install nginx
This installs Nginx, which will be used as a reverse proxy for GlitchTip.

Enable and Start Nginx
systemctl enable --now nginx
Create Nginx Configuration File
nano /etc/nginx/conf.d/glitchtip.conf
Paste the following configuration:
server {
    listen 80;
    server_name glitchtip.example.com;

    location / {
        proxy_pass http://127.0.0.1:8000;
        proxy_http_version 1.1;
        proxy_set_header Host $host;
        proxy_set_header X-Real-IP $remote_addr;
        proxy_set_header X-Forwarded-For $proxy_add_x_forwarded_for;
        proxy_set_header X-Forwarded-Proto $scheme;
        proxy_buffering off;
    }
}

Test and Reload Nginx
nginx -t
Checks for syntax errors.
systemctl reload nginx
Applies the configuration.

Step 5: Secure Your Domain with SSL
Install Certbot
dnf install certbot python3-certbot-nginx

Obtain and Install SSL Certificate
certbot --nginx -d rockylinux-tutorials.shape.host --email contact@shape.host --agree-tos --non-interactive https://glitchtip.example.com
This automatically issues and installs a free SSL certificate from Let’s Encrypt for your domain.

Step 6: Verify Installation
To confirm everything is working:
- Open your browser and visit:
http://glitchtip.example.com or https://glitchtip.example.com - Log in with the administrator credentials you created earlier.
- You should see the GlitchTip dashboard, ready for use.


You’ve successfully installed GlitchTip on Rocky Linux 9 using Docker Compose, PostgreSQL, Redis, and Nginx. This setup provides a robust and scalable self-hosted monitoring solution for your applications.
For reliable performance, security, and scalability, consider deploying your next GlitchTip instance on Shape.Host Cloud VPS — offering fast SSD storage, flexible resources, and 24/7 support for all your Linux hosting needs.