Nhost on Debian 12 (Docker Compose + PostgreSQL + Hasura + GraphQL + SSL)
Nhost is an open-source backend-as-a-service (BaaS) platform that provides developers with everything needed to build modern applications — including PostgreSQL, GraphQL APIs, authentication, storage, and serverless functions — all in one unified stack. It’s often described as an open-source alternative to Firebase, giving you complete control over your data, infrastructure, and scalability.
Running Nhost on Debian 12 (Bookworm) with Docker Compose provides a stable, secure, and production-ready environment. Debian 12 offers systemd 252, OpenSSL 3, and updated Docker Engine packages, making it an ideal base for deploying Nhost behind a reverse proxy with SSL for secure access and reliable performance.
Architecture Overview
| Layer | Component | Role |
|---|---|---|
| OS | Debian 12 (Bookworm) | Stable, long-term supported Linux base |
| Container Runtime | Docker Engine + Compose | Orchestrates Nhost services and dependencies |
| Database | PostgreSQL 15 | Stores user data, app schemas, and configuration |
| GraphQL Engine | Hasura | Automatically generates real-time GraphQL APIs from PostgreSQL |
| Auth Service | Nhost Auth (GoTrue) | Provides authentication, JWT tokens, and OAuth login options |
| Storage | Nhost Storage | Handles file uploads and S3-compatible storage access |
| Functions | Nhost Functions (Node.js) | Runs serverless functions for backend logic |
| Reverse Proxy | Nginx / Traefik (optional) | TLS termination, routing, compression, and access control |
| TLS | Let’s Encrypt / PKI | Provides secure HTTPS access for APIs and dashboard |
Why Use Nhost?
- Open-source Firebase alternative powered by PostgreSQL and GraphQL.
- Instant backend setup – auth, APIs, and database running in minutes.
- Hasura integration – real-time GraphQL API generation for any schema.
- Authentication built-in – JWT and OAuth support out of the box.
- Serverless functions – run custom backend logic without extra services.
- Self-hosted – retain full control of data and infrastructure.
Nhost vs Other Backend Platforms
| Feature/Capability | Nhost (Self-hosted) | Supabase (Self-hosted) | Firebase (Google) | Appwrite (Self-hosted) |
|---|---|---|---|---|
| Database | PostgreSQL | PostgreSQL | Firestore (NoSQL) | MariaDB / PostgreSQL |
| API Type | GraphQL (Hasura) | REST + GraphQL | Proprietary SDK | REST + GraphQL |
| Auth System | GoTrue (JWT) | GoTrue (JWT) | Firebase Auth | Custom JWT |
| File Storage | S3-compatible | S3-compatible | Cloud Storage | Local/S3 drivers |
| Serverless Logic | Node.js Functions | Limited (Edge) | Cloud Functions | Node.js Functions |
| Open-source | Yes | Yes | No | Yes |
Nhost is the best solution when you need a production-ready GraphQL backend with full self-hosting capabilities and modern authentication — without cloud lock-in.
Security & Best Practices
- Deploy behind Nginx or Traefik with HTTPS enabled.
- Use Docker secrets or environment variables for keys and credentials.
- Limit PostgreSQL and Nhost internal services to Docker networks only.
- Rotate JWT secrets and OAuth credentials regularly.
- Schedule automated PostgreSQL backups with
pg_dump. - Apply Debian’s UFW or nftables firewall to expose only ports 80/443.
- Keep Docker images, dependencies, and Debian packages updated.
- Automate SSL certificate renewals with Certbot or Traefik ACME integration.
Typical Use Cases
- Web and mobile backends with real-time GraphQL APIs.
- Internal dashboards powered by PostgreSQL and Hasura.
- SaaS applications with user authentication and file storage.
- Prototypes and MVPs requiring instant backend setup.
- Enterprise systems needing on-premise control and GDPR compliance.
Deploying Nhost on Debian 12 with Docker Compose gives you a secure, scalable, and open-source backend platform that combines PostgreSQL, Hasura, and GoTrue authentication — delivering all the power of Firebase, but with full ownership of your data and infrastructure.
Step 1: Create a Server Instance on Shape.Host
Sign in to your Shape.Host account.
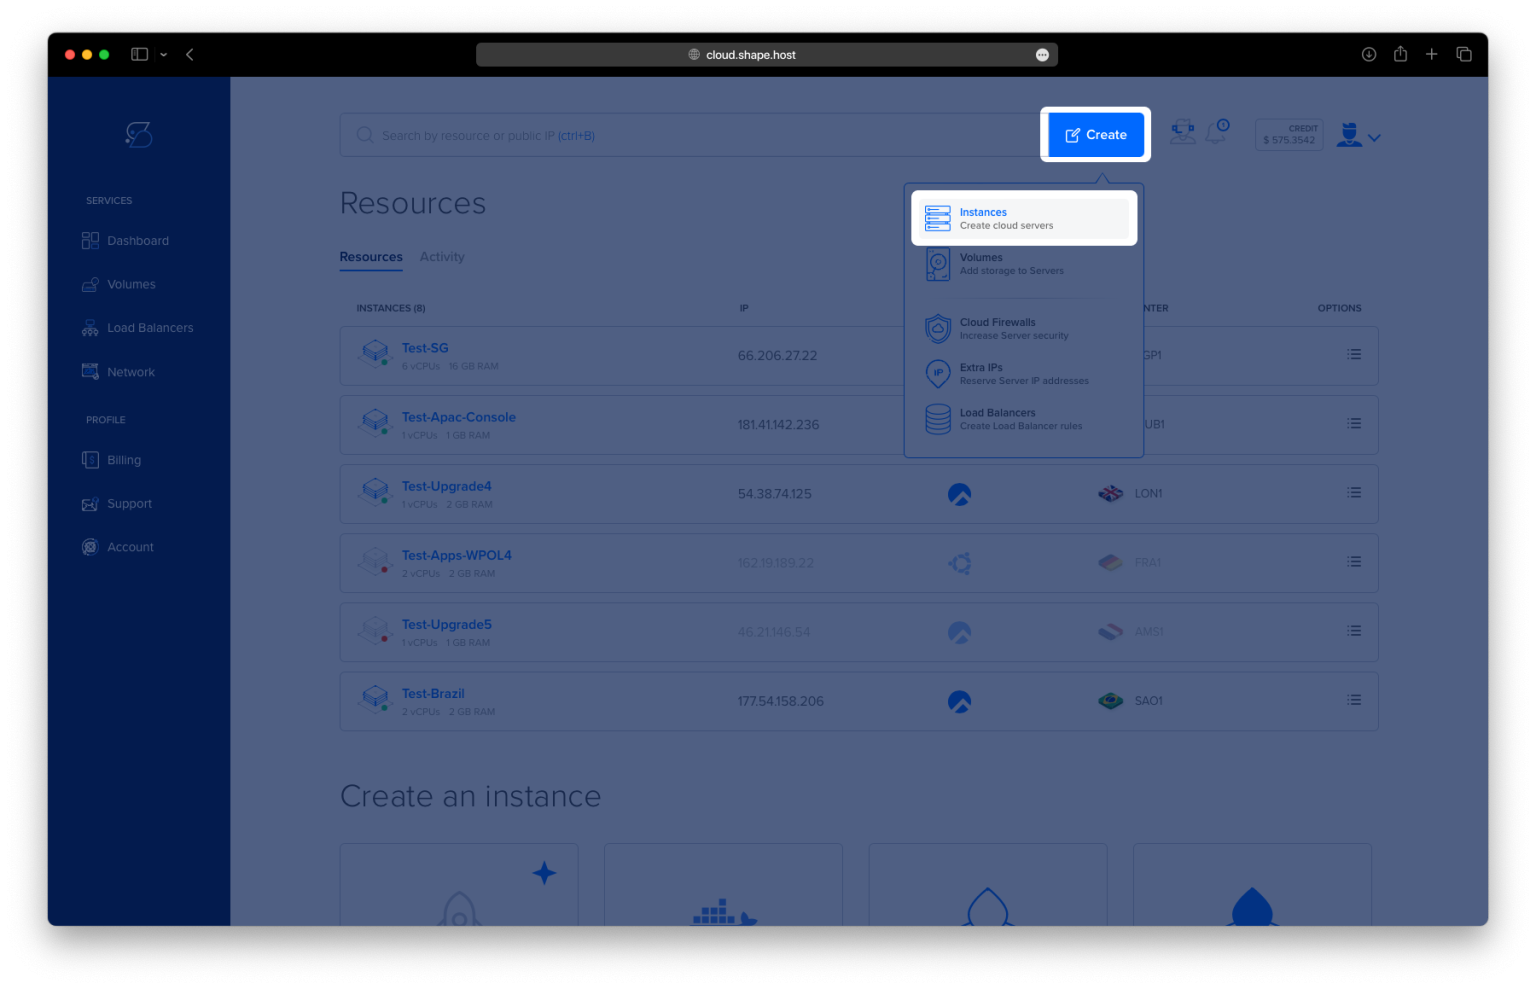
Click Create → Instance.

Choose your preferred data-center location.

Select a plan with at least 4 CPUs, 8 GB RAM, and 40 GB SSD (recommended).
Pick Debian 12 (64-bit) as the operating system.

Click Create Instance.

Copy your instance’s public IP address from the Resources panel.

Step 2: Connect to Your Server
- Linux / macOS:
ssh root@your_server_ip - Windows (PuTTY):
- Open PuTTY → enter your server IP.
- Choose SSH and click Open.
- Log in using your Shape.Host credentials.
Step 3: Install Docker and Docker Compose
Update existing packages:
apt update

Install required dependencies:
apt install ca-certificates curl gnupg lsb-release

Create a directory for Docker’s GPG key:
mkdir -p /etc/apt/keyrings
Download Docker’s GPG key:
curl -fsSL https://download.docker.com/linux/debian/gpg -o /etc/apt/keyrings/docker.asc
Set permissions so the system can read it:
chmod a+r /etc/apt/keyrings/docker.asc
Add Docker’s official repository:
echo "deb [arch=$(dpkg --print-architecture) signed-by=/etc/apt/keyrings/docker.asc] \
https://download.docker.com/linux/debian \
$(. /etc/os-release && echo "$VERSION_CODENAME") stable" \
> /etc/apt/sources.list.d/docker.list

Update again and install Docker Engine + Compose:
apt update
apt install docker-ce docker-ce-cli containerd.io docker-buildx-plugin docker-compose-plugin

Enable and start Docker at boot:
systemctl enable docker
systemctl start docker
Check installed versions:
docker --version
docker compose version
You should see version numbers confirming successful installation.

Step 4: Set Up Nhost Project Directory
Create a directory for Nhost and navigate into it:
mkdir /opt/nhost
cd /opt/nhost
Generate a secure random key for JWT and Hasura secrets:
openssl rand -hex 32
Save the generated string — you’ll use it in the next step.

Step 5: Create the Docker Compose Configuration
Open the compose file:
nano docker-compose.yml
Paste the following content:
version: "3.9"

services:
  postgres:
    container_name: nhost-postgres-1
    image: postgres:15
    restart: always
    environment:
      POSTGRES_USER: postgres
      POSTGRES_PASSWORD: "W9b2U8vTKp"
      POSTGRES_DB: nhost
    volumes:
      - postgres_data:/var/lib/postgresql/data
    ports:
      - "5432:5432"

  hasura:
    container_name: hasura
    image: hasura/graphql-engine:v2.41.0
    restart: always
    depends_on:
      - postgres
    ports:
      - "8080:8080"
    environment:
      HASURA_GRAPHQL_DATABASE_URL: "postgres://postgres:W9b2U8vTKp@postgres:5432/nhost"
      HASURA_GRAPHQL_ADMIN_SECRET: "0f8c85264d9d04998fe00881c3c61d9147b51004f5cd1cb7c17d5740d7ab30ef"
      HASURA_GRAPHQL_ENABLE_CONSOLE: "true"
      HASURA_GRAPHQL_JWT_SECRET: '{"type":"HS256","key":"0f8c85264d9d04998fe00881c3c61d9147b51004f5cd1cb7c17d5740d7ab30ef"}'
      HASURA_GRAPHQL_UNAUTHORIZED_ROLE: anonymous
      HASURA_GRAPHQL_CORS_DOMAIN: "*"

  auth:
    container_name: auth
    image: nhost/hasura-auth:latest
    restart: always
    depends_on:
      - postgres
      - hasura
    ports:
      - "4000:4000"
    environment:
      HASURA_GRAPHQL_DATABASE_URL: "postgres://postgres:W9b2U8vTKp@postgres:5432/nhost"
      HASURA_GRAPHQL_ADMIN_SECRET: "0f8c85264d9d04998fe00881c3c61d9147b51004f5cd1cb7c17d5740d7ab30ef"
      HASURA_GRAPHQL_ENDPOINT: "http://hasura:8080/v1/graphql"
      HASURA_GRAPHQL_JWT_SECRET: '{"type":"HS256","key":"0f8c85264d9d04998fe00881c3c61d9147b51004f5cd1cb7c17d5740d7ab30ef"}'
      AUTH_CLIENT_URL: "http://YOUR_SERVER_IP"
      AUTH_JWT_SECRET: '{"type":"HS256","key":"0f8c85264d9d04998fe00881c3c61d9147b51004f5cd1cb7c17d5740d7ab30ef"}'
      AUTH_ADMIN_PASSWORD: "StrongAdminPass123!"
      AUTH_ADMIN_EMAIL: "contact@shape.host"

  minio:
    container_name: nhost-minio-1
    image: minio/minio
    restart: always
    command: server /data --console-address ":9001"
    ports:
      - "9000:9000"
      - "9001:9001"
    environment:
      MINIO_ROOT_USER: "minioadmin"
      MINIO_ROOT_PASSWORD: "minioadminpass"
    volumes:
      - minio_data:/data

  functions:
    container_name: nhost-functions-1
    image: nhost/functions:latest
    restart: always
    depends_on:
      - hasura
    ports:
      - "1337:1337"
    volumes:
      - ./functions:/opt/nhost/functions

volumes:
  postgres_data:
  minio_data:

Explanation of Services
| Service | Description |
|---|---|
| Postgres | Stores application data. |
| Hasura | Exposes a GraphQL API over Postgres. |
| Auth | Handles authentication and user management. |
| MinIO | Provides S3-compatible object storage. |
| Functions | Runs custom serverless logic. |
Save and exit (CTRL + O, then CTRL + X).
Step 6: Start the Nhost Stack
Pull all required images:
docker compose pull

Start the containers in detached mode:
docker compose up -d

Confirm that everything is running:
docker compose ps
If all services show as Up, your Nhost environment is active.

Step 7: Verify the Deployment
You can verify service health by visiting:
http://YOUR_SERVER_IP:8080
You should receive a response like OK, confirming that the Auth service is healthy.
- Hasura Console:
http://YOUR_SERVER_IP:8080 - MinIO Dashboard:
http://YOUR_SERVER_IP:9001


Step 8 (Optional): Enable HTTPS with Certbot
To secure your services with SSL:
apt install python3-certbot-nginx
certbot --nginx -d yourdomain.com
Follow the interactive prompts to generate and install Let’s Encrypt certificates.
You’ve successfully installed Nhost on Debian 12 using Docker Compose.
Your backend now includes PostgreSQL, Hasura GraphQL, Auth, MinIO storage, and serverless functions — all running in containers.
https://shape.host/For the best performance and uptime, host your Nhost stack on a Shape.Host Linux SSD VPS, optimized for containerized workloads and scalable backend deployments.