Icinga 2 Monitoring Software on Ubuntu 24.04
Icinga 2 is a flexible, enterprise-grade monitoring solution designed to track the availability and performance of IT infrastructure: hosts, services, applications, databases, and more. Originally forked from Nagios, Icinga has evolved into a modern platform with enhanced scalability, distributed monitoring, REST APIs, and a responsive web interface.
When paired with Ubuntu 24.04 LTS, Icinga 2 becomes a powerful part of any DevOps or IT operations toolkit, combining stability, open-source extensibility, and long-term support in one platform.
Key Features of Icinga 2
- Monitoring of Hosts and Services
Define checks for servers, containers, databases, network devices, and websites. Icinga supports both active and passive checks via agents or remote plugins. - Distributed Monitoring Architecture
Built-in support for satellite nodes and zone-based clustering allows efficient monitoring across multiple data centers or cloud regions. - High Availability (HA)
Built-in support for clustered master nodes using the Icinga 2 API ensures zero downtime and load balancing of checks. - Powerful Configuration Language
Icinga’s domain-specific language (DSL) allows programmatic configuration of hosts, checks, thresholds, and event handlers. - Advanced Notification System
Supports rules for multi-channel alerts (email, SMS, Telegram, Slack, etc.) based on severity, host groups, or escalation policies. - Icinga Web 2
A modular and extensible GUI with role-based access control (RBAC), performance graphs (via Graphite/InfluxDB), and deep service analytics.
Why Use Ubuntu 24.04 for Icinga 2?
Ubuntu 24.04 “Noble Numbat” is a Long-Term Support (LTS) release, supported until 2029. It brings:
- Linux Kernel 6.8+ for improved network stack performance
- Systemd 253+, which integrates well with Icinga 2 service management
- Updated GCC and OpenSSL toolchains, ensuring better compatibility and TLS support
- Optimized security patches, automatic updates, and AppArmor profiles useful in hardening Icinga setups
The combination of Icinga 2 and Ubuntu 24.04 gives DevOps engineers a modern, reliable, and secure base for large-scale infrastructure observability.
Architecture & Components
- Icinga 2 Core – The monitoring engine written in C++, responsible for executing checks and evaluating states.
- Icinga Web 2 – A separate package that provides the graphical dashboard.
- Icinga DB / IDO (Icinga Data Output) – Handles database integration with MariaDB/PostgreSQL for historical and real-time metrics.
- Monitoring Plugins – Custom or default plugins for service checks, compatible with Nagios-style scripts.
- Icinga Agents – Lightweight agents installed on remote machines, communicating securely with the Icinga core.
Optional components include:
- Graphite/InfluxDB + Grafana – For time-series storage and visualization.
- Director – A configuration module for managing hosts/services from the web UI using a structured API.
Use Cases for Icinga 2
- Enterprise IT Monitoring: Across physical servers, cloud VMs, and containers
- SaaS/Uptime Monitoring: Web services, SSL certificates, load balancers, APIs
- Network Device Monitoring: Routers, firewalls, and switches via SNMP or custom plugins
- Security/Compliance Monitoring: Monitor unauthorized port openings, failed login attempts, or outdated packages
- DevOps Pipelines: Integrated into CI/CD workflows with alerts on failed deployments or service disruptions
Integration & Extensibility
Icinga 2 is open and highly integrable:
- REST API – Allows remote management, check scheduling, and real-time status fetching.
- Webhook and Alert Integration – Works with Slack, Opsgenie, PagerDuty, Telegram, etc.
- Automation Friendly – Can be configured via Ansible, Puppet, or custom shell scripts.
- Compatible with Prometheus & Grafana – Bridges the gap between metric scraping and classic threshold-based monitoring.
Considerations Before Deployment
- Scaling Strategy: For large networks, plan master/satellite topology from the start.
- TLS Certificate Management: Agent communication is encrypted; you must handle CA issuance and renewal.
- Performance Tuning: Avoid overly frequent checks and use event handlers wisely.
- Database Backend: Choose between MySQL/MariaDB or PostgreSQL based on your preferred stack.
Icinga 2 on Ubuntu 24.04 is a production-ready, extensible solution ideal for both traditional infrastructure and cloud-native environments. It offers flexibility, high availability, robust API access, and visibility across the full stack—making it an excellent choice for DevOps, SREs, and system administrators focused on uptime, automation, and observability.
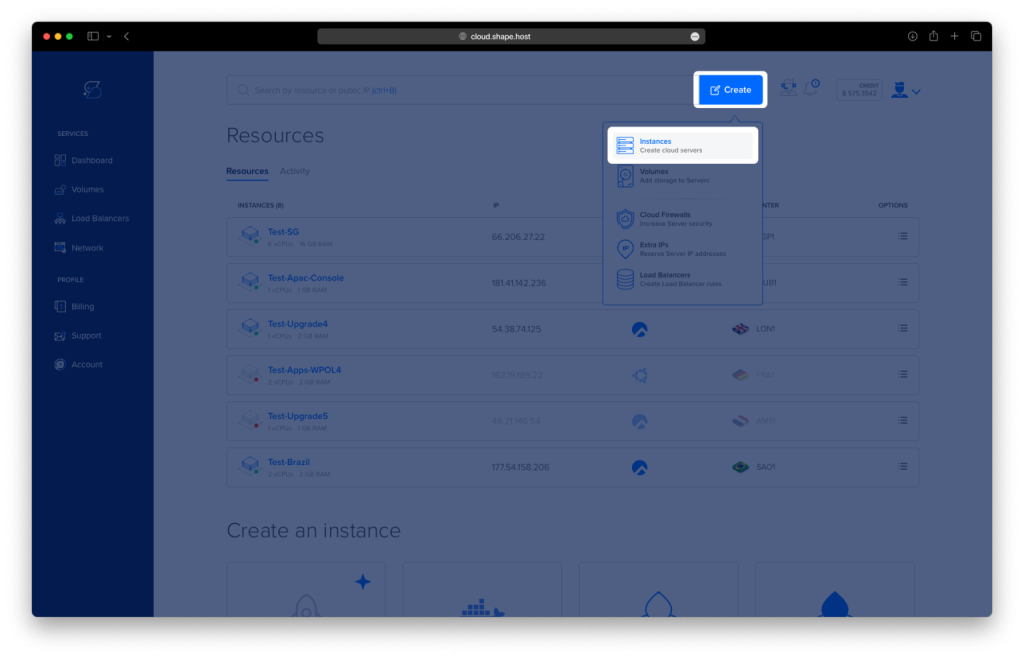
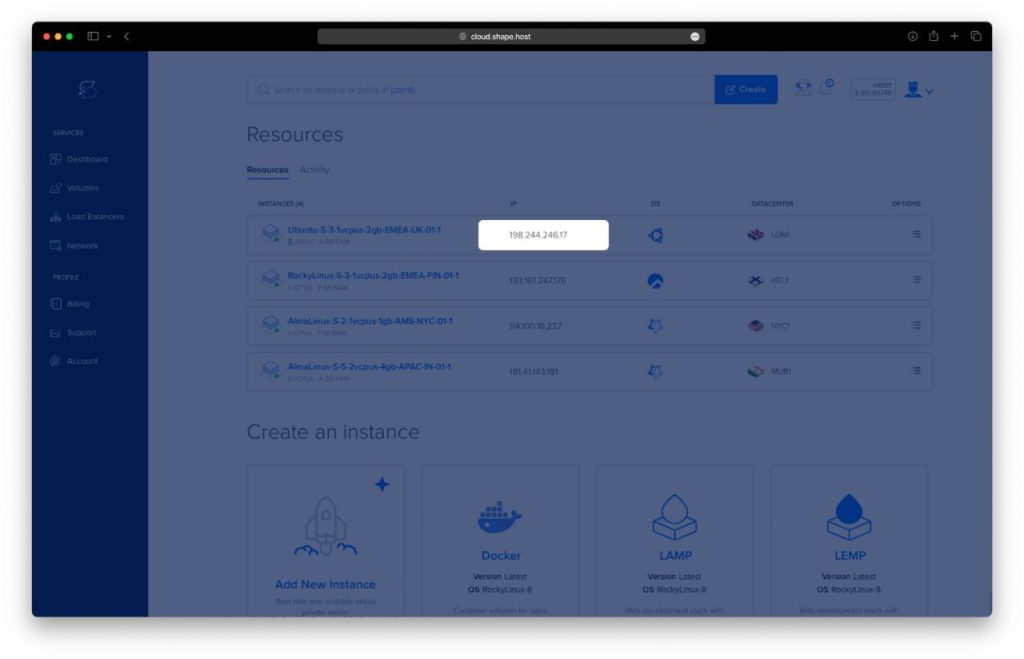
Step 1: Create a Shape.Host Instance
Go to https://shape.host and log in.
Click “Create”.
Choose “Instance”.
Select your preferred server location.
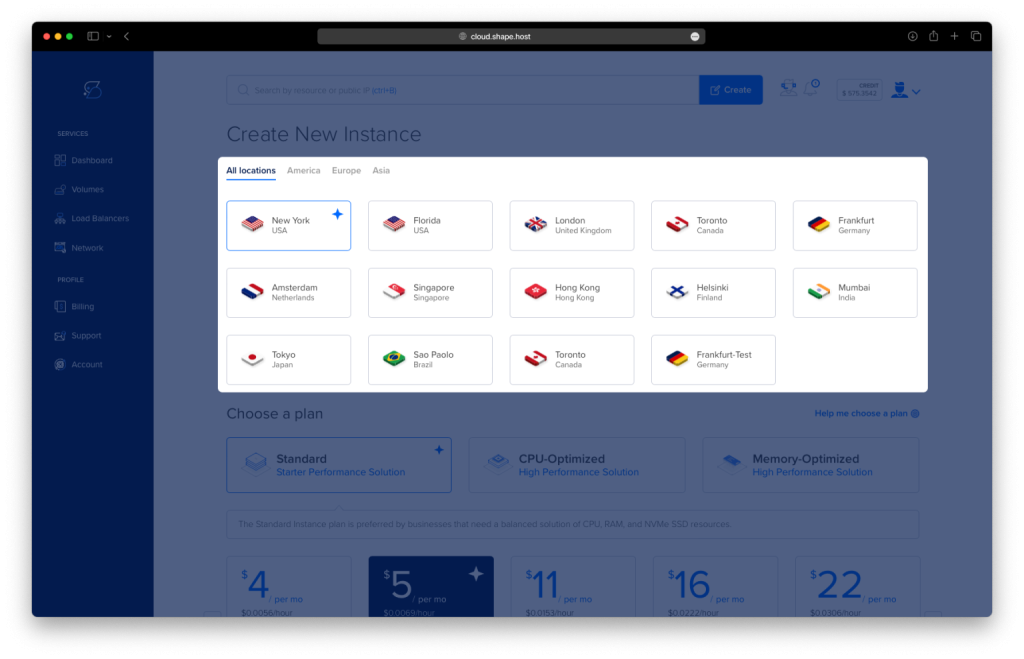
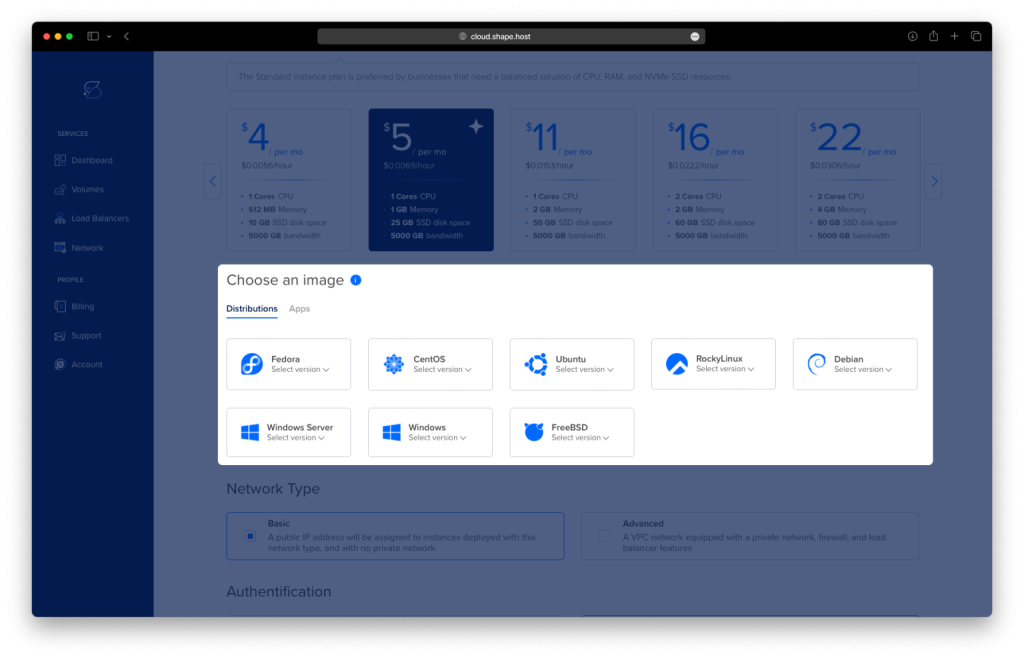
Select Ubuntu 24.04 (64-bit) as the operating system.
Choose a plan with at least 2 CPUs, 2 GB RAM, and 20 GB SSD.
Click “Create Instance”.
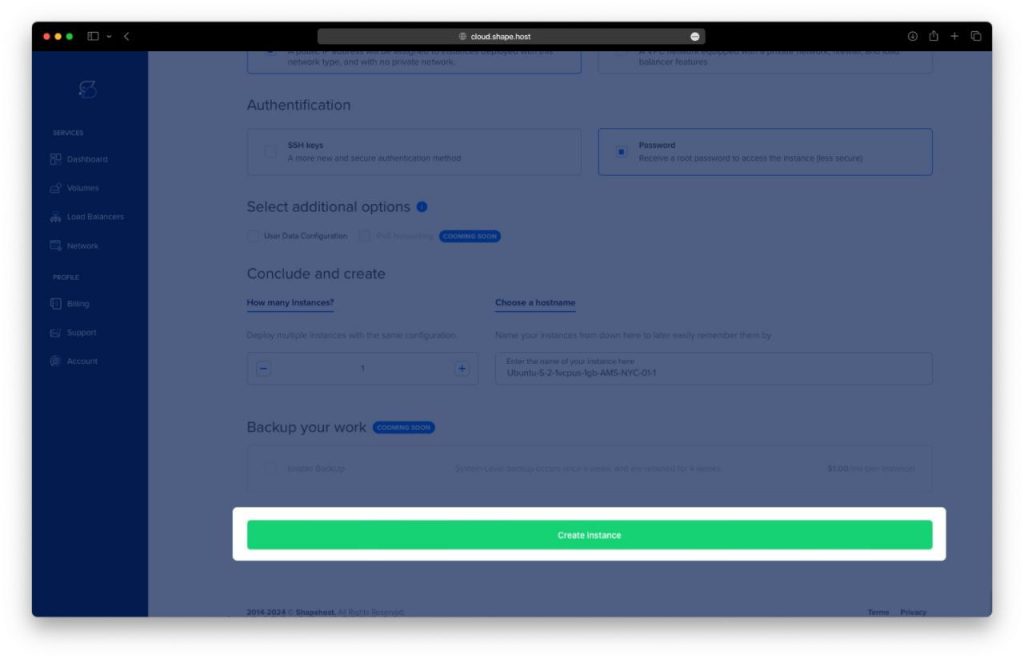
Find your instance’s IP address under the “Resources” section.
Step 2: Connect to Your Instance
From Linux/macOS:
ssh root@your-server-ip
From Windows (with PuTTY):
- Download and install PuTTY.
- Enter your server IP in Host Name.
- Click Open, then log in with
root.
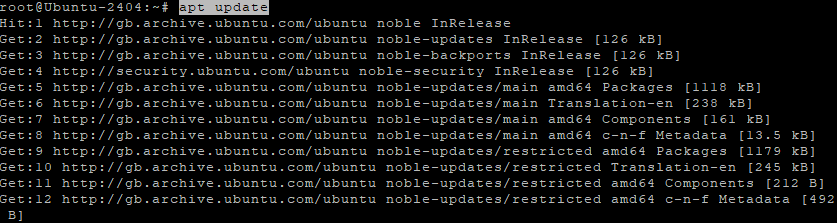
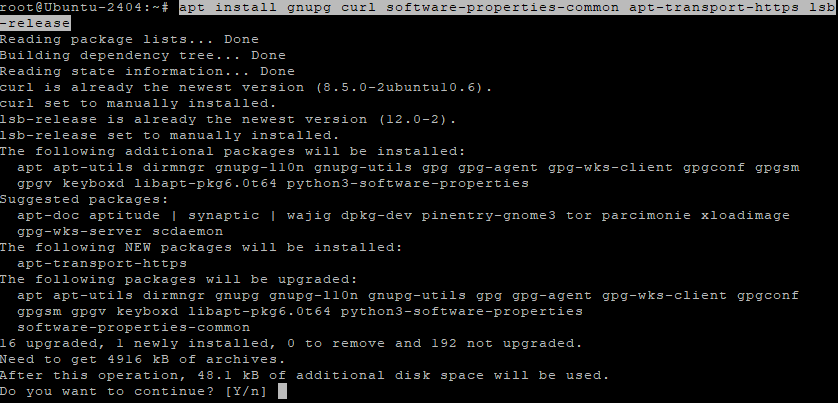
Step 3: Install Icinga 2 and Dependencies
Update package index and install essentials:
apt update
apt install gnupg curl software-properties-common apt-transport-https lsb-release -y
Add the Icinga GPG key and repository:
curl https://packages.icinga.com/icinga.key | gpg --dearmor -o /etc/apt/trusted.gpg.d/icinga.gpg
echo "deb [signed-by=/etc/apt/trusted.gpg.d/icinga.gpg] https://packages.icinga.com/ubuntu icinga-$(lsb_release -cs) main" > /etc/apt/sources.list.d/icinga.list
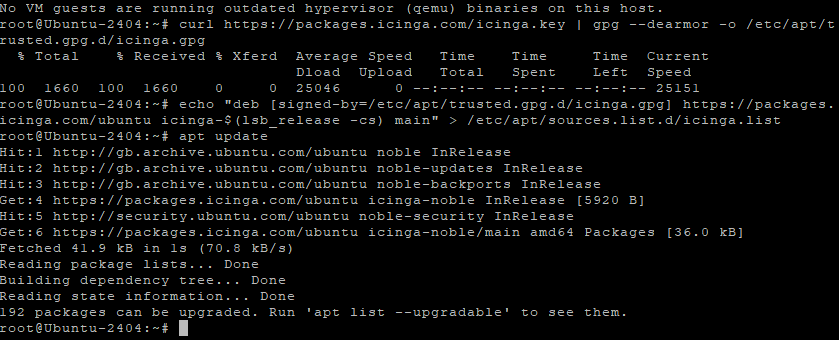
Update package index and install Icinga 2:
apt update
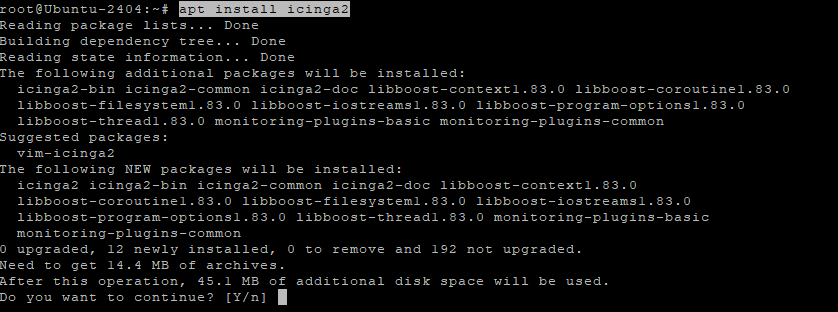
apt install icinga2 -y
Enable and start Icinga 2:
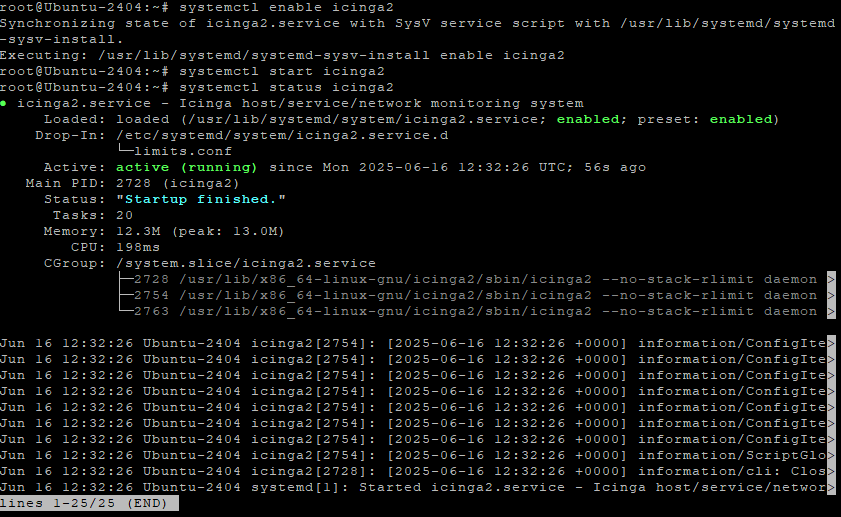
systemctl enable icinga2
systemctl start icinga2
systemctl status icinga2
Step 4: Install Monitoring Plugins
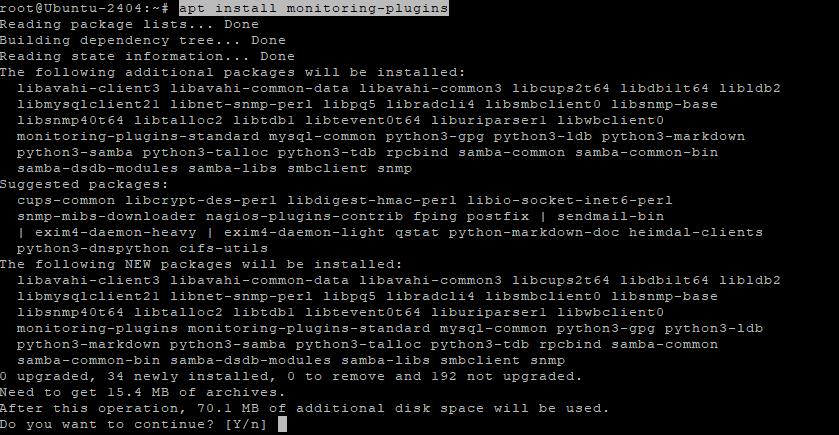
apt install monitoring-plugins -y
Step 5: Install MariaDB
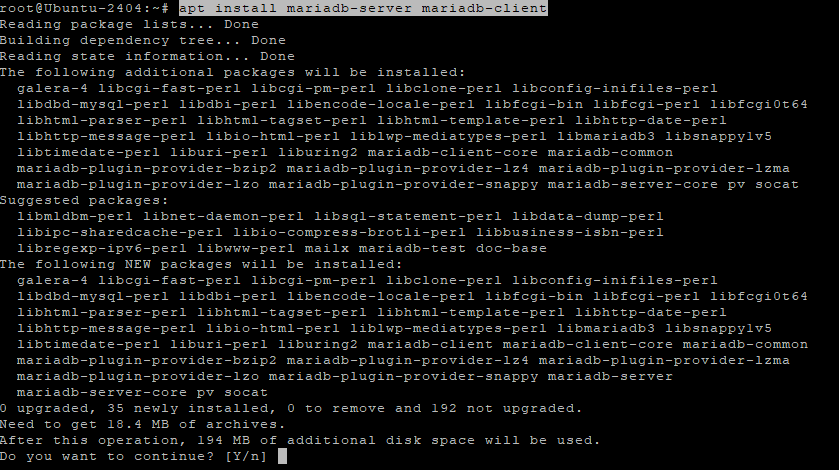
apt install mariadb-server mariadb-client -y
Secure MariaDB installation:
mysql_secure_installation
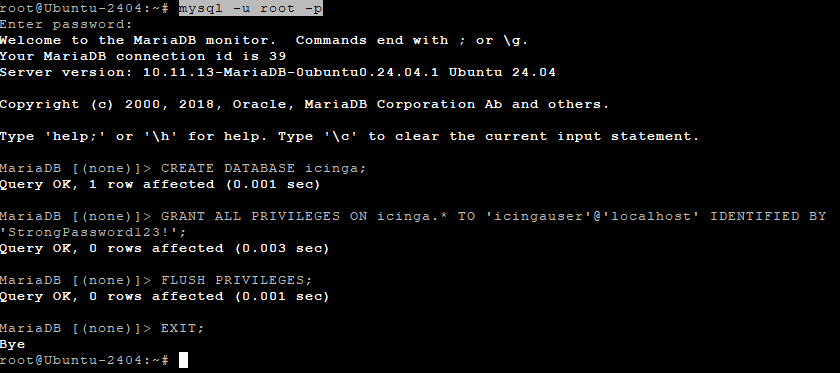
Create database and user for Icinga:
mysql -u root -p
Inside MariaDB prompt:
CREATE DATABASE icinga;
GRANT ALL PRIVILEGES ON icinga.* TO 'icingauser'@'localhost' IDENTIFIED BY 'StrongPassword123!';
FLUSH PRIVILEGES;
EXIT;
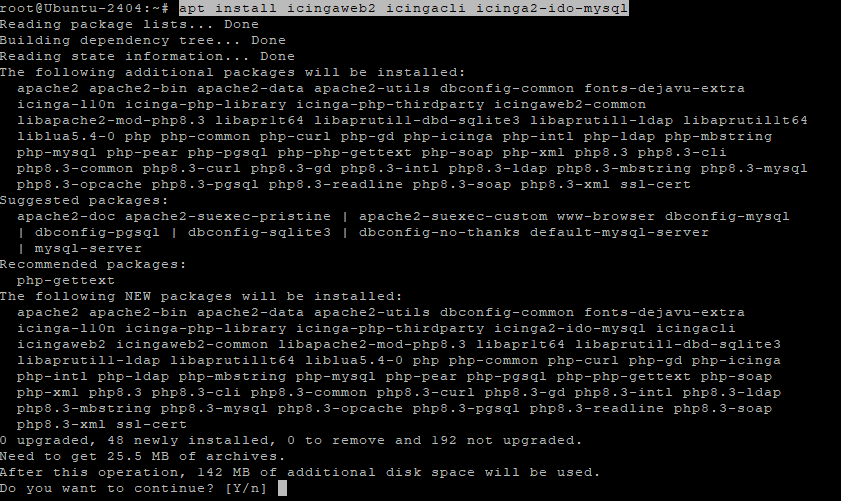
Step 6: Install Icinga Web 2 and IDO Modules
apt install icingaweb2 icingacli icinga2-ido-mysql -y
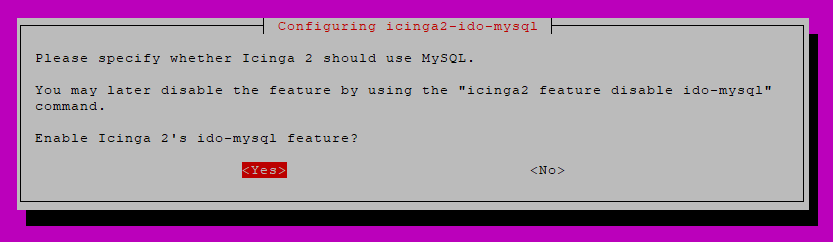

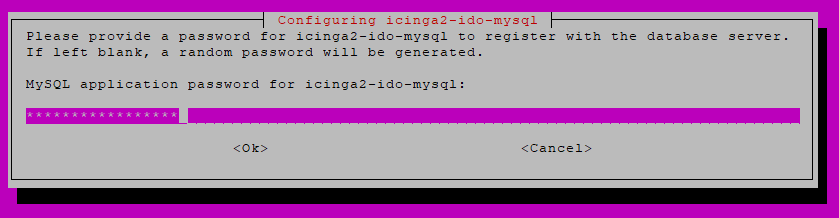
Enable the IDO MySQL feature:
icinga2 feature enable ido-mysql

Configure IDO module:
nano /etc/icinga2/features-enabled/ido-mysql.conf
Insert:
library "db_ido_mysql"

object IdoMysqlConnection "ido-mysql" {
  user = "icingauser"
  password = "StrongPassword123!"
  host = "localhost"
  database = "icinga"
}
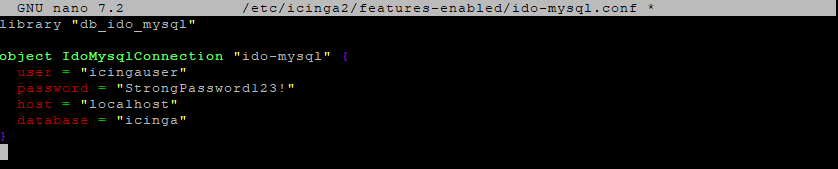
Restart Icinga 2:
systemctl restart icinga2

Step 7: Install Apache and PHP for Web Interface
apt install apache2 php php-cli php-mysql php-gd php-curl php-intl php-dom php-mbstring php-xml php-ldap php-imagick php-zip -y
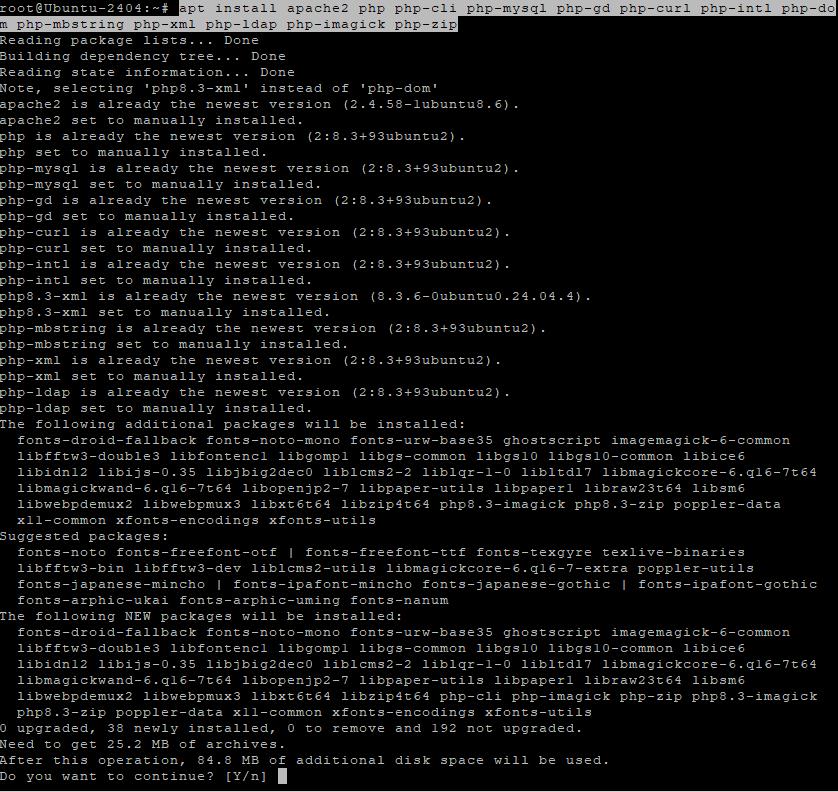
Enable Apache and start it:
systemctl enable apache2
systemctl start apache2

Step 8: Generate Icinga Web 2 Setup Token
icingacli setup token create
Copy the token shown in terminal.

Access Web Installer:
Open the following URL in your browser:
http://YOUR_SERVER_IP/icingaweb2/setup
Follow the web interface steps to complete the Icinga Web 2 setup.
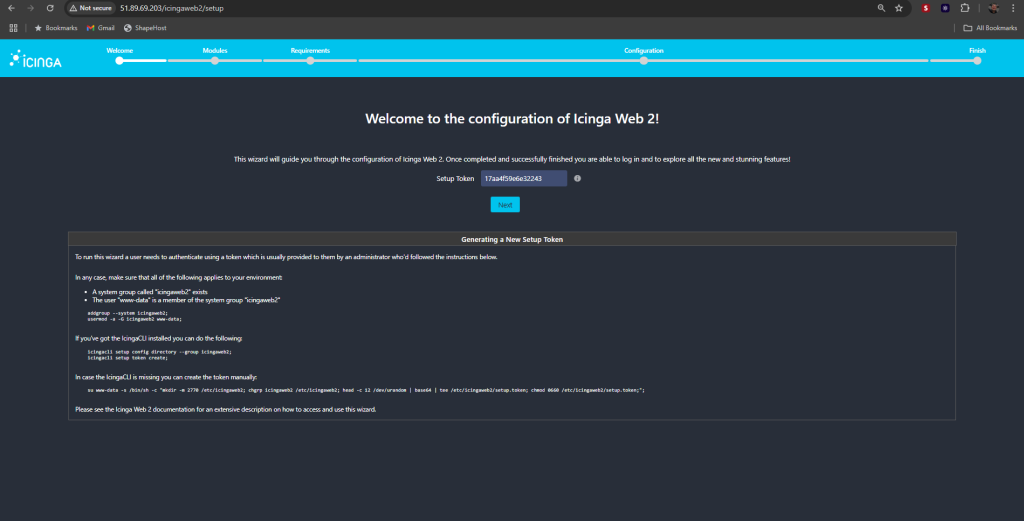
Step: Welcome to the Configuration of Icinga Web 2
In this step, you’re accessing the Icinga Web 2 setup wizard, which helps guide you through the installation and configuration process.
Action Required: Enter Setup Token
You must provide a Setup Token to authenticate access to the wizard.
- In your case, the token has already been generated and pre-filled:
17aa4f59e6e32243 - Click the “Next” button to proceed.
What is a Setup Token?
The setup token is a security mechanism to ensure only authorized users can configure Icinga Web 2.
How to Generate a Token (if needed)
If the token is not present, you can generate it in several ways:
Using the CLI (if icingacli is available):
icingacli setup config directory --group icingaweb2 icingacli setup token createManually (without icingacli):
su www-data -s /bin/sh -c "mkdir -p /etc/icingaweb2; \ tr -dc A-Za-z0-9 </dev/urandom | head -c 12 | \ tee /etc/icingaweb2/setup.token; \ chmod 0640 /etc/icingaweb2/setup.token"Ensure permissions are correct:
The user www-data must be part of the group
icingaweb2: addgroup --system icingaweb2 usermod -a -G icingaweb2 www-data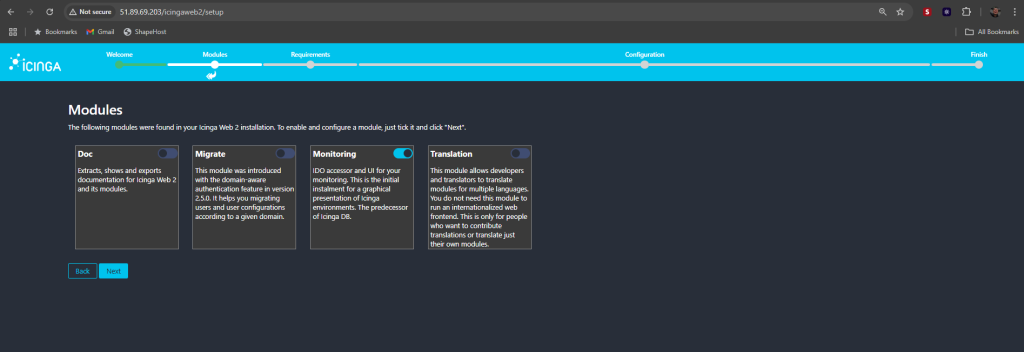
Step: Select Modules to Enable
In this step, you must choose which Icinga Web 2 modules you want to enable. These modules add specific functionality to the web interface.
Recommended Module Selection
- Monitoring (enabled by default)
➤ This is mandatory for using the monitoring UI. It provides access to host/service views and is the core of Icinga Web 2.
Optional Modules (can be toggled ON if needed):
- Doc
➤ Enables documentation export and display for Icinga Web 2 and installed modules. Useful for local help references. - Migrate
➤ Helps migrate user accounts and configuration if you are upgrading from a version older than 2.5.0 or switching domains. - Translation
➤ Allows use of multi-language UI and supports contributing translations. Enable it only if multilingual support is needed.
What to Do:
- Make sure the Monitoring module is enabled (as shown).
- Optionally, toggle other modules depending on your needs.
- Click “Next” to proceed.
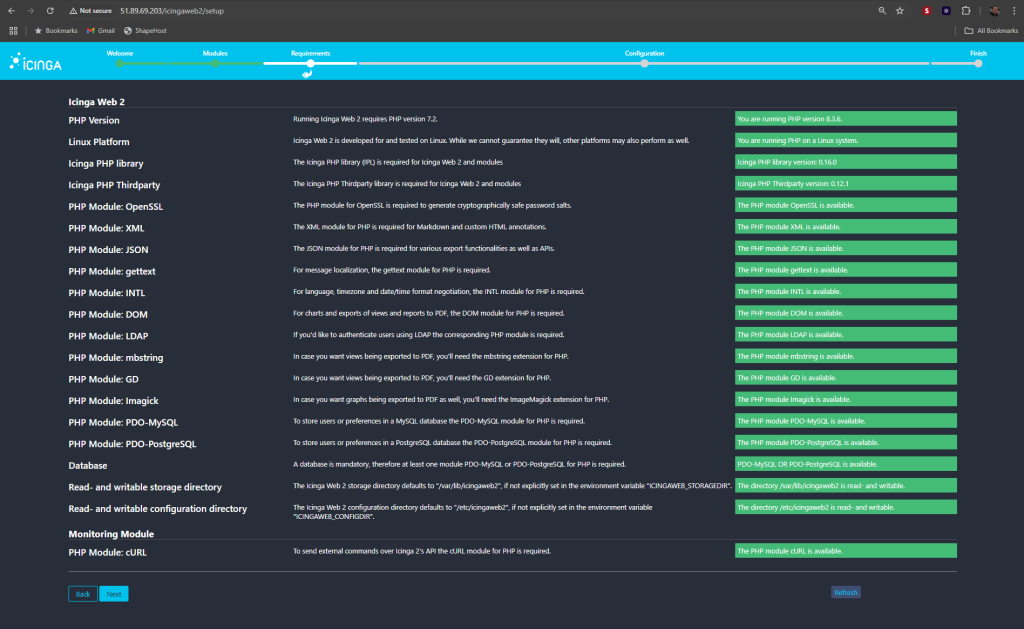
Step: Requirements Check
In this screen, Icinga Web 2 verifies if your system meets all necessary requirements to proceed with the installation.
What This Page Does:
It checks:
- PHP version and required PHP modules
- OS compatibility
- Icinga libraries
- Directory permissions
- Database driver availability
Your Current Status:
Everything on your system is correctly configured — all checks are marked in green, including:
- PHP Version: 8.3.6 (meets requirement of ≥ 7.2)
- OS: Running on a Linux system ✔
- Required PHP Modules: All modules (e.g., OpenSSL, XML, JSON, gettext, intl, dom, imagick, mbstring, etc.) are available.
- Database Support: Both PDO-MySQL and PDO-PostgreSQL drivers are present.
- Directories:
/var/lib/icingaweb2and/etc/icingaweb2are writable.
What to Do:
- Confirm that everything is marked in green (✅).
- If so, click the “Next” button to proceed to the configuration step.
- If anything shows red, click “Refresh” after resolving the issue.
Here are the step-by-step indications for the Authentication screen in the Icinga Web 2 setup wizard:
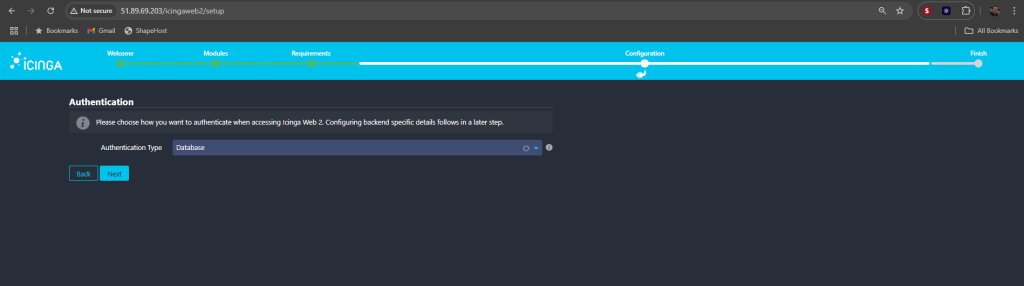
Step: Authentication
This step allows you to choose the method of authentication for logging into Icinga Web 2.
What You See:
A dropdown labeled Authentication Type with the default selection:Database
Explanation:
- Database Authentication is the recommended option for most users. It allows user accounts and roles to be managed within Icinga Web 2’s own user database.
- Other options (LDAP, External Auth, etc.) may be available depending on your setup, but for simplicity and first-time installation,
Databaseis the easiest and most flexible.
What to Do:
- Keep Database selected (default).
- Click “Next” to proceed to the user and backend configuration steps.

Step: Configure Database Resource
In this step, you provide the connection details for the database that will store Icinga Web 2 user data, including accounts, roles, and permissions.
Fields to Fill:
| Field | Description |
|---|---|
| Resource Name | A custom name for this database connection. You can leave it as icingaweb_db. |
| Database Type | Select your DB type. Here, it’s correctly set to MySQL. |
| Host | Usually localhost if the database runs on the same server. |
| Port | Leave empty to use the default MySQL port (3306), or specify it if non-standard. |
| Database Name | The name of your Icinga Web 2 database, e.g., icinga. |
| Username | The MySQL username used to connect, e.g., icingauser. |
| Password | The password for the above MySQL user. |
| Character Set | Leave blank to use the default (utf8mb4 recommended). |
| Use SSL | Toggle this on only if you require SSL-secured DB connections. By default, leave it off. |
Note: The database does not need to exist beforehand. Icinga Web 2 will create it automatically later, if permissions allow.
What to Do:
- Verify your MySQL user has rights to create and manage the specified database.
- Click “Validate Configuration” to check the connection.
- If validation passes, click “Next” to proceed.
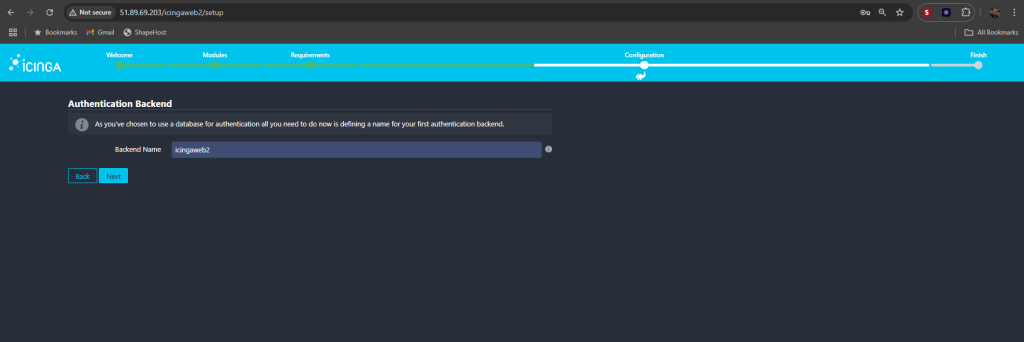
Step: Authentication Backend
Since you’ve chosen Database as your authentication method earlier, you now need to define a name for the authentication backend.
Backend Name:
- Default suggestion: icingaweb2
- You can leave it as-is unless you have multiple backends or want to use a more descriptive name.
This name is used internally by Icinga Web 2 to refer to this authentication configuration (it does not affect login credentials).
What to Do:
- Leave the Backend Name as
icingaweb2(recommended). - Click “Next” to proceed.
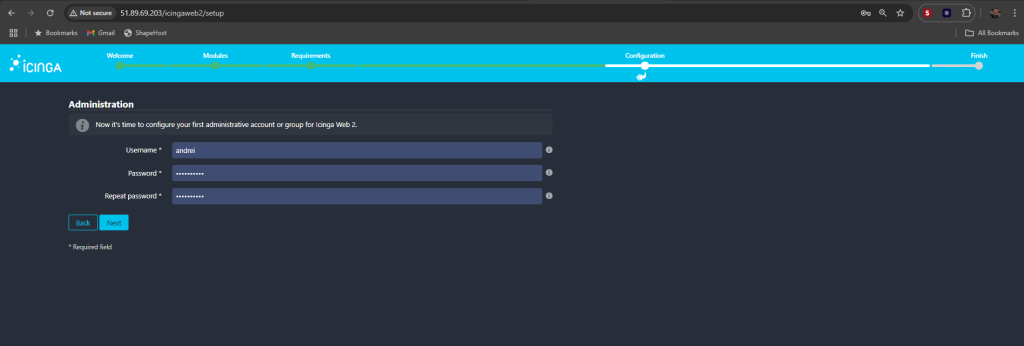
Step: Administration – Create the First Admin User
This step allows you to define the first administrative account for logging into Icinga Web 2.
Fields to Complete:
- Username:
Choose a login name for the administrator account.In your case:andrei - Password:
Set a strong password for this account. - Repeat Password:
Re-enter the same password to confirm.
This account will have full access to Icinga Web 2 and will be used to log in right after installation.
What to Do:
- Fill in a desired username (already set to
andrei). - Enter and confirm the password.
- Click “Next” to continue.
Here are the instructions for the Application Configuration screen in the Icinga Web 2 setup:
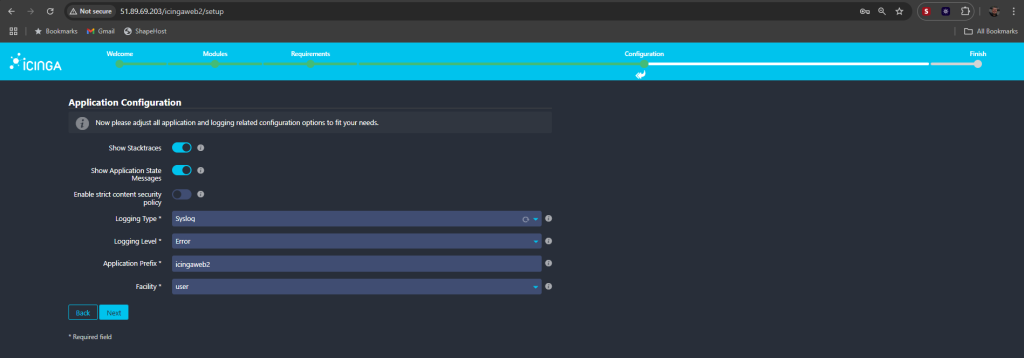
Step: Application Configuration
This section allows you to fine-tune application behavior and logging preferences for Icinga Web 2.
Available Settings:
- Show Stacktraces:
Enabled – useful for debugging in case of errors. - Show Application State Messages:
Enabled – displays internal status messages in the web UI (recommended for visibility). - Enable strict content security policy:Disabled by default – enable only if you need enforced CSP headers for security. It might break some extensions or custom integrations.
Logging Settings:
- Logging Type:
Syslog– logs are sent to the system logging facility. - Logging Level:
Error– only errors will be logged (you can change toInfoorDebugif more verbosity is needed). - Application Prefix:
icingaweb2– this will prefix log entries, helping identify them in the syslog. - Facility:
user– specifies the syslog facility under which logs are stored. Leave as is unless you have a custom logging setup.
What to Do:
- Leave the default logging and debug settings unless you have specific security or audit requirements.
- Click “Next” to continue to the final steps.
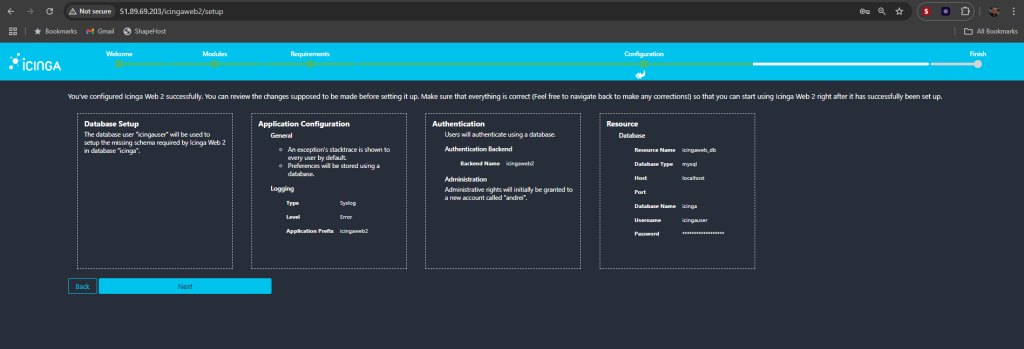
Step: Configuration Summary
This screen provides a final overview of all your settings before completing the Icinga Web 2 setup.
Review the Following Sections:
Database Setup
- The user
icingauserwill be used to initialize the schema in the database namedicinga.
Application Configuration
- Stacktraces enabled.
- State Messages enabled.
- Logging:
- Type:
Syslog - Level:
Error - Prefix:
icingaweb2
- Type:
Authentication
- Users will authenticate using the database backend.
- Backend Name:
icingaweb2 - Admin account:
andrei
Resource
- Resource Name:
icingaweb_db - Type:
MySQL - Host:
localhost - DB Name:
icinga - Username:
icingauser - Password: ************ (hidden for security)
What to Do:
- If everything looks correct, click “Next” to apply the configuration and complete the setup.
- If you want to change anything, use the “Back” button to go to that step.
Once you click Next, the database schema will be initialized and you’ll be ready to log in.
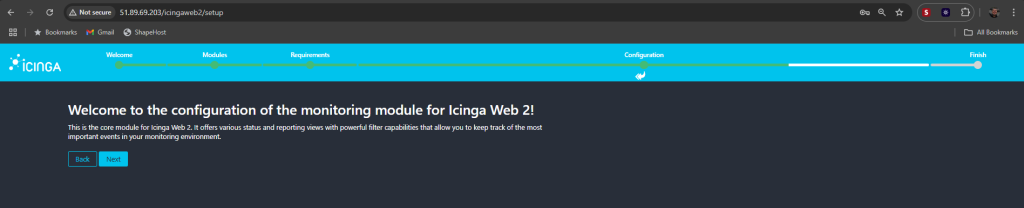
Step: Monitoring Module Configuration (Introduction)
This screen confirms that you are about to configure the Monitoring Module, which is the core component of Icinga Web 2.
🧾 What This Module Does:
- Provides status views, reporting, and monitoring dashboards.
- Offers powerful filtering tools to help you track services, hosts, and alerts across your infrastructure.
This is essential for viewing all monitored data from your Icinga 2 core installation.
What to Do:
- Click “Next” to begin the detailed setup for the monitoring module.
- No configuration is needed yet — this is just an informational screen.
Here are the setup indications and troubleshooting guidance for the Monitoring IDO Resource screen in Icinga Web 2:
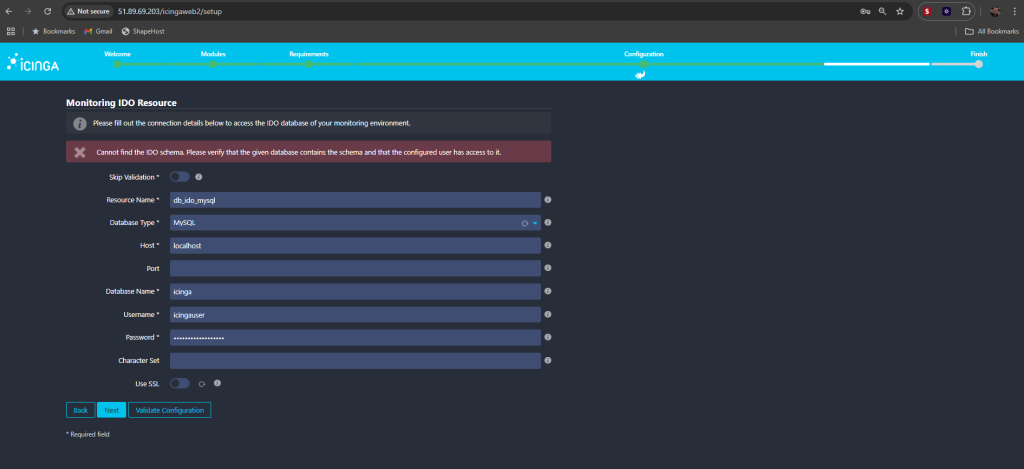
Fields Overview:
- Resource Name:
db_ido_mysql(you can leave this as-is) - Database Type:
MySQL - Host:
localhost - Port: empty → defaults to 3306
- Database Name:
icinga(must be the one with the IDO schema) - Username:
icingauser - Password: your configured MySQL password
- Character Set: optional (leave blank or use
utf8mb4) - Use SSL: Optional
Here are the configuration instructions for the Command Transport screen in the Icinga Web 2 setup wizard:
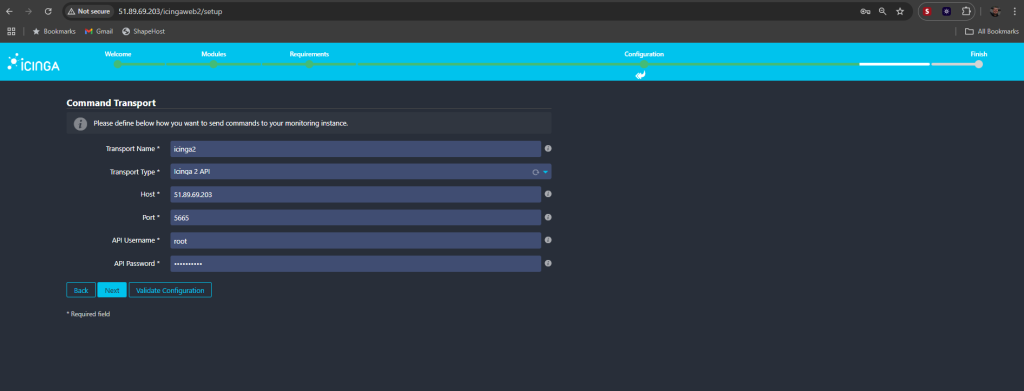
Step: Configure Command Transport
This section defines how Icinga Web 2 will send commands to your monitoring instance, typically through the Icinga 2 API.
Fields Explained:
| Field | Description |
|---|---|
| Transport Name | A name for this transport configuration. You can leave it as icinga2. |
| Transport Type | Icinga 2 API — the recommended method to send commands (like re-checks, downtimes, etc.). |
| Host | The IP address or hostname of your Icinga 2 server. In your case: 51.89.69.203. |
| Port | The API port. Default is 5665. |
| API Username | The Icinga 2 API user with permissions to handle commands. Here, it’s root (not ideal for production; create a dedicated user if needed). |
| API Password | The password set for that API user. |
This user and password must be defined in the Icinga 2 API credentials (
/etc/icinga2/conf.d/api-users.conf).
Validate Configuration:
- Click “Validate Configuration” to check connection and credentials.
- If successful, click “Next” to proceed.
Here are the setup instructions for the Monitoring Security step in the Icinga Web 2 installation:
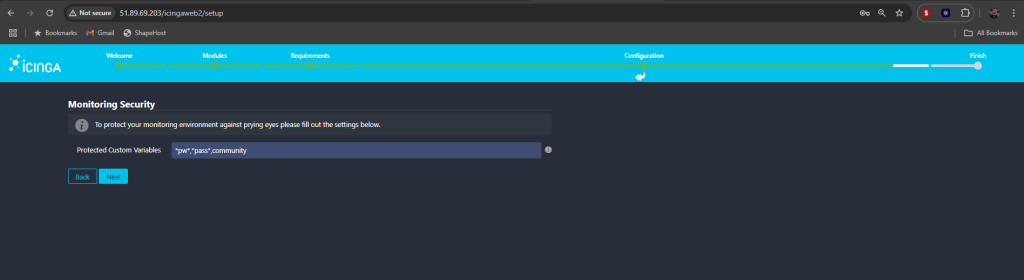
Step: Monitoring Security – Protect Custom Variables
This step helps protect sensitive data such as passwords or SNMP communities from being displayed in the web interface.
Field: Protected Custom Variables
Default value:
*pw*,*pass*,community
What It Does:
- Hides the values of custom variables in the Icinga Web 2 UI that match these patterns.
- Helps avoid accidental exposure of credentials or tokens.
Recommended Patterns:
*pw*– matches any variable containing “pw” (likesnmp_pw,admin_pw)*pass*– matches any variable containing “pass” (likemysql_pass)community– matches SNMP community strings
You can customize this list to include any sensitive variable patterns you use (e.g.,
token,apikey, etc.)
What to Do:
- Keep the defaults unless you have other custom-sensitive variable names.
- Click “Next” to proceed.
Here are the final instructions for completing the Icinga Web 2 Monitoring Module setup as shown in your last screenshot:
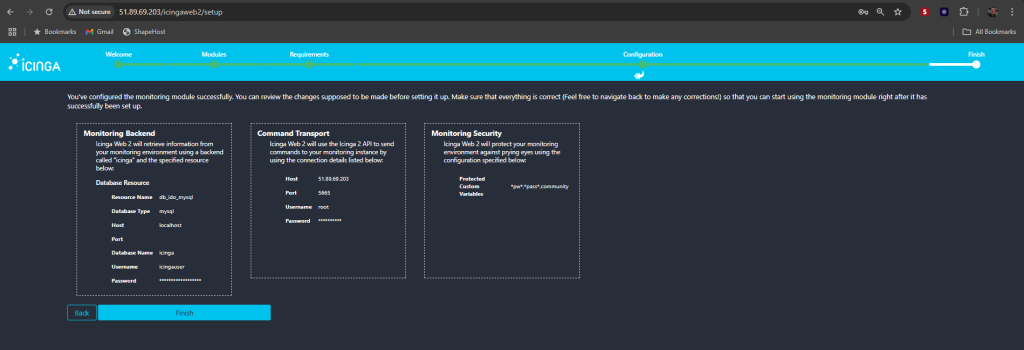
Final Step: Monitoring Module Summary & Confirmation
You’ve successfully configured the monitoring backend, command transport, and monitoring security settings.
Summary Overview:
Monitoring Backend
- Icinga Web 2 will retrieve monitoring data using:
- Resource Name:
db_ido_mysql - Type: MySQL
- Host:
localhost - Database:
icinga - User:
icingauser
- Resource Name:
Command Transport
- Commands to Icinga 2 will be sent via API:
- Host:
51.89.69.203 - Port:
5665 - Username:
root
(You can replace this later with a limited API user for better security.)
- Host:
Monitoring Security
- Protected custom variables:
*pw*,*pass*,community
What to Do Now:
- Review all the configuration settings shown.
- If everything looks good, click “Finish”.
- After clicking “Finish”, the system will write all configurations and finalize the setup. You’ll be redirected to the Icinga Web 2 login or dashboard.
You can always modify settings later via the web interface or config files.
Perfect! Here’s the final step explained for your Icinga Web 2 setup completion screen:
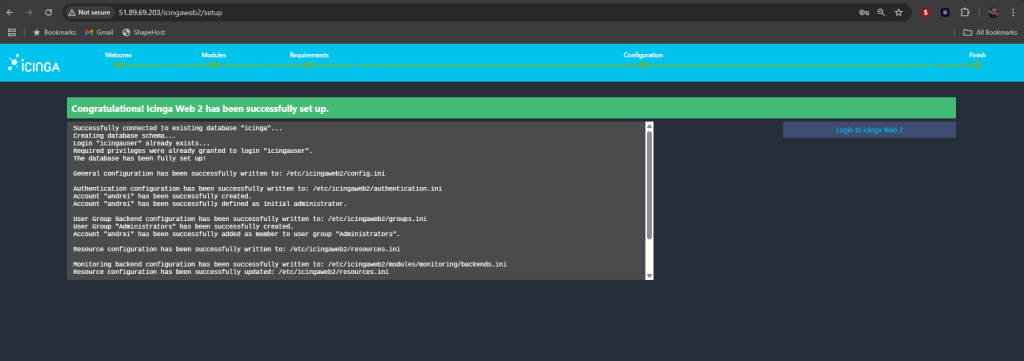
Final Confirmation – Setup Successful
You’ve reached the end of the Icinga Web 2 installation wizard, and everything has been correctly configured!
Success Messages:
- The database connection was successful and the schema was created or confirmed.
- The user
icingauseralready existed and had the necessary privileges. - Admin account
andreiwas created and assigned to the “Administrators” group. - All configuration files were successfully written:
/etc/icingaweb2/config.ini/etc/icingaweb2/authentication.ini/etc/icingaweb2/groups.ini/etc/icingaweb2/resources.ini/etc/icingaweb2/modules/monitoring/backends.ini
What to Do Next:
Click the “Login to Icinga Web 2” button on the right side of the screen to enter your credentials and access the dashboard.
- Username:
andrei - Password: (the one you set earlier)
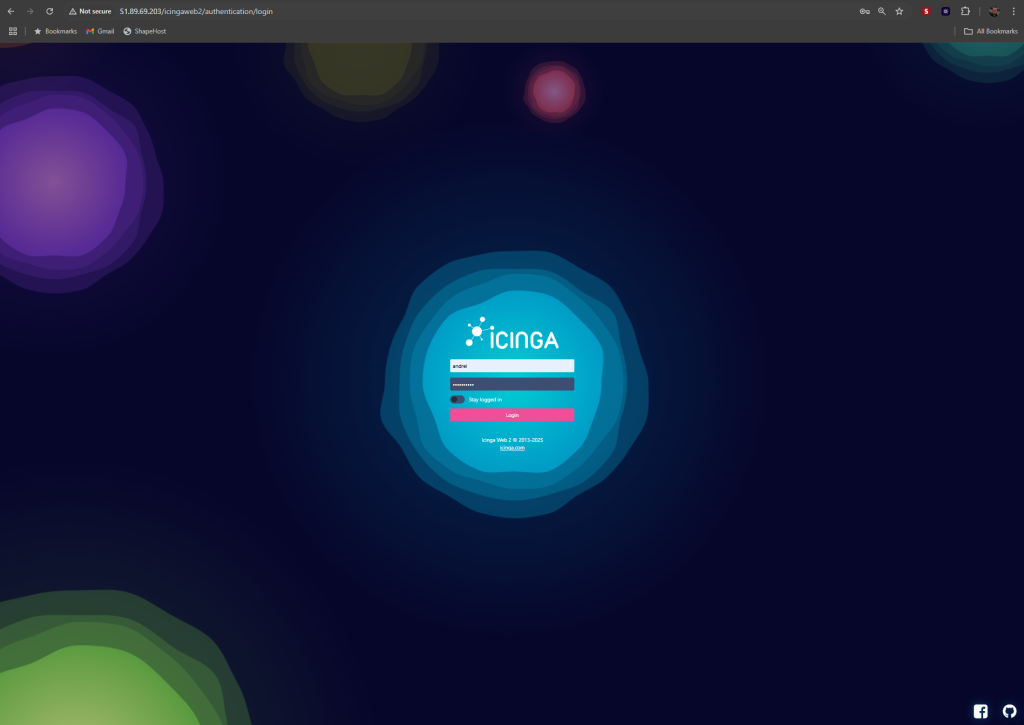
Final Step: Icinga Web 2 Login Screen
You’ve officially reached the login page — your installation was successful!
What to Do Now:
- Username:
Enter the admin account you created during setup.Example:andrei - Password:
Enter the password you chose for this user. - (Optional) Check the “Stay logged in” box if you’re on a secure system and want to maintain your session.
- Click the “Login” button (highlighted in pink).
After logging in, you’ll land in the Icinga Web 2 dashboard, where you can:
- View monitoring stats
- Add new hosts/services
- Configure users and permissions
- Set up notifications
- Customize dashboards
This deployment runs perfectly on a Shape.Host Cloud VPS. Get high-speed storage, full root access, and reliable support to deploy your monitoring solutions today.
➔ Start your VPS on Shape.Host