What is OpenCart?
OpenCart is a free, open-source eCommerce platform built with PHP and MySQL. It enables users to build and manage online stores with a user-friendly interface, powerful extensions system, and support for multiple languages, currencies, and payment gateways.
Running OpenCart on Ubuntu 24.04 offers a secure, stable, and high-performance environment for hosting an eCommerce site, thanks to Ubuntu’s modern LTS (Long-Term Support) foundation.
Key Features of OpenCart
User-Friendly Admin Panel
- Intuitive dashboard to manage products, categories, orders, customers, and reports.
- Support for multiple administrators with role-based permissions.
Multi-Store & Multi-Language Support
- Run multiple stores from a single admin interface.
- Support for multi-language and multi-currency setups.
Extensions Marketplace
- Thousands of free and paid modules, themes, and plugins via the OpenCart Marketplace.
- Easily extend functionality for SEO, payment, shipping, marketing, and more.
Responsive Themes
- Built-in and third-party responsive templates for mobile-ready design.
- Customizable layout and design via template editing.
Payment and Shipping Integrations
- Supports major payment gateways: PayPal, Stripe, Square, Authorize.Net, and others.
- Multiple shipping options including flat rate, weight-based, and integrations with DHL, FedEx, UPS, etc.
Reports and Analytics
- Built-in reports for sales, products, customers, and marketing.
- Integration with Google Analytics.
SEO & Marketing Tools
- Friendly URLs, meta titles, and descriptions.
- Built-in support for discount codes, gift vouchers, and affiliate programs.
Why Use OpenCart on Ubuntu 24.04?
Ubuntu 24.04 offers several benefits for hosting OpenCart:
- LTS (Long-Term Support) until 2029
- Support for modern PHP versions (e.g., PHP 8.2)
- Improved systemd, AppArmor, and security patches
- Smooth integration with Apache, Nginx, MariaDB/MySQL, and Let’s Encrypt SSL
- Ideal for cloud deployments, VPS, or bare-metal servers
System Requirements for OpenCart on Ubuntu 24.04
| Component | Minimum Requirement |
|---|---|
| Web Server | Apache or Nginx |
| PHP Version | PHP 8.0 or 8.2 (recommended) |
| PHP Extensions | curl, zip, gd, mbstring, xml, intl, bz2, mysqli, openssl |
| Database | MySQL or MariaDB (5.7+/10.4+) |
| Disk Space | 300 MB (OpenCart files), more for product media |
| RAM | 1 GB minimum (2+ GB recommended) |
Typical OpenCart Stack on Ubuntu 24.04
- Web Server: Apache or Nginx
- Database: MySQL or MariaDB
- Language: PHP 8.2 with required extensions
- SSL: Let’s Encrypt via Certbot
- Optional Tools: Redis, Varnish, UFW (firewall), ModSecurity (WAF)
Use Cases of OpenCart
- Small to medium-sized online shops or boutiques
- Multilingual, multicurrency stores for global selling
- Dropshipping or B2B catalogs
- Custom stores with extensions (loyalty, marketing, POS systems)
Pros of Using OpenCart
- Completely free and open-source
- Large ecosystem of themes and extensions
- Easy to use, even for non-technical users
- Lightweight and resource-efficient compared to Magento
- Active community support and developer-friendly API
Cons
- Requires manual setup and maintenance
- Not as feature-rich out of the box as Shopify or WooCommerce
- Performance optimization needed for large stores
- Some advanced features are only available via paid extensions
- Lacks a built-in page builder (requires third-party modules)
Security Best Practices on Ubuntu 24.04
- Use strong passwords and SSL (HTTPS)
- Set correct file permissions (
755for directories,644for files) - Keep OpenCart and all extensions up to date
- Disable unused PHP functions and modules
- Configure firewall (UFW) and fail2ban for brute-force protection
- Consider mod_security or other WAFs
OpenCart on Ubuntu 24.04 is a powerful and flexible solution for creating online stores of all sizes. With its modern UI, wide extension ecosystem, and compatibility with major payment and shipping services, OpenCart provides a cost-effective and open-source alternative to proprietary platforms.
Ubuntu 24.04 enhances this setup with cutting-edge security, performance, and long-term support, making it an ideal base for both personal eCommerce projects and commercial deployments.
Step 1: Create a Cloud VPS with Shape.Host
To start, deploy a clean server:
Go to https://shape.host and log in.
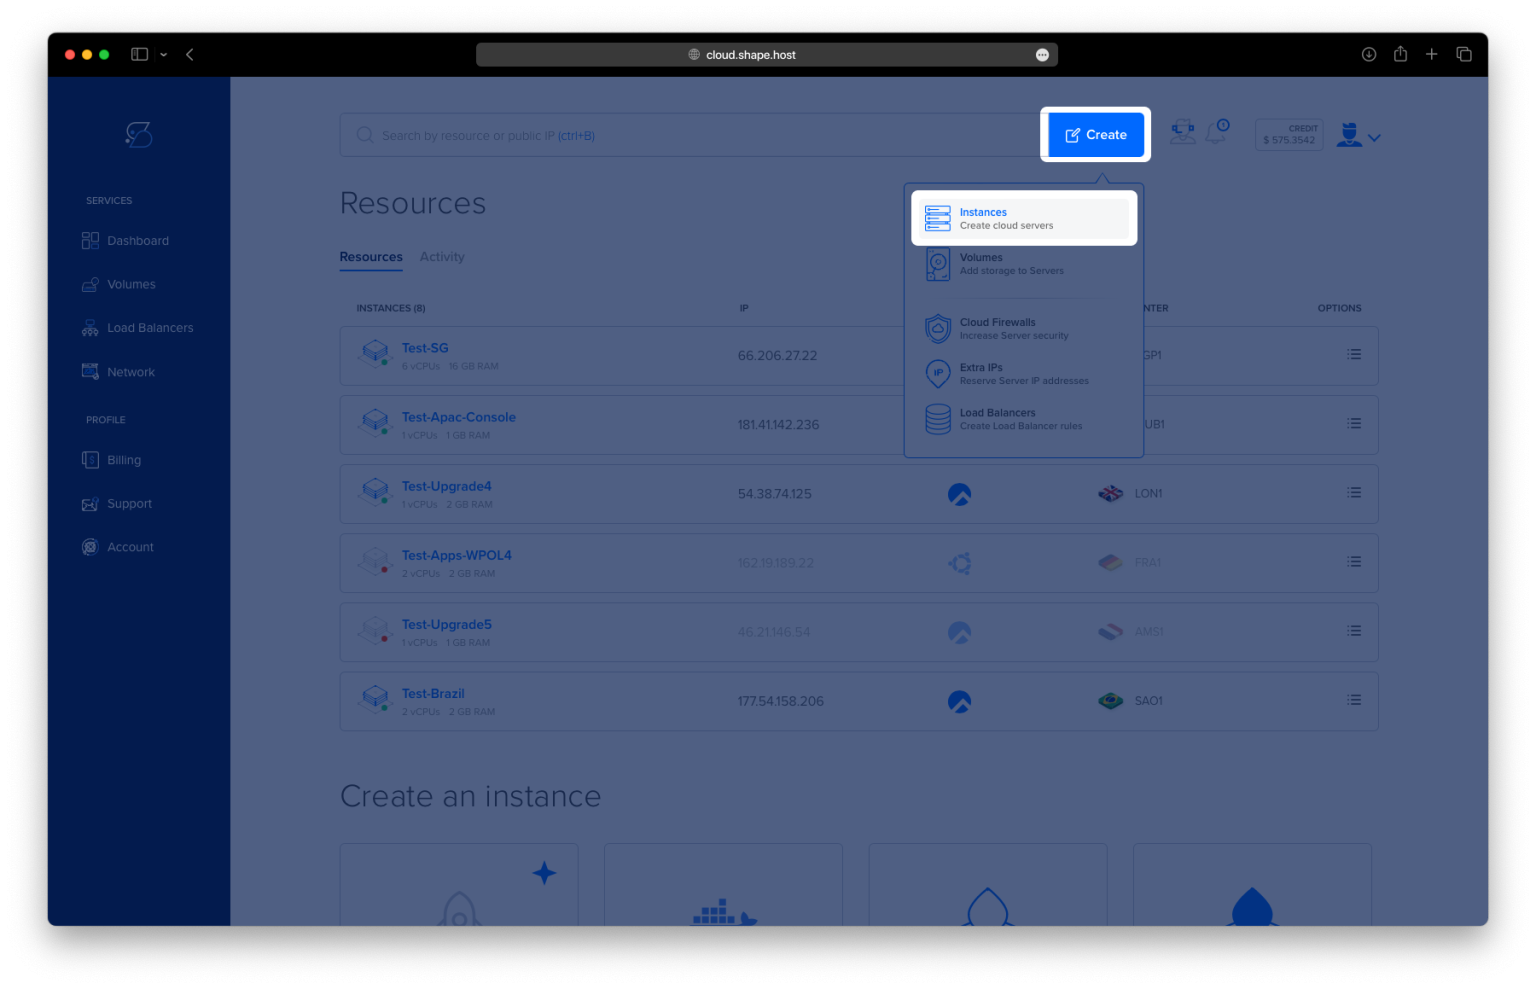
Click “Create”.
Choose Instance.

Choose your preferred server location.

Select Ubuntu 24.04 (64-bit) as your OS.
Pick a plan with at least 2 CPUs, 4 GB RAM, and 20 GB SSD.

Click Create Instance.

Find your instance’s IP address under the Resources section and use it to access your server.

Step 2: Connect to your server
ssh root@your_server_ip
This gives you root terminal access to the VPS.
Step 3: Update the package index
apt update
Prepares your server to install the latest available packages.

Step 4: Install Apache
apt install apache2
Installs the Apache HTTP web server.

Step 5: Start and enable Apache
systemctl start apache2
systemctl enable apache2
systemctl status apache2
Starts the web server and ensures it runs on every reboot.

Step 6: Install MariaDB (MySQL-compatible)
apt install mariadb-server
MariaDB is the database system OpenCart will use.

Step 7: Start and enable MariaDB
systemctl start mariadb
systemctl enable mariadb
systemctl status mariadb
Activates the database server and sets it to run at startup.

Step 8: Set up the OpenCart database
mariadb
Inside the MariaDB shell, run:
CREATE DATABASE opencartdb CHARACTER SET utf8mb4 COLLATE utf8mb4_general_ci;
CREATE USER opencartdbuser@localhost IDENTIFIED BY 'your-password';
GRANT ALL ON opencartdb.* TO opencartdbuser@localhost WITH GRANT OPTION;
FLUSH PRIVILEGES;
exit
This creates the database, user, and grants access.

Step 9: Install PHP and required extensions
apt install php libapache2-mod-php php-intl php-mysql php-curl php-cli php-zip php-xml php-gd php-common php-mbstring php-xmlrpc php-json php-sqlite3 php-soap php-zip
These PHP modules are necessary for OpenCart to function properly.

Step 10: Download and unzip OpenCart
cd /tmp
wget https://github.com/opencart/opencart/releases/download/4.0.2.3/opencart-4.0.2.3.zip
apt install unzip
unzip opencart-4.0.2.3.zip
Downloads and extracts the latest OpenCart release.

Step 11: Move OpenCart files to your web directory
mv opencart-*/upload/ /var/www/opencart
Places OpenCart in Apache’s web root directory.
Step 12: Copy default config files
cp /var/www/opencart/config-dist.php /var/www/opencart/config.php
cp /var/www/opencart/admin/config-dist.php /var/www/opencart/admin/config.php
These files are needed to configure the app during setup.
Step 13: Set file permissions
chown -R www-data:www-data /var/www/opencart
Gives Apache ownership of the files so it can serve them correctly.

Step 14: Configure Apache virtual host
nano /etc/apache2/sites-available/opencart.conf
Paste the following:
<VirtualHost *:80>
  ServerName your-domain.com
  ServerAdmin contact@shape.host
  DocumentRoot /var/www/opencart

  <Directory /var/www/opencart/>
       Options FollowSymlinks
       AllowOverride All
       Require all granted
  </Directory>

  ErrorLog ${APACHE_LOG_DIR}/error.log
  CustomLog ${APACHE_LOG_DIR}/access.log combined
</VirtualHost>
Replace ServerName and ServerAdmin with your actual server IP and email if needed.

Step 15: Enable the site and mod_rewrite
a2ensite opencart.conf
a2enmod rewrite
This activates your site and allows OpenCart-friendly URLs.
Step 16: Restart Apache
systemctl restart apache2
Applies the new configuration.
Step 17: Remove the installer directory
rm -rf /var/www/opencart/install/
This should be done after completing the web-based setup for security.
Step 18: Finish setup in the browser
Go to:
http://your_server_ip
Follow the installer interface to finalize your OpenCart store.

An OpenCart installation wizard page should appear. Ensure all requirements are met and continue.

Next, enter the database name, create an account and password, and continue.

Your OpenCart site should be set up and ready to use.

You’ve installed OpenCart 4.0.2.3 with Apache, PHP, and MariaDB on Ubuntu 24.04, using real-world, working commands from your setup.
This guide was created for Shape.Host users. With Shape.Host, you get:
- Instant Linux SSD VPS setup
- Full root access
- Great speed and uptime for eCommerce platforms like OpenCart