UFW (Uncomplicated Firewall) is a user-friendly firewall management tool for Linux systems, particularly designed to simplify the use of iptables. It is the default firewall configuration tool for Ubuntu and many other Debian-based distributions, providing an intuitive way to manage firewall rules without dealing with complex iptables commands.
Key Features of UFW
- Simple Command-Line Interface
- Allows users to enable, disable, and configure firewall rules easily.
- IPv4 & IPv6 Support
- Manages firewall rules for both IPv4 and IPv6 traffic.
- Default Deny Policy
- By default, UFW blocks all incoming traffic and allows outgoing traffic, enhancing security.
- Application Profiles
- Pre-configured rules for common applications like OpenSSH, Apache, and Nginx.
- Port and Protocol Control
- Supports rule configuration for TCP and UDP ports to allow or deny traffic.
- Logging and Monitoring
- Provides logs for tracking network activity and blocked requests.
- Rate Limiting and Flood Protection
- Helps prevent brute-force attacks and excessive connection attempts.
- GUI Support with GUFW
- GUFW (Graphical Uncomplicated Firewall) offers a user-friendly graphical interface for UFW management.
Advantages of UFW
- Ease of Use: Designed to simplify firewall rule management.
- Lightweight & Efficient: Uses iptables backend with minimal system overhead.
- Secure Default Configuration: Blocks unwanted traffic while allowing essential outbound connections.
- Customizable Rules: Supports custom rules for advanced users.
- Integration with Applications: Works seamlessly with SSH, web servers, and containerized environments.
What You Can Do with UFW
- Secure Your Linux Server
- Control incoming and outgoing traffic to prevent unauthorized access.
- Allow or Deny Specific Ports
- Define rules for services like SSH (22), HTTP (80), HTTPS (443), and MySQL (3306).
- Protect Against Brute-Force Attacks
- Use rate-limiting to mitigate SSH and login attempts.
- Manage Network Access for Applications
- Configure predefined profiles for Apache, Nginx, OpenVPN, and Docker.
- Monitor Firewall Logs
- Track and analyze blocked or allowed connections for security insights.
UFW vs. Other Firewalls
| Feature | UFW | iptables | Firewalld |
|---|---|---|---|
| Ease of Use | ✅ Simple CLI | ❌ Complex Syntax | ✅ Moderate GUI Support |
| Default Rules | ✅ Preconfigured | ❌ Requires Manual Setup | ✅ Default Zone-Based Policies |
| Application Profiles | ✅ Yes | ❌ No | ✅ Yes |
| Logging & Monitoring | ✅ Basic Logs | ✅ Detailed Logs | ✅ Advanced Logs |
| GUI Support | ✅ GUFW | ❌ No | ✅ Firewall-config |
UFW is ideal for beginners and system administrators looking for a straightforward yet powerful firewall solution, while iptables and firewalld provide more fine-grained control for advanced users.
Why Use UFW?
UFW is the best choice for those who need a simple yet effective firewall for securing Linux servers, desktops, and cloud environments. It provides an easy way to restrict unauthorized access, control network traffic, and protect against cyber threats without the complexity of manual iptables configurations.
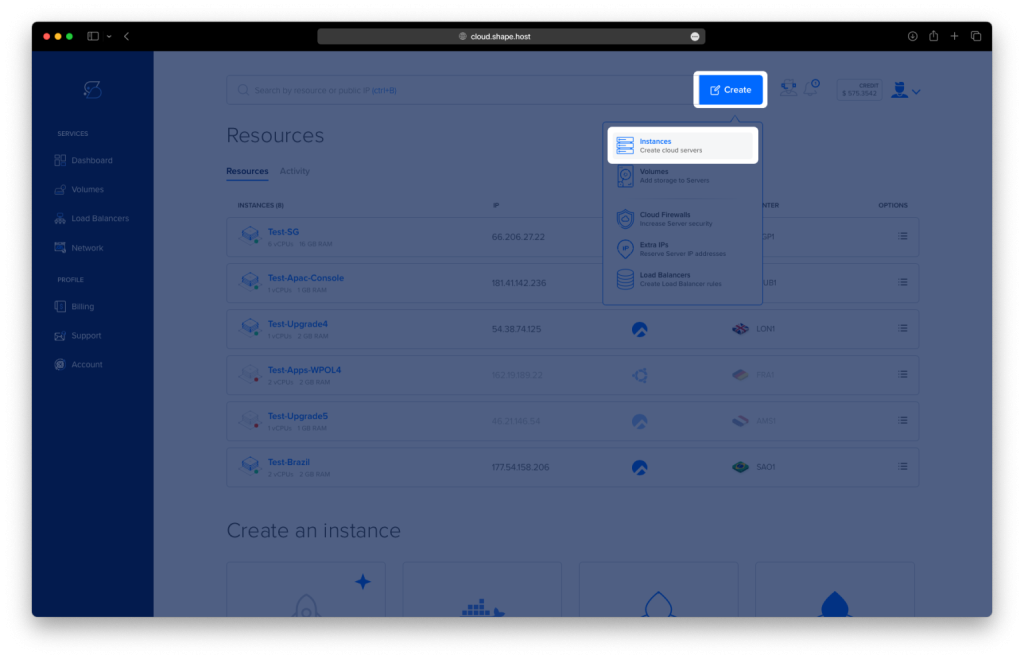
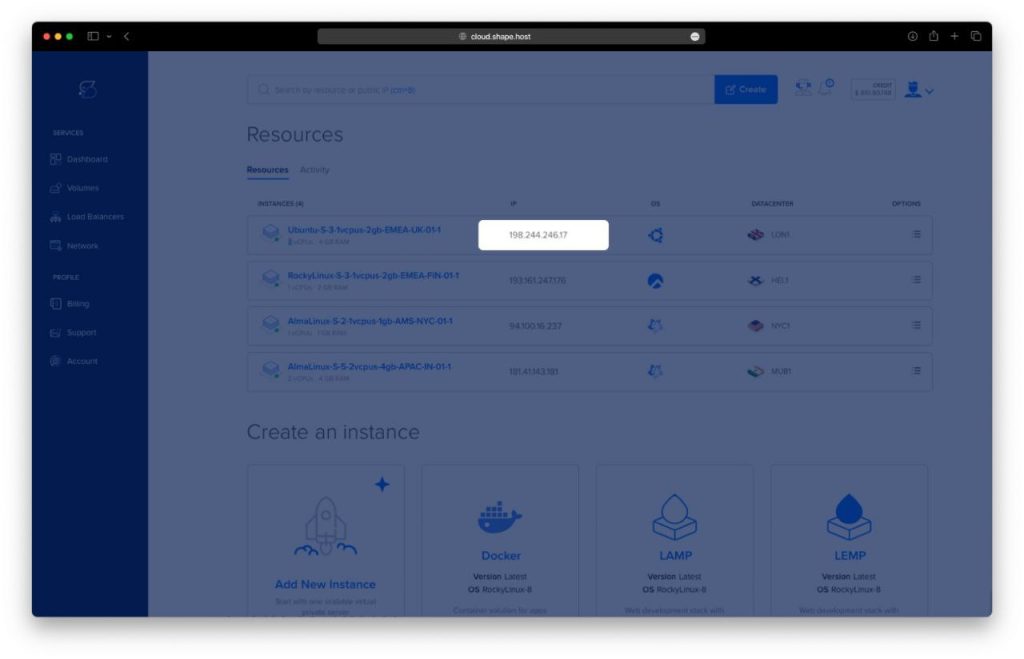
Step 1: Create a Server Instance on Shape.Host
Before setting up UFW, you need a server to host your environment. Here’s how to set up a server instance on Shape.Host:
Access Shape.Host: Log in to your Shape.Host account and navigate to the Cloud VPS section.
Launch a New Server: Click on “Create Instance” and select the server type that best suits your project requirements.
Choose a Data Center: Pick a data center location that is closest to your target audience for optimal performance.
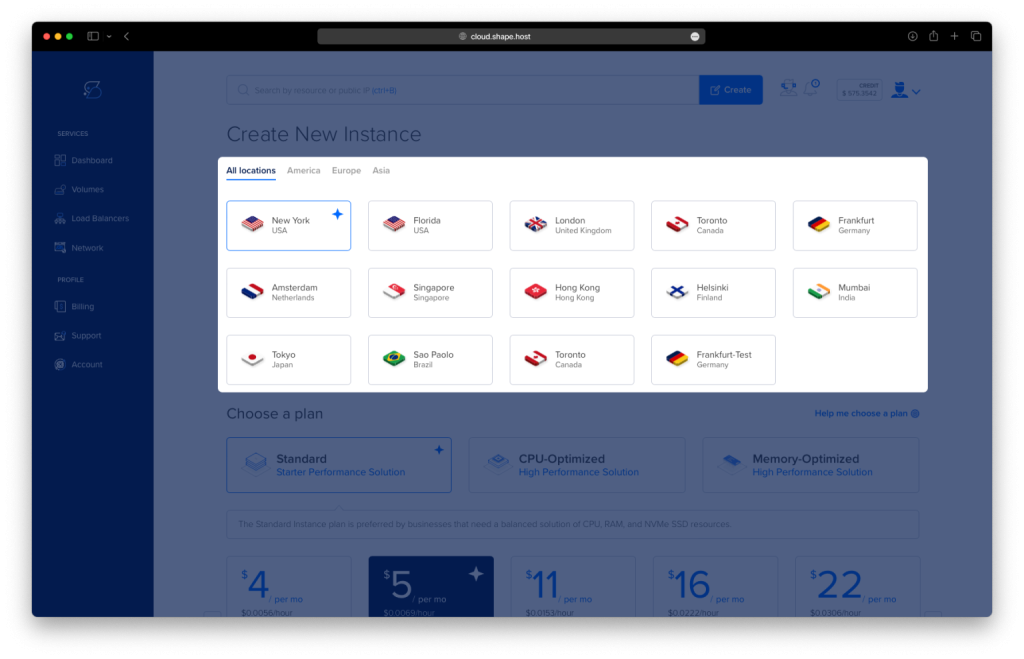
Select a Plan: Choose a hosting plan that aligns with your resource needs and budget.
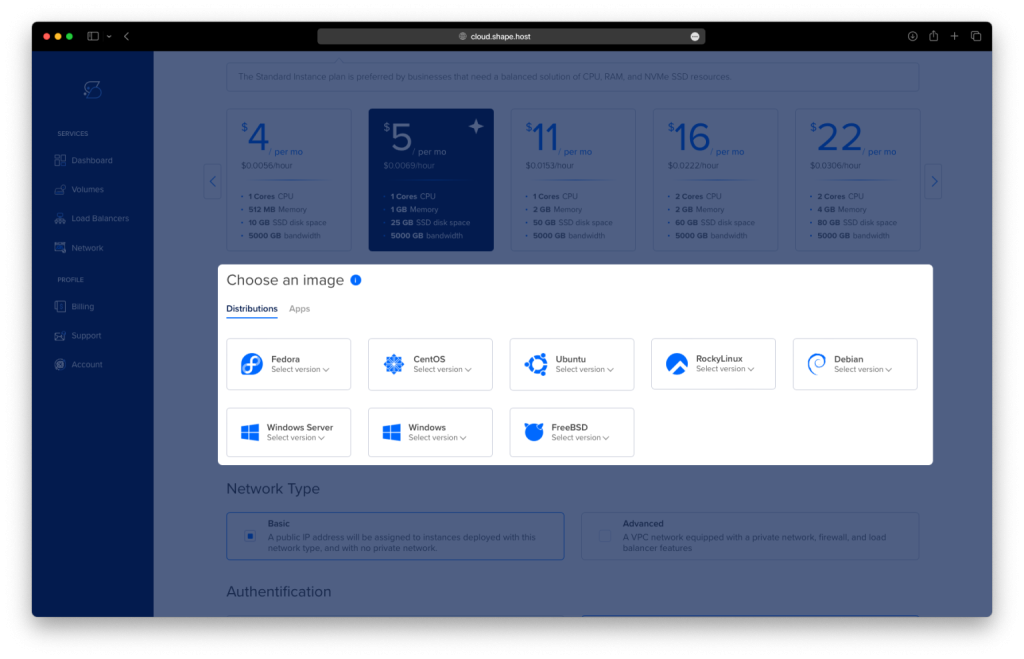
Set the OS: Select Ubuntu 24.04 as your operating system.
Finalize the Setup: Review your configuration and click “Create Instance” to deploy your instance. Your server will be ready in a few minutes.
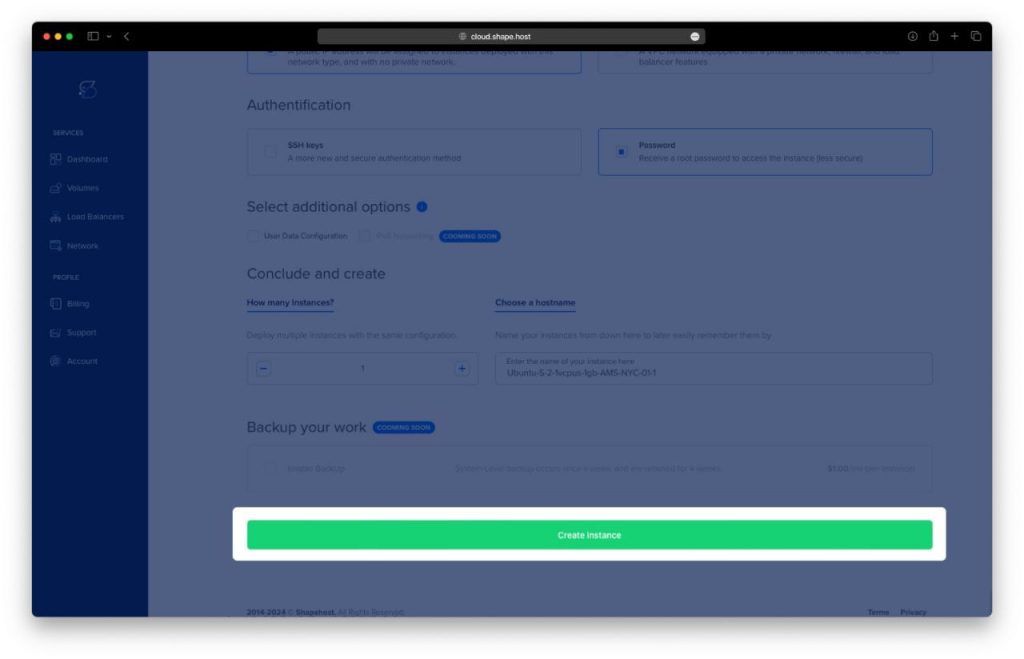
Find your instance’s IP address under the Resources section and use it to access your server.
Step 2: Connect to Your Instance
Once your server is ready, you need to connect to it using SSH. Here’s how to do it:
- Linux/macOS: Open your terminal and use the following command:
ssh root@your_server_ipReplace your_server_ip with the server’s IP address.
- Windows: Use an SSH client like PuTTY. Enter your server’s IP address, specify the port (usually 22), and click “Open.” Log in with your username and password.
Step 3: Update the System
Before installing or configuring any software, it’s a good practice to update your system to ensure all packages are up to date. Run the following command:
apt update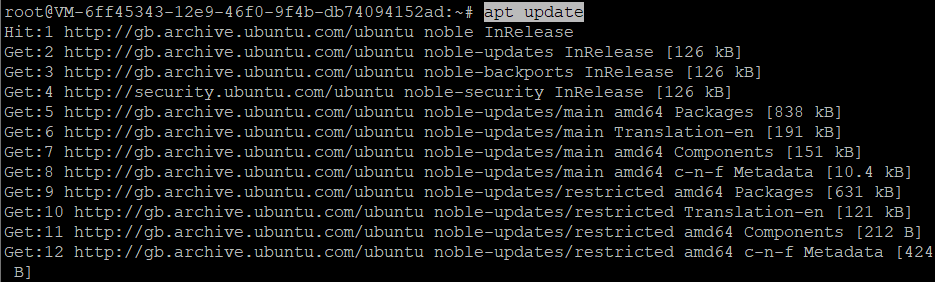
Step 4: Check UFW Status
Check the current status of UFW to see if it is active or inactive:
ufw statusIf UFW is inactive, you will see a message indicating that the firewall is not enabled.

Step 5: Set Default Policies
Set the default policies for incoming and outgoing traffic. It’s generally a good idea to allow outgoing traffic and deny incoming traffic by default:
ufw default allow outgoing
ufw default deny incoming
Step 6: Enable IPv6 Support
UFW supports IPv6, but you need to ensure it is enabled in the configuration file. Check the current IPv6 settings:
grep IPV6 /etc/default/ufw
If IPv6 is not enabled, open the configuration file:
nano /etc/default/ufwEnsure the following line is present and set to yes:
IPV6=yesSave and close the file.

Step 7: Allow SSH Access
To avoid locking yourself out of the server, allow SSH access before enabling the firewall:
ufw allow sshYou can also specify a custom SSH port if you have changed the default SSH port (22):
ufw allow 1222/tcpTo protect against brute-force attacks, you can limit SSH connections:
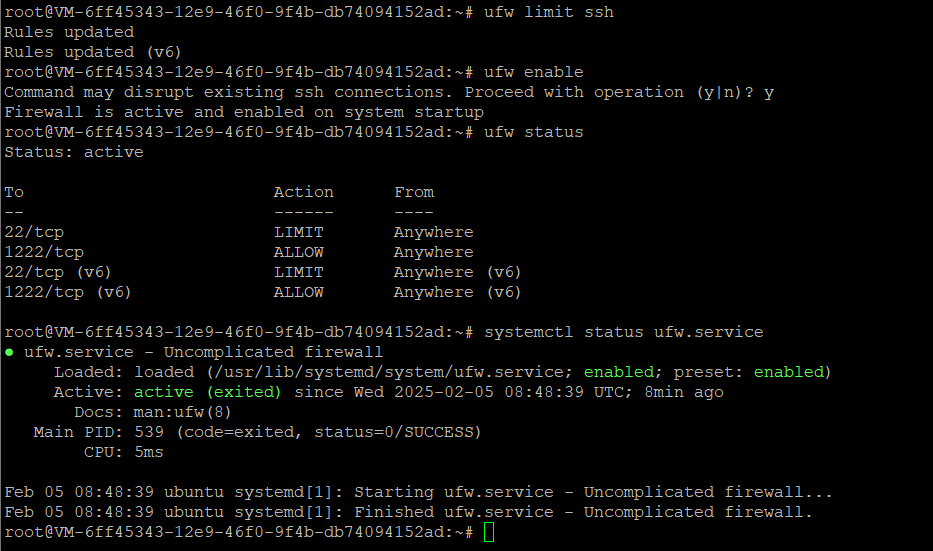
ufw limit ssh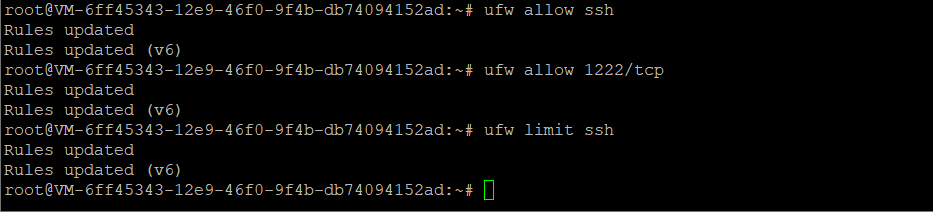
Step 8: Enable UFW
Once you have configured the basic rules, enable UFW:
ufw enableConfirm that UFW is active by checking its status:
ufw statusYou should see a list of allowed and denied rules.
Step 9: Allow Additional Ports
Depending on your server’s requirements, you may need to allow additional ports. For example, to allow HTTP and HTTPS traffic:
ufw allow 80/tcp comment 'Allow Apache HTTP'
ufw allow 443/tcp comment 'Allow Apache HTTPS'
You can also allow a range of ports for specific applications:
ufw allow 3000:3200/tcp
ufw allow 7000:8000/udp
Step 10: Manage UFW Rules
To view a numbered list of UFW rules:
ufw status numbered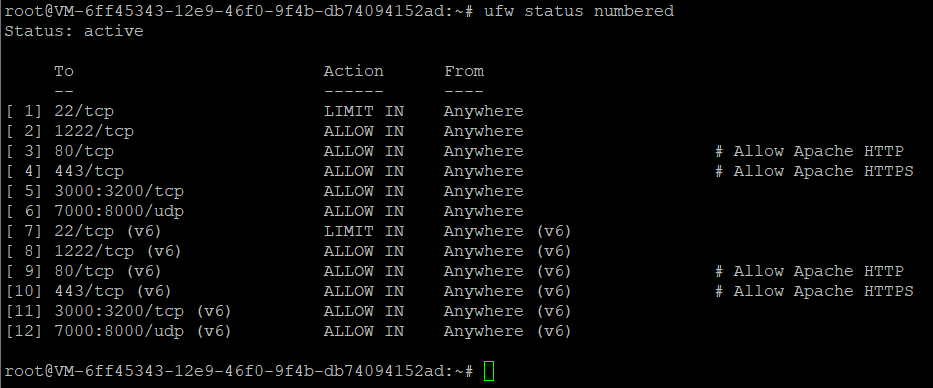
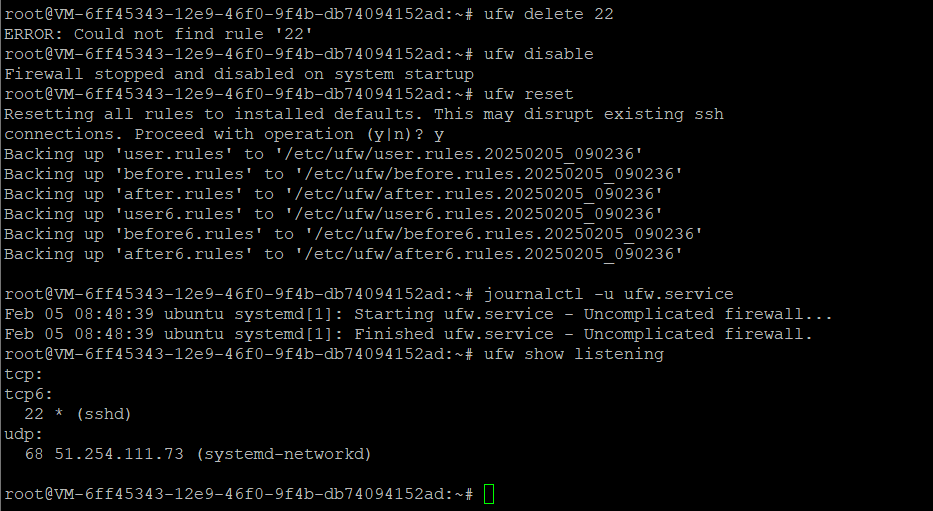
If you need to delete a rule, use the following command, replacing <rule_number> with the appropriate number:
ufw delete <rule_number>For example, to delete the rule allowing SSH on port 22:
ufw delete 22Step 11: Disable or Reset UFW
If you need to temporarily disable UFW:
ufw disableTo reset UFW to its default settings, including removing all rules:
ufw resetStep 12: Monitor UFW Logs
To monitor UFW logs and troubleshoot issues, use the following command:
journalctl -u ufw.serviceThis will display the logs related to the UFW service.
Step 13: Check Listening Ports
To see which ports are currently listening and open on your system:
ufw show listeningThis command will display a list of open ports and the services using them.
For more advanced configurations or to explore additional features, refer to the official UFW documentation.
If you’re looking for a reliable and high-performance hosting solution for your server, consider Shape.Host Cloud VPS services. With fast SSD storage, scalable resources, and excellent support, Shape.Host provides the perfect environment for running your applications securely. Visit Shape.Host to learn more and get started today!