Zabbix Server on AlmaLinux 9 – Enterprise-Grade Monitoring on a RHEL-Compatible Platform
Zabbix Server is a flexible and high-performance monitoring platform used by enterprises to gain visibility into infrastructure, applications, and services. Paired with AlmaLinux 9, a 1:1 binary-compatible replacement for RHEL 9, it becomes a rock-solid choice for building secure, scalable, and supportable monitoring environments.
AlmaLinux 9 as a Host for Zabbix
AlmaLinux 9 is designed for businesses that need long-term stability and enterprise-ready performance, making it an excellent OS base for Zabbix deployments. Key benefits include:
- 10-year support cycle, aligned with RHEL
- Linux Kernel 5.14 LTS, with support for cgroups v2 and modern namespaces
- SELinux (enforcing) by default, offering enhanced security for monitoring daemons
- Systemd v250+ for managing Zabbix services and dependencies
- dnf package manager with access to EPEL and Zabbix’s official repositories
These features allow AlmaLinux 9 to support mission-critical monitoring scenarios with minimal system volatility over time.
Zabbix Server Architecture on AlmaLinux 9
Zabbix is composed of several modular components, each supported and compatible with AlmaLinux’s system environment:
- Zabbix Server: Central collector and processor of monitoring data.
- Zabbix Agent (v1 and v2): Installed on monitored systems to send metrics.
- Zabbix Proxy (optional): Aggregates monitoring data in distributed or remote networks.
- Zabbix Frontend: Web interface built on PHP, running under Apache or NGINX.
- Database Backend: Compatible with PostgreSQL 13+, MySQL/MariaDB, or Oracle.
All Zabbix services on AlmaLinux are managed via systemd, and can be tightly integrated with system security and logging features.
Key Capabilities of Zabbix on AlmaLinux 9
| Capability | Description |
|---|---|
| Multi-protocol support | Agent, SNMP, IPMI, JMX, HTTP, scripts |
| Auto-discovery | Dynamic network scanning and service mapping |
| Built-in alerting | Escalations, acknowledgments, and recovery actions |
| Historical data storage | Metrics, trends, and event logs in SQL-based backends |
| Template-based configs | Apply standardized monitoring logic using macros and templates |
| Distributed monitoring | Proxies for scaling across locations or secure zones |
| Visualization tools | Maps, dashboards, charts, and SLA tracking |
With AlmaLinux 9, Zabbix runs securely and efficiently, benefiting from the same kernel and system stack used in many RHEL-certified environments.
Enterprise Use Cases
Zabbix on AlmaLinux 9 is widely used in:
- Enterprise IT monitoring: Full-stack visibility across Windows, Linux, networking, and cloud resources
- Service provider networks: Multi-tenant or high-availability deployments using proxies and partitions
- Compliance-heavy environments: Where SELinux, auditing, and hardening are required
- Hybrid clouds: Monitoring resources across on-prem and cloud (AWS, Azure, GCP) via native templates
- IoT & edge devices: Lightweight Zabbix agents or SNMP-based monitoring from proxies
Performance and Scalability
AlmaLinux 9’s RHEL-based kernel offers low-latency I/O and consistent process behavior, ideal for Zabbix Server’s resource-intensive data collection. Key tuning options include:
| Area | Optimization Example |
|---|---|
| Database | Use PostgreSQL 15 or tuned MariaDB for large datasets |
| Poller/Trapper config | Adjust StartPollers, StartTrappers, CacheSize, etc. |
| Frontend | Use PHP 8.1+ with OPcache for faster web GUI response |
| Logging | Direct integration with journald, or configure syslog/auditd |
For high-load environments, Zabbix on AlmaLinux supports distributed architecture with proxies, frontend clustering, and database partitioning.
Security Features
AlmaLinux 9 provides enterprise-class security tools out of the box. Zabbix integrates seamlessly with:
| Security Tool | Benefit to Zabbix |
|---|---|
| SELinux (enforcing) | Limits daemon access to only required resources |
| Firewalld | Zones and port filtering for agent/server (10050, 10051) communication |
| OpenSCAP & FIPS mode | Compliance auditing and cryptographic hardening |
| Auditd | Detailed logging of configuration and runtime activity |
| TLS + PSK support | Encrypt communication between Zabbix components |
Rootless systemd services, encrypted agent-server communication, and strong access controls make Zabbix secure by default on AlmaLinux 9.
Comparison with Other Operating Systems
| Feature | AlmaLinux 9 | Ubuntu 24.04 | Debian 12 |
|---|---|---|---|
| Kernel Version | 5.14 (RHEL-based) | 6.8 (mainline LTS) | 6.1 (LTS) |
| Security Framework | SELinux (enforcing) | AppArmor | AppArmor |
| Support Lifecycle | 10 years | 5 years | ~5 years |
| Package Availability | RHEL + EPEL | Official Docker & PHP repos | Community APT |
| Ideal Use Case | Regulated, stable IT | DevOps & modern cloud | Lightweight & stable |
AlmaLinux 9 is best suited for organizations replacing CentOS, seeking compatibility with Red Hat tooling, or operating in compliance-bound sectors like finance, healthcare, or telecom.
Zabbix Server on AlmaLinux 9 offers a hardened, long-term supported, and performance-optimized environment for comprehensive infrastructure monitoring. It is ideal for production workloads that demand enterprise-grade security, scalability, and integration flexibility—especially in regulated or highly available environments.
If you’re building a distributed observability stack or replacing legacy monitoring systems, this combination delivers modern monitoring with traditional Linux reliability.
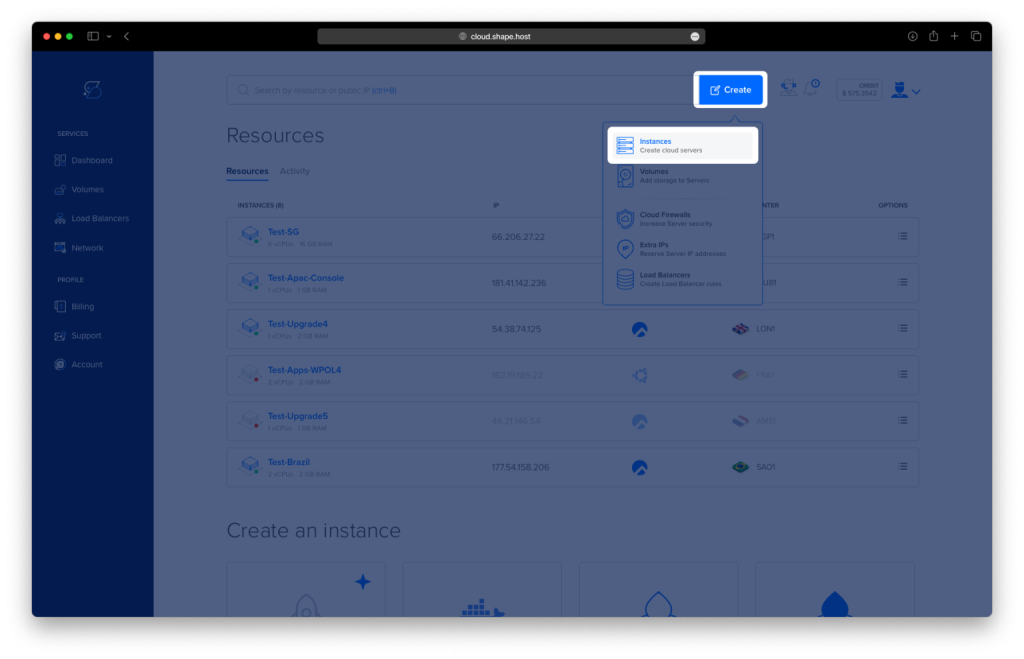
Step 1: Set Up a Server Instance on Shape.Host
To begin, provision a clean AlmaLinux 9 VPS. Shape.Host provides fast, SSD-based virtual servers perfect for running enterprise monitoring tools like Zabbix.
Create an Instance:
Go to https://shape.host and log in.
Click “Create” in the dashboard.
Select “Instance”.
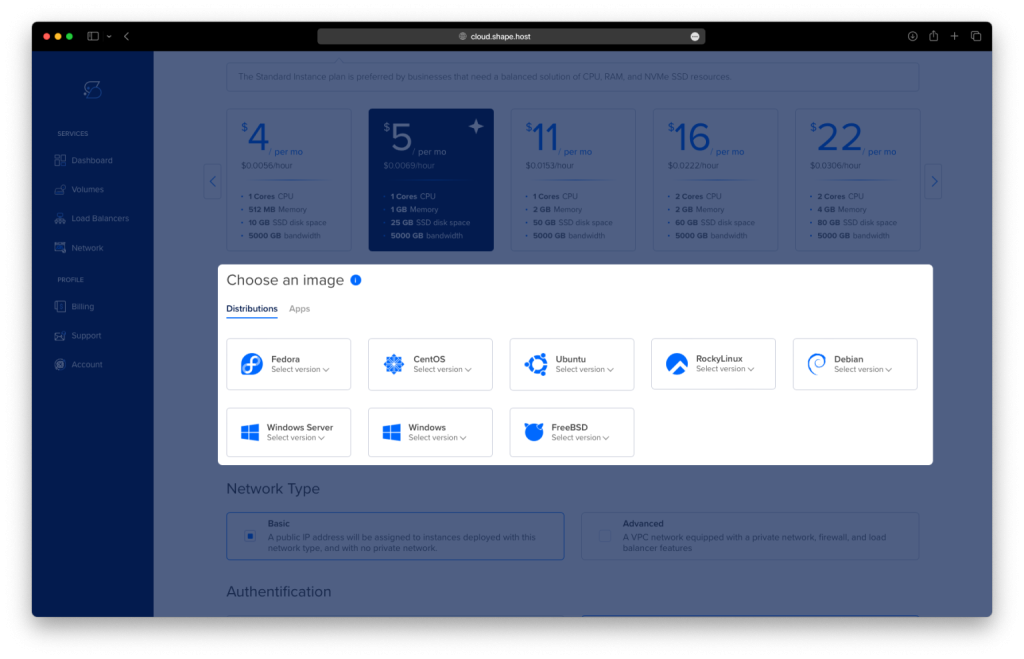
Pick a server location.

Plan with at least 2 CPUs, 2 GB RAM, and 20 GB SSD.
Choose AlmaLinux 9 (64-bit) as the OS.
Finalize by clicking “Create Instance”.
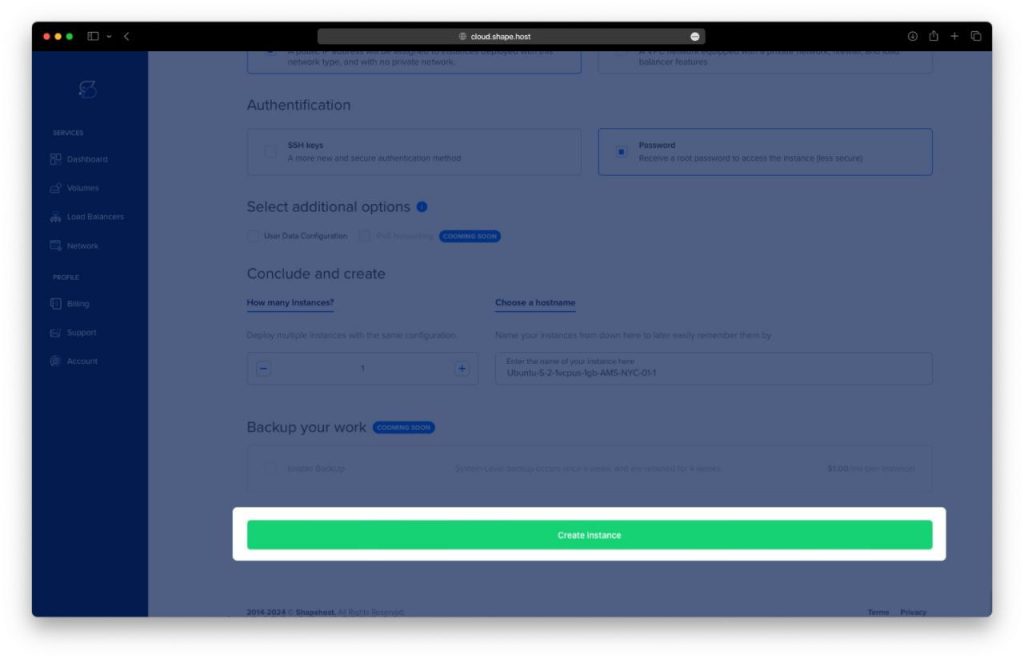
Copy your VPS’s IP address from the Resources tab.

Connect via SSH
On Linux/macOS:
ssh root@your_server_ip
On Windows (using PuTTY):
- Download PuTTY.
- Enter your server’s IP in the Host Name field.
- Use port
22and select SSH. - Click Open and log in as
root.
Step 2: Install Zabbix and Required Components
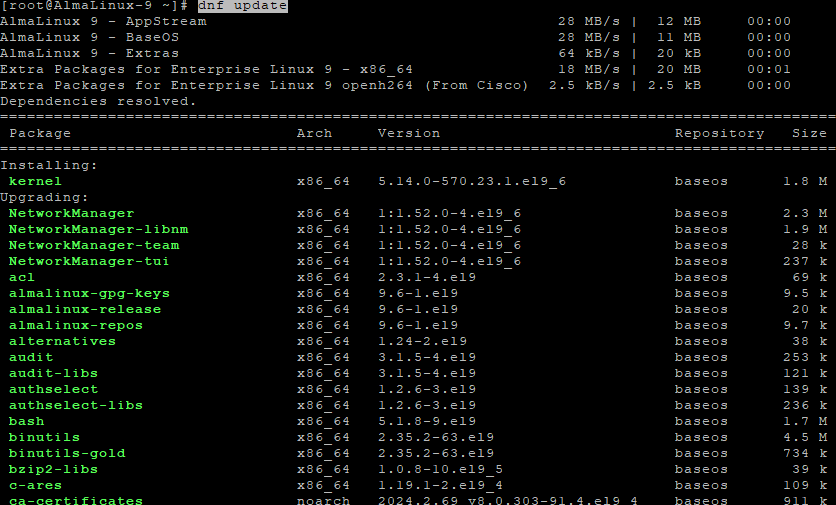
1. Update your system:
dnf update
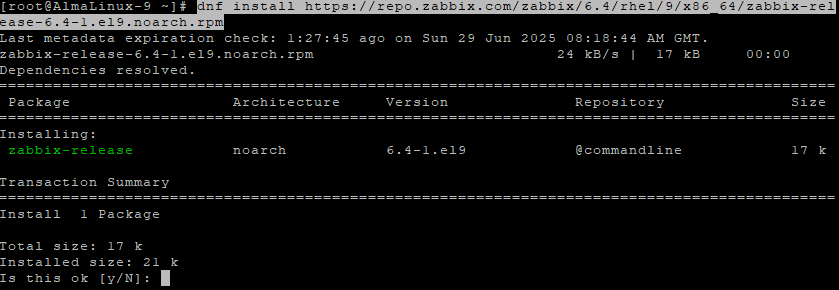
2. Add the official Zabbix repository:
dnf install https://repo.zabbix.com/zabbix/6.4/rhel/9/x86_64/zabbix-release-6.4-1.el9.noarch.rpm
3. Disable EPEL temporarily to avoid conflicts:
dnf config-manager --set-disabled epel
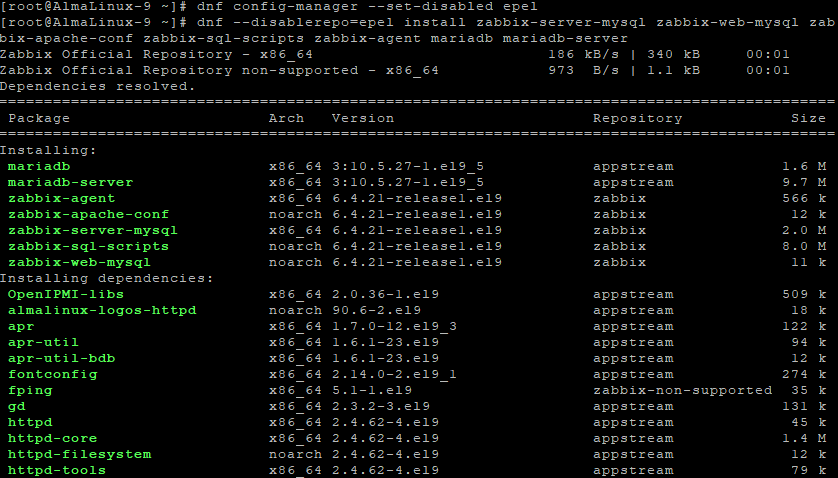
4. Install Zabbix server, frontend, agent, and MariaDB:
dnf --disablerepo=epel install zabbix-server-mysql zabbix-web-mysql zabbix-apache-conf zabbix-sql-scripts zabbix-agent mariadb mariadb-server
Step 3: Configure MariaDB
1. Start and enable MariaDB:
systemctl enable --now mariadb

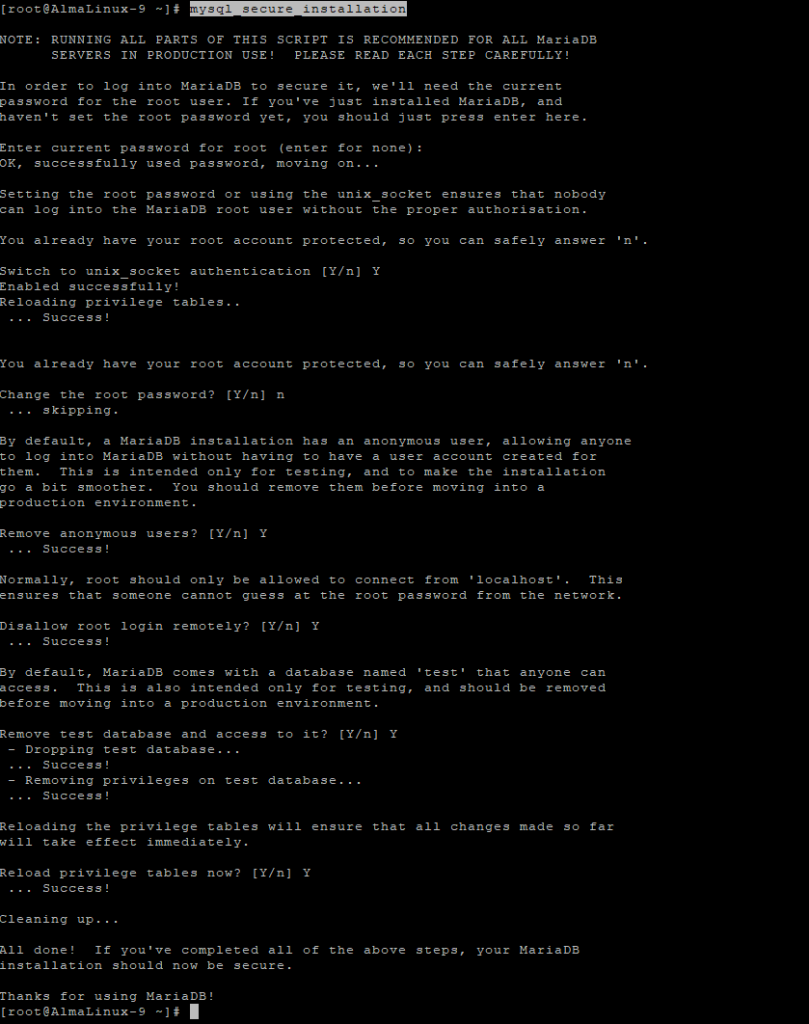
2. Secure MariaDB:
mysql_secure_installation
3. Create the Zabbix database and user:
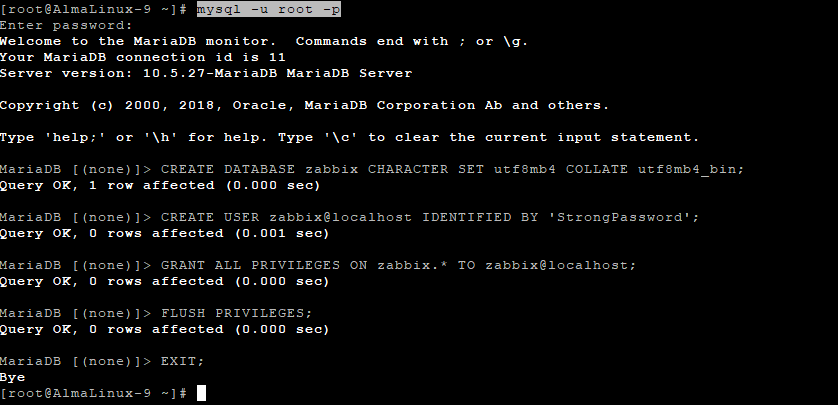
mysql -u root -p
Then run:
CREATE DATABASE zabbix CHARACTER SET utf8mb4 COLLATE utf8mb4_bin;
CREATE USER zabbix@localhost IDENTIFIED BY 'StrongPassword';
GRANT ALL PRIVILEGES ON zabbix.* TO zabbix@localhost;
FLUSH PRIVILEGES;
EXIT;
Step 4: Import the Initial Schema
Import the schema into the database:
zcat /usr/share/zabbix-sql-scripts/mysql/server.sql.gz | mysql -u zabbix -p zabbix
Enter the StrongPassword when prompted.

Step 5: Configure Zabbix Server
1. Edit the Zabbix server config:
nano /etc/zabbix/zabbix_server.conf
Set the database password:
DBPassword=StrongPassword

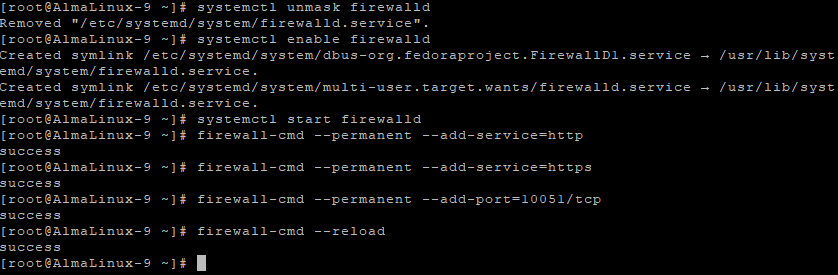
Step 6: Configure the Firewall
1. Unmask and start firewalld:
systemctl unmask firewalld
systemctl enable firewalld
systemctl start firewalld
2. Open required ports:
firewall-cmd --permanent --add-service=http
firewall-cmd --permanent --add-service=https
firewall-cmd --permanent --add-port=10051/tcp
firewall-cmd --reload
Step 7: Configure PHP for Zabbix Web Interface
Edit the PHP configuration:
nano /etc/php.ini
Find and set:
date.timezone = Europe/Bucharest

Step 8: Start and Enable Zabbix Services
1. Restart all necessary services:
systemctl restart zabbix-server zabbix-agent httpd php-fpm
2. Enable services at boot:
systemctl enable zabbix-server zabbix-agent httpd php-fpm

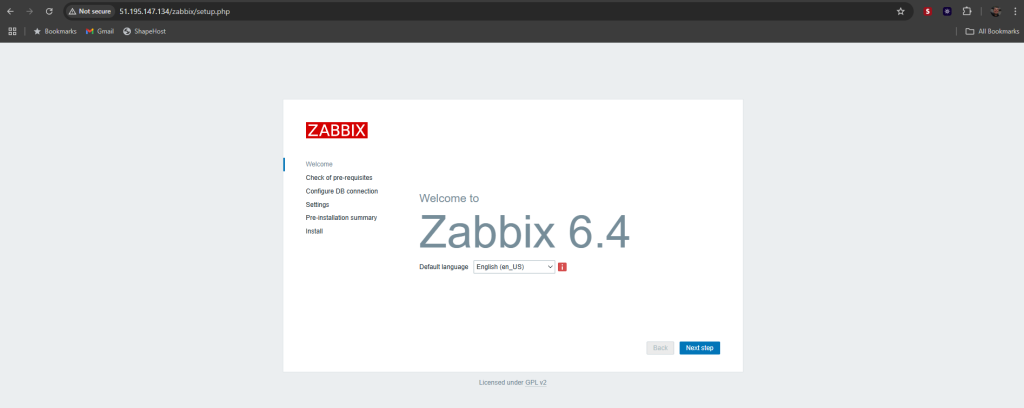
Step 9: Access Zabbix Web Installer
Open your browser and go to:
http://your-server-ip/zabbix
Follow the on-screen wizard:
- Confirm prerequisites
- Enter DB user:
zabbixand password:StrongPassword - Set timezone and server name
- Complete the installation
🧭 Zabbix Web Installer
1. Welcome
- Open in browser:
http://<your-ip>/zabbix/setup.php - Select preferred language
- Click Next step
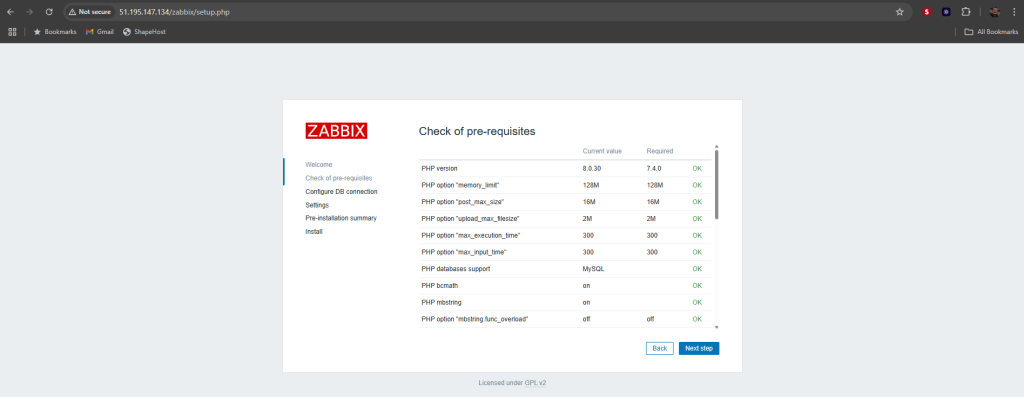
2. Check of pre-requisites
- Installer checks PHP version, extensions, limits
- Ensure everything is OK
- Click Next step
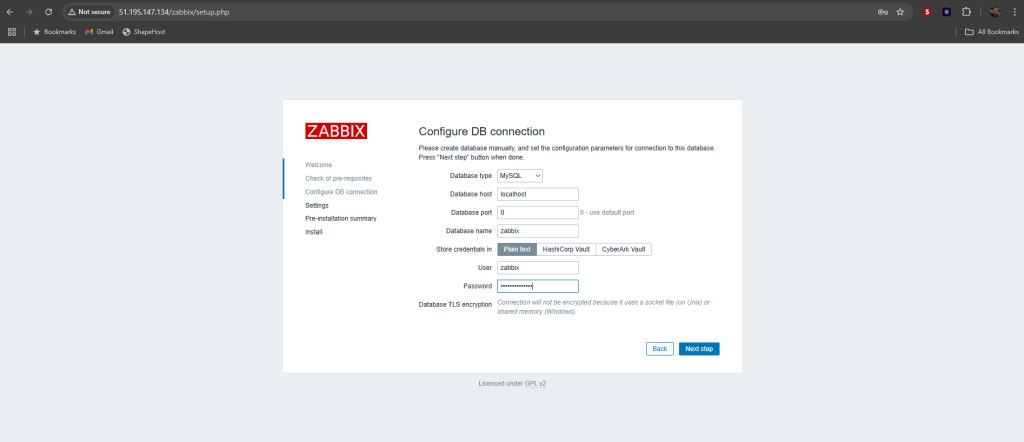
3. Configure DB Connection
- Fill in:
- Database type: MySQL/MariaDB
- Host:
localhost - Port:
0(default) - DB name:
zabbix - User:
zabbix - Password: your DB password
- Click Next step
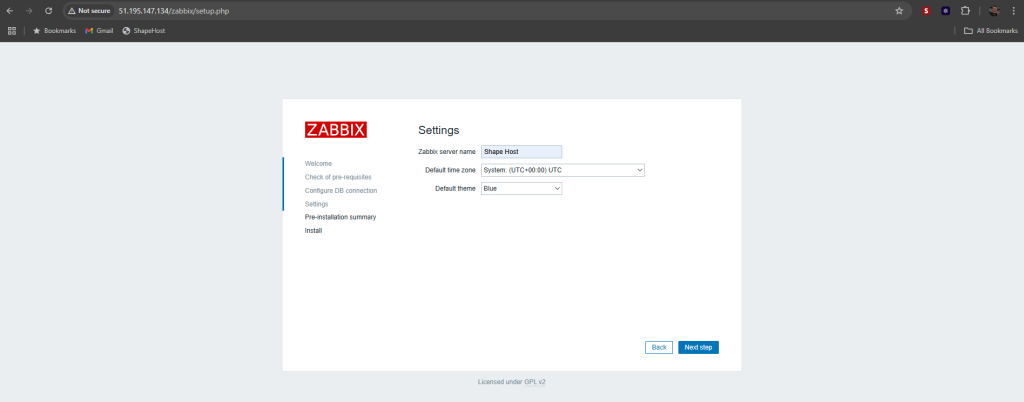
4. Settings
- Set:
- Server name (e.g.,
Zabbix Alma) - Time zone (e.g.,
Europe/Bucharest) - Theme (default is fine)
- Server name (e.g.,
- Click Next step
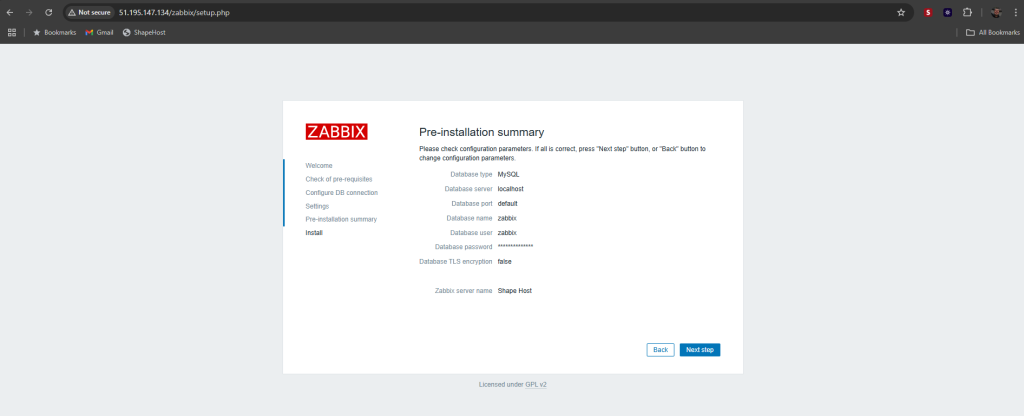
5. Pre-installation Summary
- Review all configuration values
- If everything is good → Click Next step
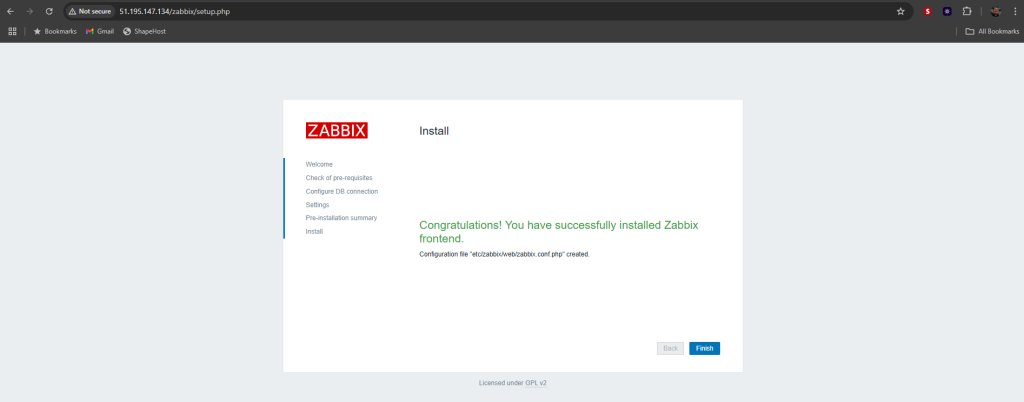
6. Install
- Installer creates the
zabbix.conf.phpconfig file - Click Finish
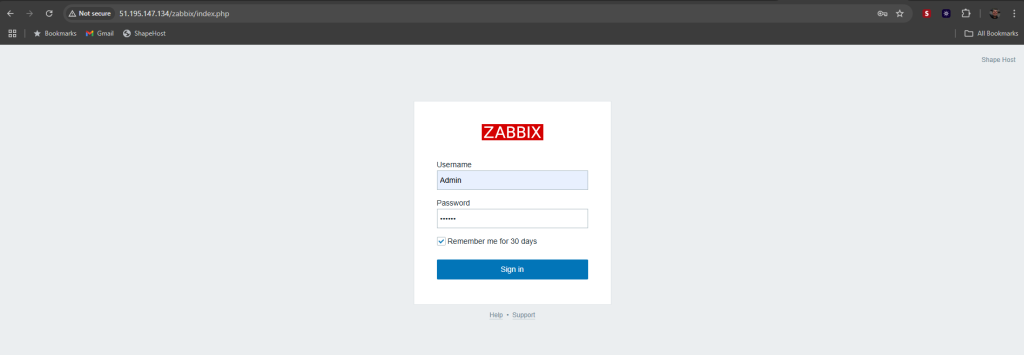
7. Login
- Username:
Admin - Password:
zabbix(default) - Remember to change the password after login
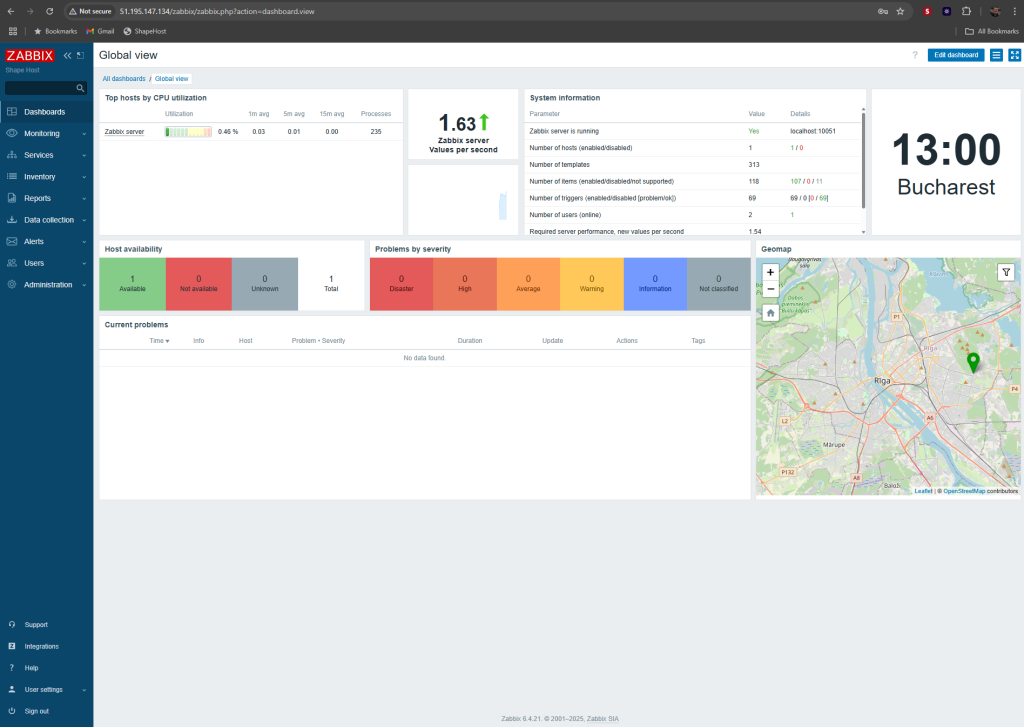
8. Dashboard
- The global view will load with CPU stats, system status, and map
- You’re ready to monitor hosts!
You’ve now installed and configured Zabbix Server 6.4 on AlmaLinux 9, ready to monitor your infrastructure. With the web UI accessible and services running, you can start adding hosts and setting up alerts.
Run Zabbix on Shape.Host Cloud Vps for optimal performance and flexibility in production.
Launch your Zabbix monitoring stack now at https://shape.host.