Zabbix Server on Debian 12 – Stable, Scalable Monitoring on a Minimalist Foundation
Zabbix Server is an enterprise-grade, open-source monitoring solution designed to observe, alert, and visualize IT infrastructure performance and availability. Deployed on Debian 12, it benefits from a secure, minimalist, and LTS-supported environment that’s ideal for mission-critical monitoring at scale.
Why Use Debian 12 as a Host for Zabbix?
Debian 12 is known for:
- Long-term support (until mid-2028)
- High system stability and consistency
- Minimal default packages, ideal for security-focused deployments
- Linux Kernel 6.1 LTS, with strong support for cgroups, namespaces, and systemd
- Robust package manager (APT) and wide availability of monitoring dependencies
Because of its predictable release model and conservative updates, Debian 12 offers a secure and low-maintenance base for running Zabbix in both centralized and distributed monitoring environments.
Zabbix Server Architecture on Debian 12
Zabbix Server’s architecture is modular and adaptable:
- Zabbix Server: Core engine for data collection, alerting, and trend analysis
- Zabbix Agent (v1 and v2): Installed on monitored systems to push or allow pull of metrics
- Zabbix Frontend: PHP-based web GUI (requires Apache or NGINX + PHP + database)
- Database Backend: PostgreSQL, MySQL, or MariaDB store configuration and historical data
- Zabbix Proxy (optional): Offloads data collection in large or segmented environments
On Debian 12, all core components can be managed via systemd, and the APT ecosystem supports a wide range of compatible software, including PHP 8.2, PostgreSQL 15, and MariaDB 10.11.
Key Features
| Feature | Description |
|---|---|
| Auto-discovery | Dynamic detection of new hosts and services |
| Templates | Predefined monitoring logic for OSes, apps, and devices |
| Flexible alerting | Configurable actions, media types (email, webhook, SMS, etc.) |
| High scalability | Easily expanded with proxies and partitioned DB setups |
| Data visualization | Dashboards, maps, graphs, and trend charts |
| API access | Full-featured JSON-RPC API for automation and third-party tools |
| Built-in security | TLS encryption between agents/server, support for PSK/cert-based auth |
Zabbix is fully modular and can monitor systems via agent, SNMP, IPMI, JMX, HTTP, and external scripts.
Debian 12 System Compatibility
Debian 12 integrates seamlessly with Zabbix and offers:
- Systemd 252+ for efficient process management and logging
- PHP 8.2, the recommended version for the Zabbix frontend
- PostgreSQL 15 or MariaDB 10.11 as performant backend options
- Fping, SNMP tools, and IPMI utilities available in the main APT repositories
Debian’s preference for simplicity and upstream stability ensures fewer breaking changes over time—ideal for long-lived Zabbix installations.
Use Cases
Zabbix on Debian 12 is suitable for:
- Datacenter monitoring: Track servers, storage, switches, and routers
- Cloud & VM monitoring: AWS, Azure, Proxmox, VMware, and OpenStack templates
- Application performance monitoring (APM): Databases, web services, APIs
- IoT & edge: Lightweight agents, proxies, and traps over low-bandwidth networks
- SIEM integration: Collect and correlate logs and metrics alongside security platforms
Templates, macros, low-level discovery (LLD), and custom scripts provide flexibility across all industries.
Performance and Optimization
Debian’s lightweight base allows Zabbix Server to operate with minimal overhead:
| Optimization Area | Detail |
|---|---|
| Database tuning | Partitioning, buffer tuning, and indexing for large installations |
| Concurrent pollers | Adjustable StartPollers, StartTrappers, etc. |
| Cache settings | Control CacheSize, HistoryCacheSize, TrendCacheSize |
| Frontend caching | PHP OPcache and static file caching with NGINX |
Running Zabbix on Debian 12 ensures high resource efficiency and predictable performance even under large workloads.
Security Advantages on Debian 12
Debian’s default configuration is minimal and hardened. Combined with Zabbix’s own security model, deployments are robust:
| Security Feature | Purpose |
|---|---|
| AppArmor | Limits file and syscall access for Zabbix daemons |
| TLS encryption | Secure connections between server, proxies, and agents |
| PSK & certificates | Optional mutual auth for agent-server communication |
| Firewall (nftables) | Controls network access to ports 10050 (agent) and 10051 (server) |
| Audit tools | auditd, fail2ban, and journald integration |
Debian 12’s focus on transparency and open-source security patches makes it ideal for secure monitoring infrastructure.
Comparison with Other OS Platforms
| Feature | Debian 12 | Ubuntu 24.04 | Rocky/Alma Linux 9 |
|---|---|---|---|
| Kernel Version | 6.1 (LTS) | 6.8 | 5.14 |
| Security Framework | AppArmor | AppArmor | SELinux |
| System Overhead | Low | Medium | Medium |
| Support Model | LTS (~5 years) | LTS (~5 years) | Enterprise-grade (~10 yrs) |
| Package Freshness | Conservative | Moderate | Conservative |
| Community Support | Strong, stable | Broad, modern stack | Enterprise and server-focused |
Debian 12 is ideal when you prioritize system control, low bloat, and highly predictable upgrade paths for monitoring infrastructure.
Deploying Zabbix Server on Debian 12 results in a secure, efficient, and highly customizable monitoring solution. Backed by Debian’s legendary stability and Zabbix’s flexibility, this combination is especially well-suited for enterprises, public sector IT, and anyone who requires long-term reliability in complex infrastructure monitoring.
Whether you are building a small observability setup or a distributed monitoring mesh across data centers and cloud regions, Debian 12 and Zabbix Server provide the reliability and power you need.
Step 1: Set Up a Server Instance on Shape.Host
To start, you need a clean Debian 12 VPS. Shape.Host offers high-performance, SSD-based cloud infrastructure that’s ideal for running monitoring systems like Zabbix.
Create an Instance on Shape.Host:
Go to https://shape.host and sign in.
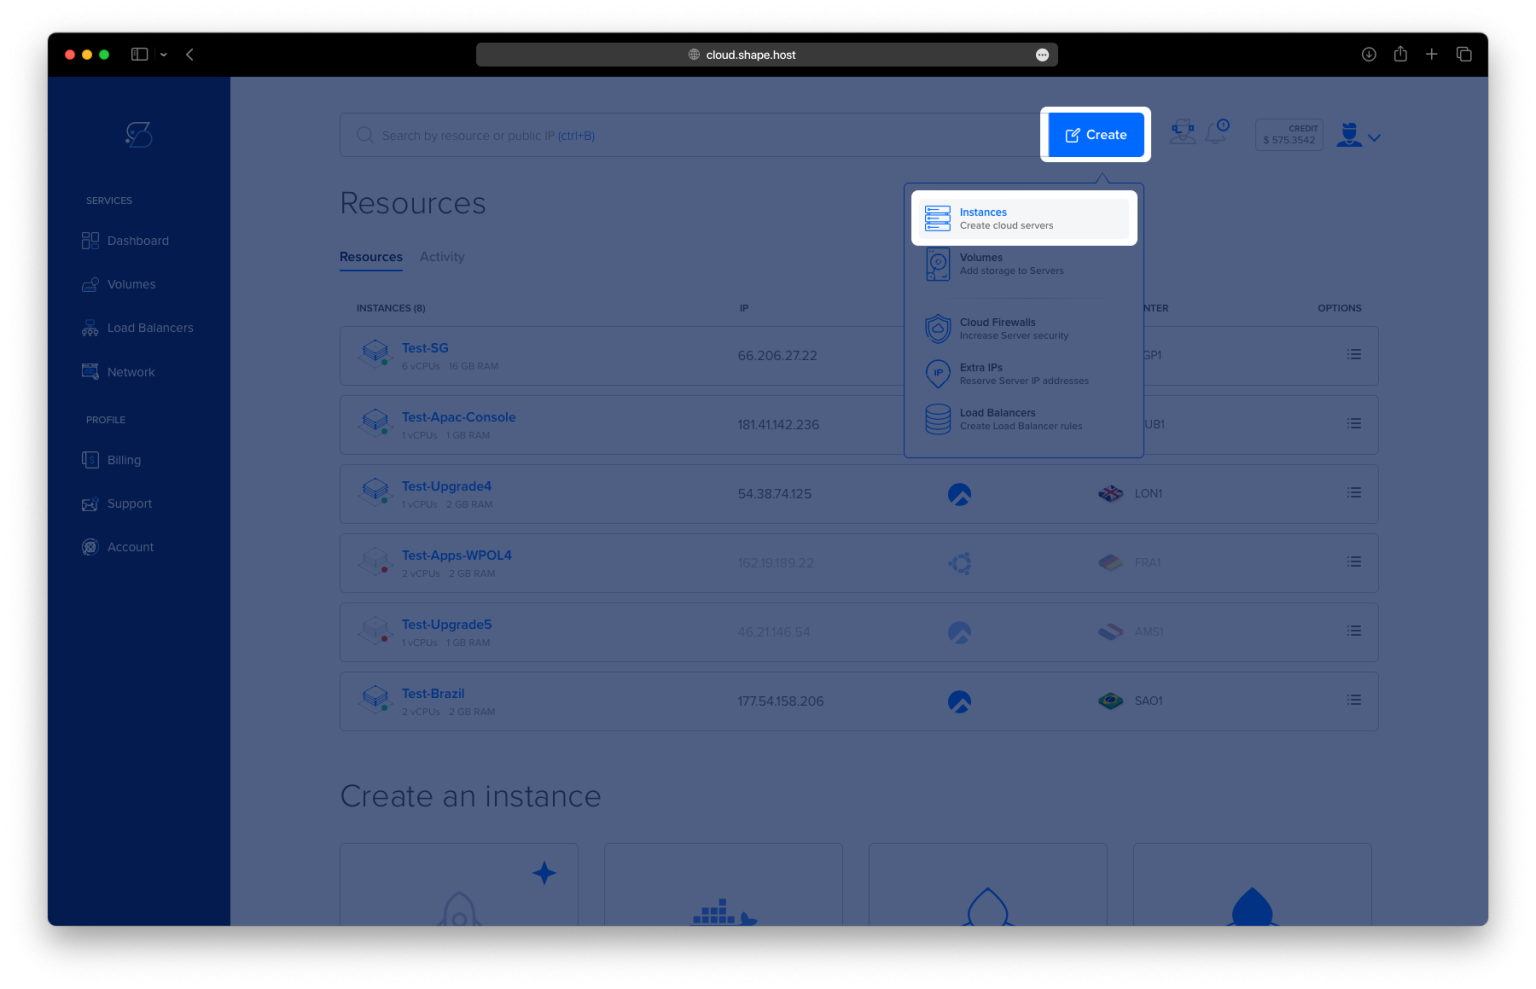
Click “Create” from the dashboard.
Select “Instance” as the resource type.

Choose a data center location (e.g., Frankfurt, Amsterdam).

Select Debian 12 (64-bit) as the OS.
Pick a plan with at least 2 CPUs, 2 GB RAM, and 20 GB SSD.

Click “Create Instance” and wait for it to finish provisioning.

Copy your instance’s IP address under the Resources tab.

Connect to Your Instance
On Linux/macOS:
ssh root@your_server_ip
On Windows:
Use PuTTY:
- Download PuTTY.
- Enter your server’s IP in the Host Name field.
- Use port
22and connection typeSSH. - Click Open and log in as
root.
Step 2: Install Zabbix and Required Packages
1. Update the package list:
apt update

2. Download the Zabbix 6.4 repository for Debian 12:
wget https://repo.zabbix.com/zabbix/6.4/debian/pool/main/z/zabbix-release/zabbix-release_6.4-1+debian12_all.deb
3. Install the repository package:
dpkg -i zabbix-release_6.4-1+debian12_all.deb
4. Update the package index again:
apt update

5. Install Zabbix server, frontend, and MariaDB:
apt install zabbix-server-mysql zabbix-frontend-php zabbix-apache-conf zabbix-sql-scripts zabbix-agent mariadb-server

Step 3: Configure MariaDB for Zabbix
1. Start and enable MariaDB:
systemctl enable mariadb --now

2. Secure your MariaDB installation:
mysql_secure_installation

3. Create the Zabbix database and user:
mariadb -u root -p
Then run the following SQL commands:
CREATE DATABASE zabbix CHARACTER SET utf8mb4 COLLATE utf8mb4_bin;
CREATE USER zabbix@localhost IDENTIFIED BY 'StrongPassword';
GRANT ALL PRIVILEGES ON zabbix.* TO zabbix@localhost;
FLUSH PRIVILEGES;
EXIT;

Step 4: Import Initial Zabbix Schema
1. Load Zabbix database schema into MariaDB:
zcat /usr/share/zabbix-sql-scripts/mysql/server.sql.gz | mysql -u zabbix -p zabbix
You may repeat this command if it fails the first time. Be sure to use the correct password for the Zabbix user (StrongPassword).

Step 5: Configure Zabbix Server and Frontend
1. Edit the Zabbix server configuration:
nano /etc/zabbix/zabbix_server.conf
Find and update:
DBPassword=StrongPassword

2. Set the correct timezone in Apache config for Zabbix:
nano /etc/zabbix/apache.conf
Add this line or adjust as needed:
php_value date.timezone Europe/Bucharest

Step 6: Configure System Locale
1. Install and generate locale settings:
apt install locales
locale-gen en_US.UTF-8
update-locale LANG=en_US.UTF-8

2. Restart Apache:
systemctl restart apache2

Step 7: Start and Enable Zabbix Services
1. Restart Zabbix and Apache services:
systemctl restart zabbix-server zabbix-agent apache2
2. Enable them to start at boot:
systemctl enable zabbix-server zabbix-agent apache2

Step 8: Access Zabbix Web Installer
In your browser, open:
http://your-server-ip/zabbix
Follow the on-screen steps:
- Provide DB connection (User:
zabbix, Password:StrongPassword) - Confirm timezone, Zabbix server name, etc.
Great! Here’s a shortened version of the Zabbix web installation steps (based on your previous screenshots), adapted for Debian 12:
🧭 Zabbix Web Installer – Short Guide (Debian 12)
1. Welcome
- Start the installer at
http://<your-ip>/zabbix/setup.php. - Select language → Click Next step.

2. Check of pre-requisites
- Installer checks PHP version and extensions.
- Make sure all values are marked OK.
- Click Next step.

3. Configure DB Connection
- Fill in:
- Database type: MySQL
- Host:
localhost - DB name:
zabbix - User:
zabbix - Password: your DB password
- Click Next step.

4. Settings
- Set:
- Server name (e.g.
Zabbix Debian) - Timezone (e.g.
Europe/Bucharest) - Theme (optional)
- Server name (e.g.
- Click Next step.

5. Pre-installation Summary
- Review all settings.
- If everything is correct → Click Next step.

6. Install
- Installer creates
zabbix.conf.php. - Click Finish.

7. Login Page
- Username:
Admin - Password:
zabbix(default) - Change password after login.

8. Global Dashboard
- Access metrics, host status, and alerts.
- Customize widgets and start monitoring!

You’ve successfully installed and configured Zabbix Server 6.4 on Debian 12, including database setup, web frontend, and services. With Zabbix up and running, you’re ready to begin monitoring your infrastructure with powerful automation and alerts.
For peak performance, run Zabbix on Shape.Host Linux SSD VPS—secure, flexible, and built for modern IT monitoring.
Launch yours now at https://shape.host.