What is Asterisk?
Asterisk is an open-source communications server and PBX (Private Branch Exchange) developed by Sangoma Technologies. It enables businesses and developers to build custom VoIP, telephony, IVR, conferencing, and call center systems using SIP, IAX2, and WebRTC protocols.
With Asterisk 22, the latest major release, you get modernized SIP handling, improved WebRTC support, and enhanced media processing. Combined with Ubuntu 24.04 LTS, which offers long-term stability, this setup is ideal for deploying reliable, scalable telephony infrastructure.
Key Features of Asterisk 22
SIP and VoIP Support
- Full support for PJSIP, the modern and modular SIP channel driver.
- Support for SIP trunking, VoIP softphones, desk phones, and gateways.
- Optional chan_sip legacy module for backward compatibility.
Media and Call Control
- Built-in support for call recording, voicemail, conferencing, call queues, call parking, and IVR trees.
- Audio codecs: G.711, G.729, Opus, Speex, GSM, and more.
- Video support available via PJSIP and compatible endpoints.
APIs and Integration
- ARI (Asterisk REST Interface): RESTful API for controlling calls and media.
- AMI (Asterisk Manager Interface): TCP-based control interface for real-time events.
- AGI (Asterisk Gateway Interface): Enables scripting with Bash, Python, PHP, etc.
WebRTC and NAT Support
- Supports WebRTC clients using WebSocket, ICE, STUN, TURN, and SRTP.
- Compatible with modern SIP/WebRTC softphones in the browser.
Call Logging and Reporting
- Detailed Call Detail Records (CDR) stored in flat files, MySQL, or PostgreSQL.
- Logging integration with Rsyslog, Graylog, or ELK stack for monitoring.
Why Use Asterisk 22 on Ubuntu 24.04?
Ubuntu 24.04 offers:
- Latest LTS Python, OpenSSL, and system libraries
- Long-term support until 2029
- Excellent integration with systemd, Netplan, UFW, and AppArmor
- Native support for Python 3.11, useful for scripting with ARI
- Broad ecosystem of VoIP tools and compatibility with cloud environments
System Requirements
| Component | Recommended Minimum |
|---|---|
| OS | Ubuntu 24.04 LTS |
| CPU | 1+ core (4+ for production) |
| RAM | 2 GB or more |
| Disk Space | 1 GB (more for recordings) |
| Dependencies | libedit-dev, libjansson-dev, uuid-dev, libssl-dev, libxml2-dev, libsqlite3-dev |
Common Use Cases
- On-premise PBX system for businesses
- VoIP gateway (e.g. SIP-to-PSTN)
- Call center and queue management
- Custom IVR and telephony automation
- WebRTC backend for browser-based communications
- Voicemail and voicemail-to-email systems
Asterisk vs Other Telephony Platforms
| Feature | Asterisk 22 | FreeSWITCH | 3CX | Issabel/Elastix | FusionPBX |
|---|---|---|---|---|---|
| License | Open-source (GPLv2) | Open-source (MPL) | Freemium / Commercial | Open-source (GPL) | Open-source (MPL) |
| SIP Support | Full (PJSIP) | Full | Full | Full (based on Asterisk) | Full (based on FreeSWITCH) |
| Media Handling | Built-in | Advanced, modular | Built-in | Built-in | Built-in |
| Web Interface | None (CLI/API only) | None (uses FusionPBX) | Full GUI | FreePBX-style UI | FusionPBX |
| PBX Features | Yes | Yes | Yes | Yes | Yes |
| WebRTC Support | Yes (PJSIP) | Yes (more complete) | Limited | Yes | Yes |
| Scalability | Medium to High | High | Medium | Medium | High |
| Best Use Case | Custom PBX, flexible APIs | Carrier-grade VoIP core | Easy office setup | Community PBX systems | Multi-tenant VoIP hosting |
When to Choose Asterisk
Choose Asterisk if:
- You need customized PBX behavior or integration via ARI/AMI/AGI.
- You’re comfortable managing a Linux server and CLI tools.
- You want a lightweight and modular PBX for SIP, IAX, or WebRTC.
- You prefer building your own management interface or workflow.
- You are developing a telephony application platform or VoIP service backend.
Security Best Practices
- Use TLS/SRTP to encrypt SIP signaling and media.
- Limit access via firewall (UFW, iptables).
- Enable fail2ban to protect against SIP brute-force attacks.
- Set secure passwords for SIP users, voicemail, and manager interfaces.
- Disable unused modules and ports.
- Regularly apply security updates from Ubuntu and Asterisk.
Deployment and Monitoring Stack Suggestions
- Web Server/Proxy: Nginx or Apache for WebRTC and dashboards
- Database: MySQL/MariaDB or PostgreSQL for CDR and user data
- Monitoring: Prometheus + Grafana or ELK stack
- Reverse Proxy/WebRTC: Coturn for TURN/STUN, RTPEngine for media proxy
- CI/CD: GitHub Actions or Jenkins for deploying dialplans and configurations
Asterisk 22 on Ubuntu 24.04 is a versatile, production-ready platform for building secure, scalable, and feature-rich telephony systems. While it requires some technical knowledge, it offers unmatched flexibility for developers and system administrators.
If you need a fully open-source solution to power your VoIP, PBX, or real-time communications system, and want the long-term reliability of Ubuntu 24.04 LTS, Asterisk 22 is a top-tier choice. For those who need advanced media routing or want a full GUI, FreeSWITCH, FusionPBX, or 3CX may be more appropriate.
Step 1: Set Up a VPS Instance on Shape.Host
To begin, provision a clean server environment:
Head over to https://shape.host and sign into your account.
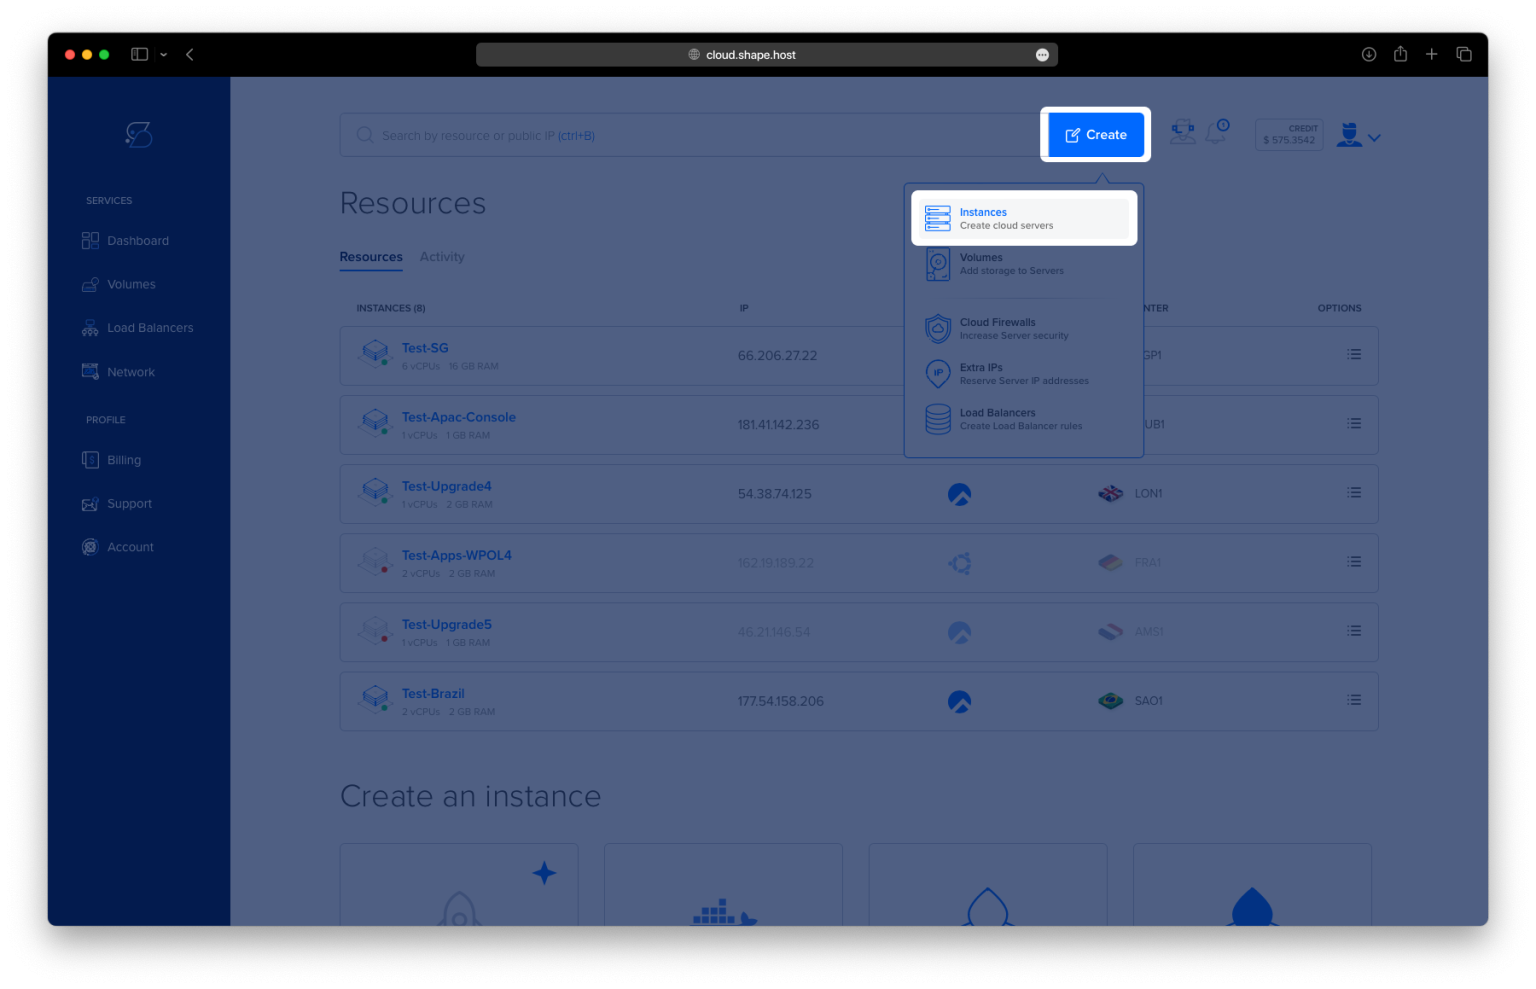
Click on the “Create” button.
Select “Instance” as the type of server you want to launch.

Pick the data center location that best fits your user base or region.

Choose Ubuntu 24.04 (64-bit) as your operating system.
For a smooth Asterisk experience, choose a plan with 2 or more CPUs, 4 GB RAM, and 20 GB SSD at minimum.

Finalize your setup by clicking “Create Instance”.

Once deployed, you’ll see your server IP address listed in the Resources tab — this is what you’ll use to connect.

Step 2: Connect to Your Server
Linux/macOS:
Open Terminal:
ssh root@your_server_ip
Windows:
Use PuTTY, enter the IP, and log in as root.
Step 3: Update Your Package List
apt update
Updates your system’s local list of available packages.

Step 4: Install Build Tools and Dependencies
apt install wget build-essential subversion
These are required to download and compile Asterisk from source.

Step 5: Download Asterisk Source Code
cd /usr/src/
wget http://downloads.asterisk.org/pub/telephony/asterisk/asterisk-22-current.tar.gz
Downloads the latest version of Asterisk 22.

Step 6: Extract the Source Code
tar zxf asterisk-22-current.tar.gz
cd asterisk-22.*/
Unpacks and enters the source directory.
Step 7: Get MP3 Codec Source
contrib/scripts/get_mp3_source.sh
Downloads required source files for MP3 support.

Step 8: Install Required Libraries and Dependencies
contrib/scripts/install_prereq install
Installs all needed packages for a successful build.


Step 9: Configure Asterisk for Compilation
./configure
Sets up the environment for building.


Step 10: Customize Build Options (Optional)
make menuselect
Opens an interactive menu to include or exclude modules.

Step 11: Build Asterisk
make -j2
Compiles the source using 2 CPU threads.


Step 12: Install Asterisk Binaries
make install
Installs Asterisk onto your system.

Step 13: Install Sample Config Files
make samples
Optional — adds default configuration files to /etc/asterisk.

Step 14: Install a Basic PBX Setup
make basic-pbx
Sets up a working example PBX system.

Step 15: Enable Asterisk as a Systemd Service
make config
Adds Asterisk to systemctl so it can be managed as a service.
Step 16: Update Shared Libraries Cache
ldconfig
Refreshes the system’s shared library paths.
Step 17: Create Asterisk User and Group
addgroup --quiet --system asterisk
adduser --quiet --system --ingroup asterisk --no-create-home --disabled-password asterisk
Sets up a dedicated system user for Asterisk for better security.

Step 18: Edit Default Asterisk Settings
nano /etc/default/asterisk
Uncomment and modify the following lines:
AST_USER="asterisk"
AST_GROUP="asterisk"
This tells the system to run Asterisk under the new user/group.

Step 19: Fix Permissions for Asterisk Files
usermod -a -G dialout,audio asterisk
chown -R asterisk: /var/{lib,log,run,spool}/asterisk /usr/lib/asterisk /etc/asterisk
chmod -R 750 /var/{lib,log,run,spool}/asterisk /usr/lib/asterisk /etc/asterisk
Ensures only Asterisk can access and modify its necessary files.

Step 20: Enable and Start the Asterisk Service
systemctl enable asterisk
systemctl start asterisk
Enables the service to run at startup and starts it right away.

Step 21: Open the Asterisk CLI
asterisk -vvvr
Lets you interact directly with Asterisk via its terminal interface.

Step 22: Configure Firewall for SIP and RTP
ufw allow 5060/udp
ufw allow 10000:20000/udp
ufw allow ssh
ufw enable
Opens required ports for SIP signaling, media streaming, and remote access.


You installed Asterisk 22 PBX from source on Ubuntu 24.04, configured a dedicated system user, and opened all the right ports for VoIP traffic.
This setup was done on a Shape.Host Cloud SSD VPS. With Shape.Host, you get:
- Quick and easy cloud instance deployment
- Full root control
- Reliable uptime and solid performance for PBX, VoIP, and other telecom services
Try it now at https://shape.host