Drupal is a powerful, open-source content management system (CMS) used to build and manage websites, blogs, and web applications. Known for its flexibility, security, and scalability, Drupal is widely used by enterprises, government institutions, and developers to create dynamic and content-rich websites. Running Drupal on Debian 12 ensures a stable, secure, and high-performance hosting environment for web development.
Key Features of Drupal on Debian 12
- Modular Architecture
- Uses modules to extend functionality, allowing customization for different use cases.
- Content Management System (CMS)
- Provides an intuitive editor interface for managing website content efficiently.
- Scalability and Performance Optimization
- Supports caching, database replication, and load balancing for high-traffic websites.
- Security and Access Control
- Built-in role-based access control (RBAC) ensures secure user management.
- Multilingual Support
- Supports over 100 languages with built-in translation and localization tools.
- API-First Architecture
- Easily integrates with external applications and services using RESTful APIs and GraphQL.
- Flexible Theming System
- Uses Twig templating engine for advanced customization of website design.
- SEO-Friendly Features
- Provides meta tag control, clean URLs, and structured data support for better search engine rankings.
- Mobile-Responsive Design
- Fully responsive themes ensure a seamless user experience across devices.
- Integration with Third-Party Services
- Connects with CRM, marketing automation tools, e-commerce platforms, and cloud storage services.
Advantages of Using Drupal on Debian 12
- Stable and Secure: Debian 12 offers a long-term support (LTS) environment, ensuring reliability for Drupal websites.
- Optimized Performance: Runs efficiently on Debian’s lightweight, resource-efficient architecture.
- Scalable and Flexible: Ideal for small business websites, enterprise applications, and e-commerce platforms.
- Robust Security Features: Drupal’s regular security updates and Debian’s built-in security policies provide a safe hosting environment.
- Extensive Community and Support: A large Drupal community and vast repository of modules help developers extend functionality easily.
Use Cases for Drupal on Debian 12
- Corporate Websites
- Manage business websites with advanced user roles, content workflows, and multilingual support.
- Government and Non-Profit Websites
- Used by government agencies and NGOs due to its high-security standards.
- E-Commerce Platforms
- Build scalable online stores with Drupal Commerce, offering flexible payment and inventory management.
- Educational Portals and LMS
- Universities and online learning platforms use Drupal for course management and student engagement.
- Community and Social Networking Sites
- Create forums, discussion platforms, and membership-based websites with user-generated content.
- News and Media Websites
- Drupal supports content-heavy websites, with built-in tools for publishing, subscriptions, and analytics.
- API-Driven Applications
- Acts as a backend CMS for headless applications, enabling React, Vue.js, and Angular front-end integrations.
Drupal vs. Other CMS Platforms
| Feature | Drupal | WordPress | Joomla | Magento |
|---|---|---|---|---|
| Customization & Modules | ✅ Extensive (50,000+ modules) | ✅ Large Plugin Ecosystem | ✅ Many Extensions | ⚠️ Limited to E-Commerce |
| Security | ✅ High (Enterprise-Grade) | ⚠️ Moderate (Frequent Patching) | ✅ Strong Security Features | ✅ Secure but Resource-Intensive |
| Performance | ✅ Optimized for Large Sites | ✅ Optimized with Caching | ⚠️ Moderate Performance | ✅ High Performance for Stores |
| Scalability | ✅ Scalable for Enterprise | ⚠️ Limited for Large Websites | ✅ Good Scalability | ✅ Excellent for E-Commerce |
| Multilingual Support | ✅ Built-In | ✅ Plugin-Based | ✅ Built-In | ✅ Built-In |
| SEO Optimization | ✅ Strong SEO Features | ✅ Strong SEO Plugins | ✅ Good SEO Capabilities | ✅ Optimized for E-Commerce |
| Best For | ✅ Large Websites, Enterprises | ✅ Blogs, Small Businesses | ✅ Business & Non-Profit | ✅ Online Stores & E-Commerce |
Why Use Drupal on Debian 12?
- Long-Term Stability: Debian 12 ensures long-term security updates, ideal for Drupal-powered websites.
- Optimized Performance: Debian’s lightweight architecture improves website speed and scalability.
- Security and Compliance: Ideal for GDPR-compliant applications and secure government websites.
- Customizable and Extensible: Supports custom themes, plugins, and third-party integrations.
- Robust Content Management: Advanced workflow automation, user roles, and publishing features.
Drupal on Debian 12 is the perfect combination for secure, scalable, and high-performance websites. Whether you’re building a corporate website, an e-commerce store, a government portal, or a content-heavy media site, Drupal provides flexibility, modularity, and enterprise-grade security. Running Drupal on Debian 12 ensures a stable, fast, and highly customizable CMS environment, making it the preferred choice for developers, businesses, and organizations worldwide.
Step 1: Create a Server Instance on Shape.Host
Before installing Drupal, you’ll need a server to host your environment. Here’s how to set up a server instance on Shape.Host:
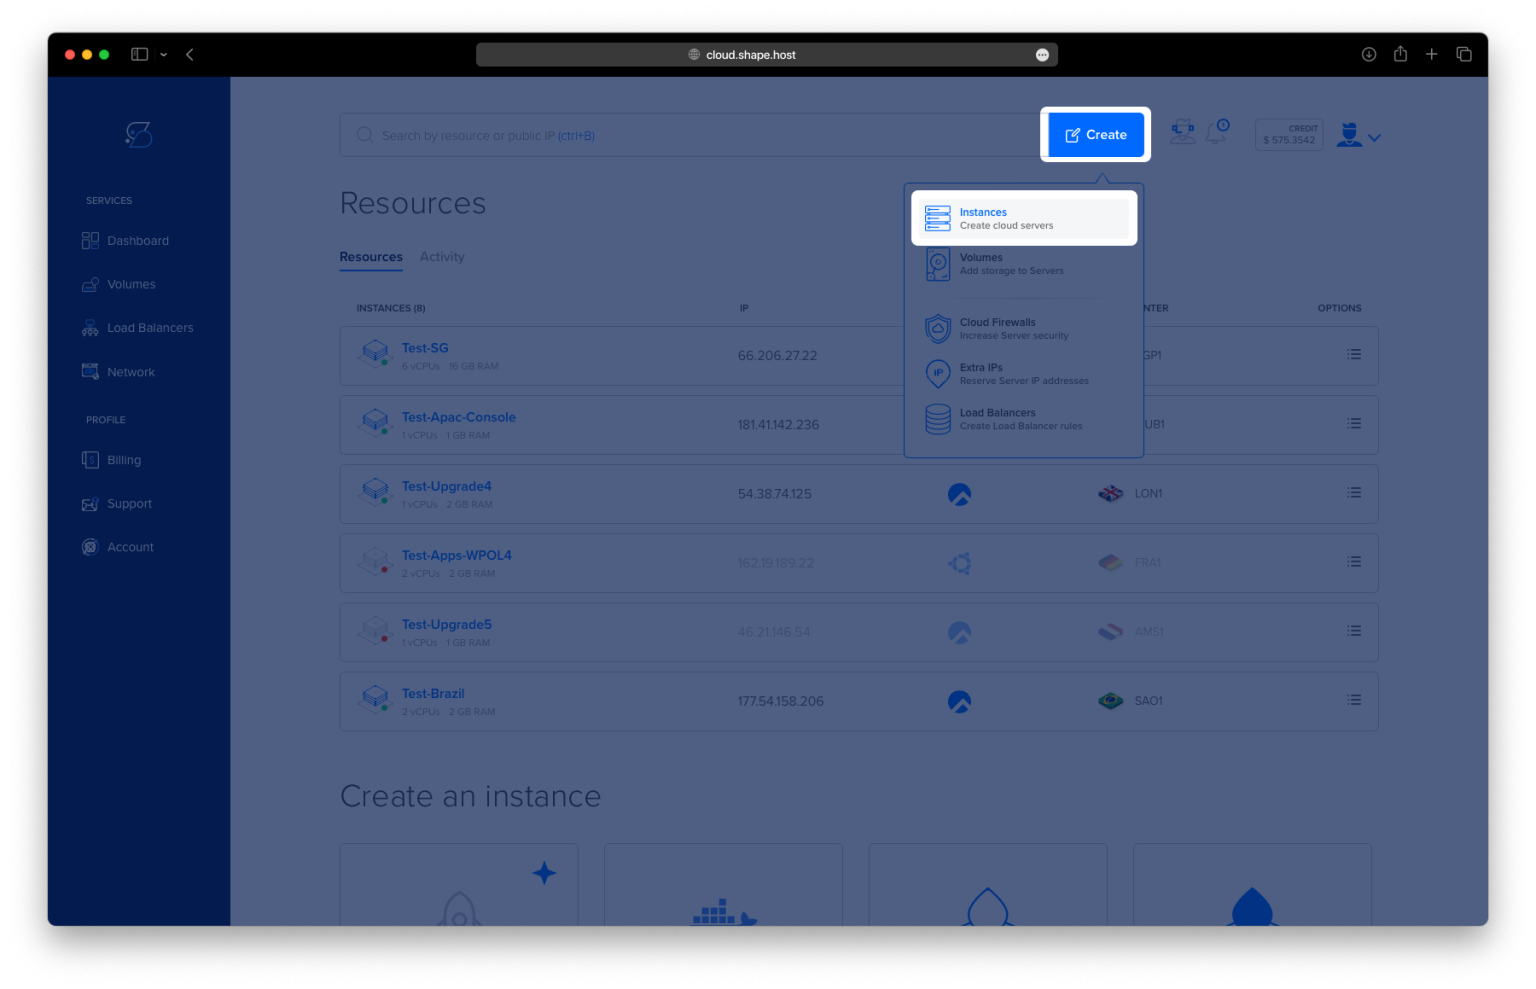
Log in to Shape.Host: Go to the Shape.Host website and log in to your account. Navigate to the Cloud VPS section.
Create a New Instance: Click on “Create” and choose the server type that fits your needs.

Pick a Data Center: Select a data center location close to your audience for better performance.

Choose a Plan: Pick a hosting plan that matches your project’s requirements and budget.
Set the OS: Choose Debian 12 as your operating system.

Launch the Server: Review your settings and click “Create Instance” Your server will be ready in a few minutes.

Find the Instance IP: Retrieve the public IP address of your instance from the Shape.Host dashboard.

Step 2: Connect to Your Server
Once your server is ready, you’ll need to connect to it using SSH. Here’s how:
- Linux/macOS: Open your terminal and type:
ssh root@your_server_ipReplace your_server_ip with your server’s IP address.
- Windows: Use an SSH client like PuTTY. Enter your server’s IP address, specify the port (usually 22), and click “Open.” Log in with your username and password.
Step 3: Update Your System
Before installing any software, it’s important to update your system to ensure all packages are up to date. Run the following command:
apt update && apt upgrade -y
Step 4: Install Apache
Drupal requires a web server to serve content. Install Apache with:
apt install apache2
Enable and start the Apache service:
systemctl enable apache2 && systemctl start apache2Check the status of Apache to ensure it’s running:
systemctl status apache2
Step 5: Install MariaDB
Drupal uses a database to store content. Install MariaDB, a popular MySQL-compatible database:
apt install mariadb-server mariadb-client
Enable and start the MariaDB service:
systemctl start mariadb && systemctl enable mariadbCheck the status of MariaDB:
systemctl status mariadb
Secure your MariaDB installation:
mysql_secure_installationFollow the on-screen prompts to set a root password and secure your database.


Step 6: Install PHP
Drupal requires PHP to run. Install PHP and the necessary extensions:
- Add the PHP Repository:
   apt install -y lsb-release ca-certificates apt-transport-https software-properties-common gnupg2
   wget -qO- https://packages.sury.org/php/apt.gpg | tee /etc/apt/trusted.gpg.d/php-sury.gpg >/dev/null
   echo "deb https://packages.sury.org/php/ $(lsb_release -sc) main" | tee /etc/apt/sources.list.d/php.list
apt update- Install PHP and Extensions:
apt install -y php8.3 libapache2-mod-php8.3 php8.3-dev php8.3-bcmath php8.3-intl php8.3-soap php8.3-zip php8.3-curl php8.3-mbstring php8.3-mysql php8.3-gd php8.3-xml- Restart Apache:
systemctl restart apache2- Verify PHP Installation:
php -vStep 7: Download and Install Drupal
Download the latest version of Drupal:
wget https://www.drupal.org/download-latest/tar.gz -O drupal-latest.tar.gz
Extract the Drupal files:
tar -xzf drupal-latest.tar.gz -C /var/www/html/Rename the Drupal directory for easier access:
mv /var/www/html/drupal-* /var/www/html/drupal
Set the correct permissions:
chown -R www-data:www-data /var/www/html/drupal
chmod -R 755 /var/www/html/drupal
Step 8: Create a Database for Drupal
Log in to MariaDB and create a database and user for Drupal:
mariadb -u root -pRun the following SQL commands:
CREATE DATABASE drupaldb;
CREATE USER 'drupal'@'localhost' IDENTIFIED BY 'password123';
GRANT ALL PRIVILEGES ON drupaldb.* TO 'drupal'@'localhost';
FLUSH PRIVILEGES;
EXIT;
Step 9: Configure Apache for Drupal
Create a new Apache configuration file for Drupal:
nano /etc/apache2/sites-available/drupal.confAdd the following configuration:
<VirtualHost *:80>
    ServerName example.com
    DocumentRoot /var/www/html/drupal

    <Directory /var/www/html/drupal/>
        AllowOverride All
        Require all granted
    </Directory>
</VirtualHost>
Enable the Drupal site and reload Apache:
a2ensite drupal.conf
systemctl reload apache2
Step 10: Access Drupal
Open your browser and navigate to http://example.com/drupal. You should see the Drupal installation page. Follow the on-screen instructions to complete the installation.
To Access Drupal using a web browser:
- Open your web browser.
- Enter the server’s IP or domain name (i.e. localhost/drupal).
- Select your language for Drupal.

Proceed with “Save and continue”.
In “Choose profile”, select the installation profile that best suits your needs and requirements:

Ensure all the requirements are correctly configured:

Specify your database credentials to connect Drupal:

Wait a moment to complete the installation of the Dural site.

Configure your site:


After entering your credentials, save the settings by clicking “Save and continue”.
A welcome page will be displayed, indicating that you have successfully configured Drupal on your Debian 12 machine:

If you’re looking for a reliable hosting solution for your Drupal projects, consider Shape.Host Linux SSD VPS services. With fast SSD storage, scalable resources, and excellent support, Shape.Host provides the perfect environment for running Drupal and other demanding applications. Visit Shape.Host to learn more and get started today!