What is FossBilling?
FossBilling is an open-source billing and client management system designed for web hosting companies, freelancers, and digital service providers. It offers features for automated invoicing, client registration, domain and hosting management, payment gateway integration, and support ticketing—all within a self-hosted platform.
Running FossBilling with Nginx on Debian 12 (Bookworm) provides a secure, efficient, and customizable environment, ideal for businesses that want full control over their billing platform without relying on commercial software.
Key Features of FossBilling
- Client and account management: Organize customer data, invoices, and services
- Automated billing: Create and send invoices, handle recurring payments
- Product & service sales: Sell hosting, domains, licenses, or digital services
- Payment integrations: Supports Stripe, PayPal, CoinGate, and more
- Support ticket system: Enable direct communication between clients and staff
- Domain management: Integrates with popular domain registrars
- Multi-language support: Available in various languages for global use
- Theme and plugin system: Customize UI and extend core functionality
Why Use FossBilling with Nginx on Debian 12?
Debian 12 offers a stable and secure foundation for web applications like FossBilling, with:
- Long-term support and security patches
- Official access to PHP 8.2, which FossBilling requires
- Clean, minimal system base—ideal for server deployments
- Compatibility with MariaDB/MySQL, Nginx, PHP-FPM, and SSL certificates
- Popular among VPS providers and cloud environments
System Requirements
| Component | Requirement |
|---|---|
| OS | Debian 12 (Bookworm, 64-bit) |
| Web Server | Nginx (preferred for performance) |
| PHP Version | PHP 8.1 or higher (8.2 recommended) |
| Database | MySQL or MariaDB |
| PHP Extensions | pdo, mbstring, curl, openssl, xml, gd, zip, fileinfo, json |
| RAM | 512 MB minimum (1 GB+ recommended) |
| Disk Space | 500 MB minimum for base setup |
Typical Use Cases
- Hosting providers managing shared, VPS, or dedicated services
- Freelancers handling digital product or subscription sales
- SaaS startups with recurring billing needs
- In-house tools for internal billing or client tracking
- Agencies offering domain/hosting reselling with automated invoicing
Advantages of FossBilling on Debian 12 with Nginx
- Free and open-source: Fully MIT licensed with no subscription fees
- High performance: Nginx + PHP-FPM offers fast and lightweight request handling
- Full control: Host it on your own infrastructure with customizable behavior
- Active development: Continuously updated with community and developer contributions
- Modern tech stack: Works well with Let’s Encrypt, Docker, and cloud hosting tools
Security Recommendations
- Serve FossBilling over HTTPS using a valid SSL certificate
- Store sensitive files outside the web root
- Restrict admin access with IP allowlisting, firewalls, or VPN
- Apply regular system and app updates
- Monitor logs and server activity for anomalies
- Use strong MySQL passwords and limit remote database access
- Configure PHP-FPM for performance and isolation
FossBilling vs Alternatives
| Feature | FossBilling | WHMCS | ClientExec | HostBill |
|---|---|---|---|---|
| License Type | Free (MIT) | Commercial | Commercial | Commercial |
| Open Source | Yes | No | Partial | No |
| Payment Gateways | 10+ | 80+ | Limited | Extensive |
| Domain Registrar Support | Yes | Yes | Yes | Yes |
| Support Tickets | Included | Included | Included | Included |
| Customization | High | Moderate | Moderate | High (paid) |
| Ideal For | Startups, DIY | Large resellers | Mid-size providers | Premium providers |
FossBilling with Nginx on Debian 12 is a powerful, cost-effective, and open-source alternative to commercial billing platforms. It’s easy to set up, highly customizable, and perfect for web hosting providers, freelancers, and digital service businesses that want full ownership of their infrastructure and client data.
With the security and stability of Debian 12 and the performance of Nginx, this stack offers a modern foundation for building and maintaining a reliable billing platform that meets the needs of both small and growing service providers.
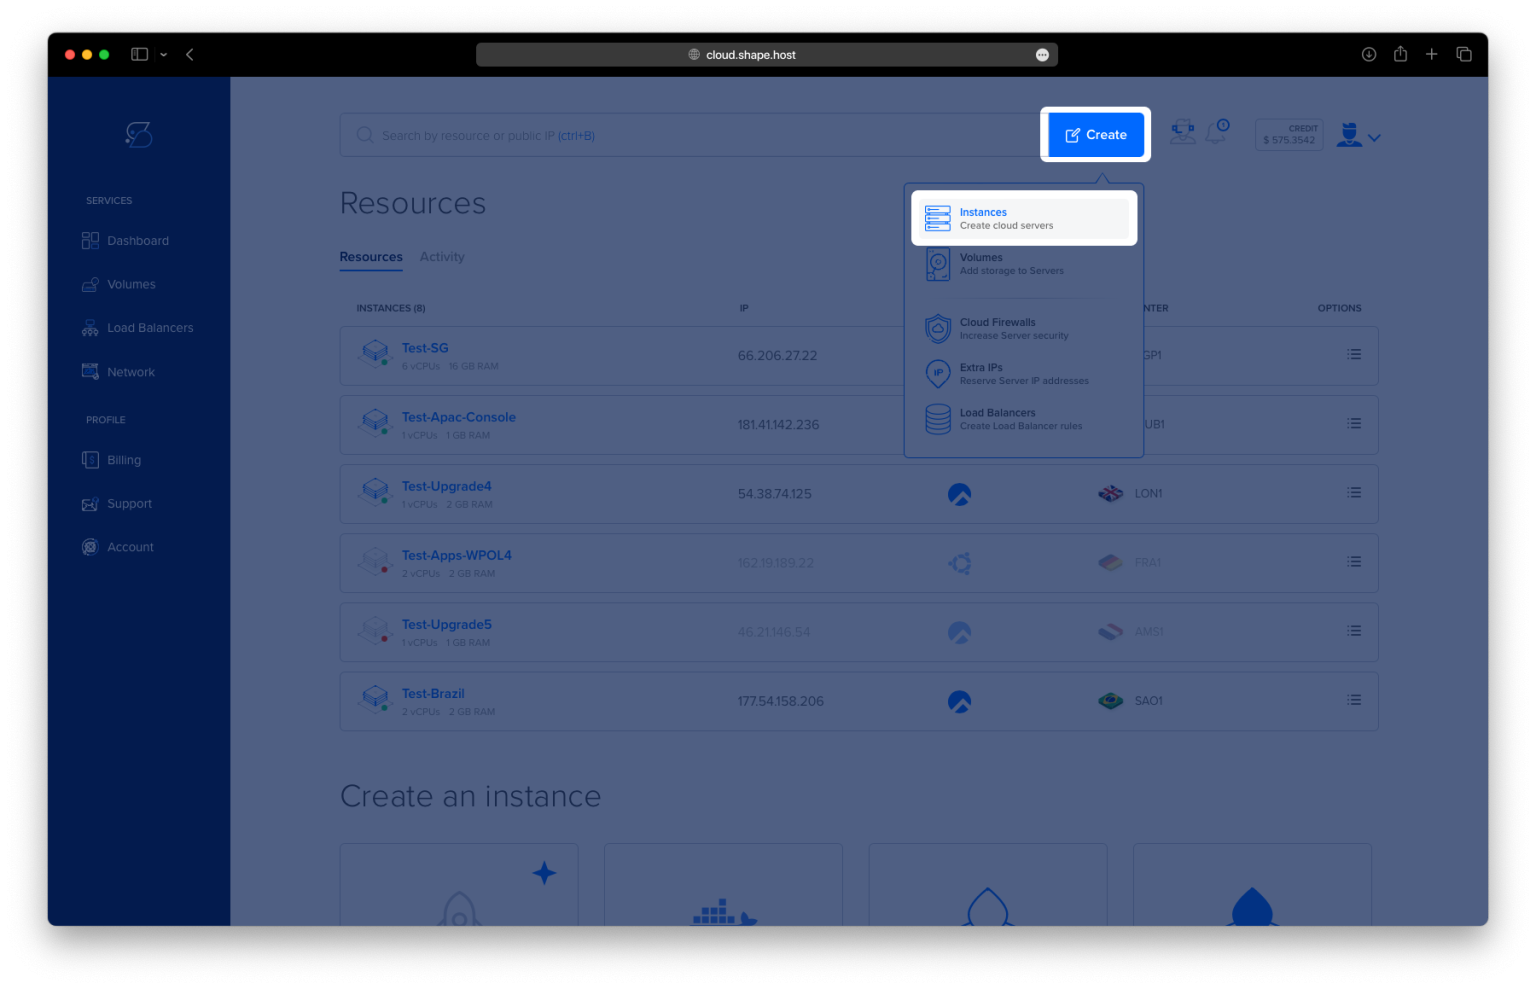
Step 1: Create a Server Instance on Shape.Host
To get started, you’ll need a clean Debian 12 server. Here’s how to set one up using Shape.Host:
Visit https://shape.host and log in.
Click “Create”, then select “Instance”.

Choose your preferred data center location.

Set the OS to Debian 12 (64-bit).
Select a hosting plan with at least 2 CPUs, 4 GB RAM, and 20 GB SSD.

Click “Create Instance”.

Once ready, copy your IP address from the Resources tab.

Step 2: Connect to the Server
From a Linux/macOS terminal:
ssh root@your_server_ip
If you’re using Windows, download and connect via PuTTY.
Step 3: Install and Start Nginx
apt update
apt install nginx
systemctl start nginx
systemctl enable nginx
systemctl status nginx
This installs and starts the Nginx web server, enabling it to launch automatically at boot.


Step 4: Install and Set Up MariaDB
apt update
apt install mariadb-server
systemctl start mariadb
systemctl enable mariadb
systemctl status mariadb
MariaDB is the database system that will store your FossBilling data.


Step 5: Create the FossBilling Database
mariadb
Then enter the following SQL commands:
CREATE DATABASE fossdb;
CREATE USER fossdbuser@localhost IDENTIFIED BY 'type_new_password';
GRANT ALL ON fossdb.* TO fossdbuser@localhost WITH GRANT OPTION;
FLUSH PRIVILEGES;
exit
Replace
'type_new_password'with a strong password.

Step 6: Add PHP 8.3 Repository
apt install software-properties-common ca-certificates lsb-release apt-transport-https
echo "deb https://packages.sury.org/php/ bookworm main" > /etc/apt/sources.list.d/php.list
wget -qO - https://packages.sury.org/php/apt.gpg | tee /etc/apt/trusted.gpg.d/sury-php.gpg > /dev/null
This adds the Sury repository to get access to PHP 8.3.


Step 7: Install PHP 8.3 and Required Extensions
apt update
apt install php8.3-fpm php8.3-intl php8.3-mysql php8.3-curl php8.3-cli php8.3-zip php8.3-common php8.3-mbstring php8.3-xml
php -v
systemctl start php8.3-fpm
systemctl enable php8.3-fpm
These packages are required for FossBilling to function correctly.


Step 8: Download and Unpack FossBilling
cd /tmp
apt install curl unzip
curl https://fossbilling.org/downloads/stable -L --output FOSSBilling.zip
mkdir -p /var/www/fossbilling
unzip FOSSBilling.zip -d /var/www/fossbilling
chown -R www-data:www-data /var/www/fossbilling
This downloads and prepares FossBilling files inside your web directory.


Step 9: Configure Nginx for FossBilling
nano /etc/nginx/sites-available/fossbilling.conf
Paste the following config (replace fossbilling.example.com with your domain):
server {
    listen 80;

    set $root_path '/var/www/fossbilling';
    server_name example.com;

    index index.html index.htm index.php;
    root $root_path;
    try_files $uri $uri/ @rewrite;
    sendfile off;

    include /etc/nginx/mime.types;

    location ~* .(ini|sh|inc|bak|twig|sql)$ {
        return 404;
    }

    location ~ /\.(?!well-known\/) {
        return 404;
    }

    location ~* /uploads/.*\.php$ {
        return 404;
    }

    location ~* /data/ {
        return 404;
    }

    location @rewrite {
        rewrite ^/page/(.*)$ /index.php?_url=/custompages/$1;
        rewrite ^/(.*)$ /index.php?_url=/$1;
    }

    location ~ \.php {
        fastcgi_split_path_info ^(.+\.php)(/.+)$;
        fastcgi_pass unix:/run/php/php8.2-fpm.sock;
        fastcgi_param PATH_INFO       $fastcgi_path_info;
        fastcgi_param SCRIPT_FILENAME $document_root$fastcgi_script_name;
        fastcgi_intercept_errors on;
        include fastcgi_params;
    }

    location ~* ^/(css|img|js|flv|swf|download)/(.+)$ {
        root $root_path;
        expires off;
    }
}

Activate the site and reload Nginx:
ln -s /etc/nginx/sites-available/fossbilling.conf /etc/nginx/sites-enabled/
systemctl restart nginx

Step 10: Install Additional PHP Tools
apt install php8.3-gd php8.3-imagick php8.3-bz2 -y
apt install imagemagick -y
systemctl restart php8.3-fpm
systemctl restart nginx
These modules help with image handling and file compression in invoices or client uploads.
Step 11: Finalize Web Installer & Secure Files
After completing the FossBilling setup in your browser:
rm -rfv /var/www/fossbilling/install
chmod 644 /var/www/fossbilling/config.php
This removes the install script and sets secure permissions for your config file.
Step 12: Add the Cron Job
FossBilling relies on scheduled tasks for automation:
crontab -u www-data -e
Paste the cron job recommended by FossBilling (you’ll see it in the admin panel).


✅ Installation Complete!
Now you can open your browser and go to:
http://your-server-ip
Or, if using a domain:
http://fossbilling.example.com
Follow the web-based installer to finish the setup.

Follow the setup wizard in your browser to finish configuration.
Click Next to continue.

Type in the database name and user account created above and click Next.

Create an administrator account and click Next.


Finally, run the commands below to remove the installation directory and configure a cron job. Then click Finish.
sudo rm -rf /var/www/fossbilling/install
sudo chmod 0644 /var/www/fossbilling/config.php
sudo crontab -u www-data -e
*/5 * * * * php /var/www/fossbilling/cron.php

Login to the dashboard using the credentials created above.

With Shape.Host, you get:
- Fast, reliable Cloud VPS servers
- Clean Debian 12 environment for web hosting
- Easy instance deployment
- Full root access
Start your FossBilling journey today at https://shape.host