Resilio Sync is a peer-to-peer (P2P) file synchronization tool that allows users to sync, share, and transfer files across multiple devices without relying on cloud storage. Built on BitTorrent technology, Resilio Sync offers fast, encrypted, and private data sharing, making it an excellent choice for personal, business, and enterprise use. Running Resilio Sync on Debian 12 ensures a secure, efficient, and decentralized file-sharing experience.
Key Features of Resilio Sync on Debian 12
1. Peer-to-Peer (P2P) File Syncing
- Direct device-to-device synchronization without cloud storage dependency.
2. End-to-End Encryption
- Uses AES-128 encryption and key-based authentication for secure file transfers.
3. Unlimited File Transfers
- No restrictions on file size or transfer limits, unlike traditional cloud storage.
4. Selective Sync (Sync on Demand)
- Users can choose which files to sync, reducing local storage usage.
5. Cross-Platform Compatibility
- Works on Debian 12, Windows, macOS, Android, iOS, and Linux-based NAS devices.
6. LAN and Remote Syncing
- Automatically detects devices on local networks for faster syncing.
- Sync files across remote locations using dynamic NAT traversal.
7. Automatic and Real-Time Syncing
- Changes made on one device are instantly reflected on all connected devices.
8. Bandwidth Control and Optimization
- Adjust upload/download speeds to optimize network performance.
9. Multi-User and Collaboration Support
- Share files securely with different access permissions (read-only, full access).
10. Offline File Access
- Files remain available even when devices are offline, syncing when reconnected.
Advantages of Using Resilio Sync on Debian 12
- No Cloud Dependency: Ensures data privacy by avoiding third-party cloud services.
- Faster Syncing: Uses P2P technology for direct, high-speed file transfers.
- Security and Encryption: Protects files with AES encryption and secure key sharing.
- Scalability: Ideal for home users, teams, and enterprises with multi-device syncing.
- Low Resource Usage: Optimized for Debian 12, ensuring minimal CPU and RAM consumption.
- Works Without Internet: Sync files over local networks (LAN) without an internet connection.
Use Cases for Resilio Sync on Debian 12
1. Personal Backup and File Sharing
- Sync files across laptops, desktops, and mobile devices without cloud storage.
2. Business File Collaboration
- Share and sync project files, reports, and documents between teams securely.
3. Self-Hosted Cloud Alternative
- Create a private cloud storage system without relying on third-party providers.
4. Media and Large File Transfers
- Transfer large media files, videos, and archives quickly between devices.
5. Disaster Recovery and Backup
- Keep real-time backups of important files across multiple locations.
6. Remote Work and Team Collaboration
- Enable secure, remote file sharing for distributed teams.
7. NAS and Server Synchronization
- Sync data between Debian 12 servers and NAS (Network-Attached Storage) devices.
Resilio Sync vs. Other File Syncing Solutions
| Feature | Resilio Sync | Dropbox | Google Drive | Syncthing |
|---|---|---|---|---|
| Cloud-Free Syncing | ✅ Yes | ❌ No | ❌ No | ✅ Yes |
| End-to-End Encryption | ✅ Yes | ❌ No | ❌ No | ✅ Yes |
| File Size Limits | ✅ No Limits | ❌ Limited by Storage Plan | ❌ Limited by Storage Plan | ✅ No Limits |
| Selective Sync | ✅ Yes | ✅ Yes | ✅ Yes | ✅ Yes |
| Local Network Sync | ✅ Yes (LAN Support) | ❌ No | ❌ No | ✅ Yes |
| Offline Access | ✅ Yes | ✅ Yes | ✅ Yes | ✅ Yes |
| Best Use Case | ✅ Secure P2P Sync | ❌ Cloud Storage | ❌ Cloud Backup | ✅ Open-Source Sync |
Why Use Resilio Sync on Debian 12?
- Fast and Secure File Syncing: Uses peer-to-peer (P2P) technology for high-speed, encrypted file transfers.
- No Cloud Storage Needed: Keep full control over your data without third-party cloud providers.
- Optimized for Debian 12: Works efficiently on Linux-based servers, NAS devices, and personal desktops.
- Perfect for Teams and Remote Work: Share files across multiple locations and devices with ease.
- Reliable Backup and Redundancy: Protect important data with automatic, real-time synchronization.
Resilio Sync on Debian 12 provides a fast, private, and decentralized solution for file syncing. Whether you need secure personal backups, business collaboration tools, or self-hosted cloud storage, Resilio Sync offers peer-to-peer technology, end-to-end encryption, and real-time synchronization. It is a powerful alternative to traditional cloud storage, ensuring maximum privacy and high-speed data transfers.
Step 1: Set Up Your Debian 12 Server
Before installing Resilio Sync, you need a Debian 12 server. If you don’t have one yet, follow these steps to create an instance on Shape.Host:
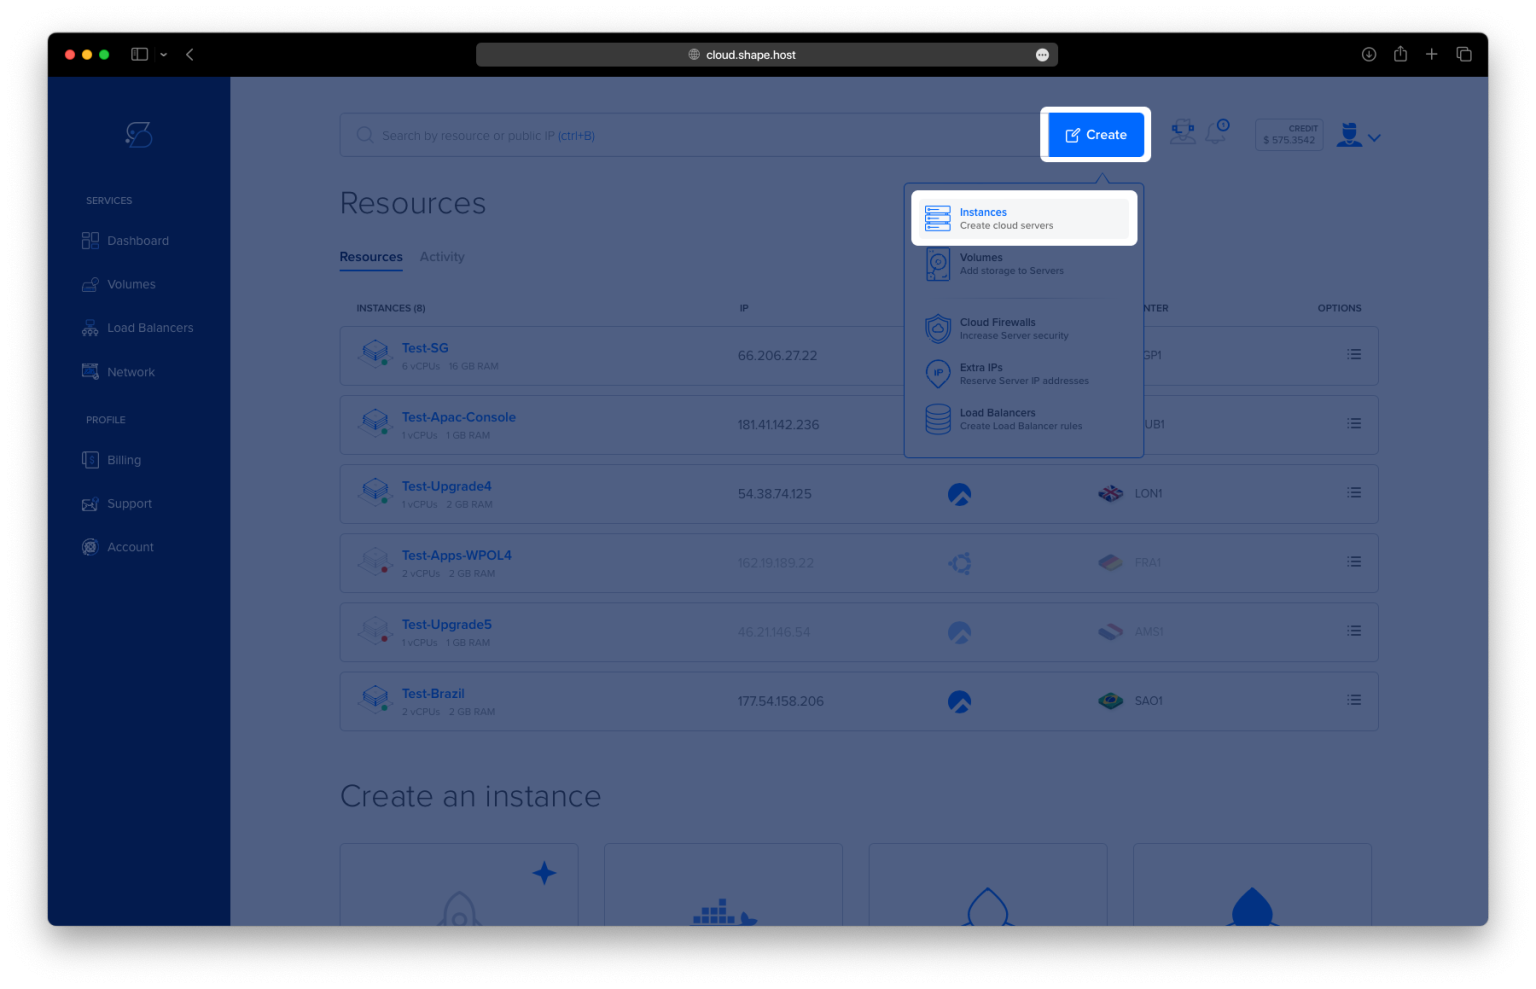
Log in to Shape.Host and go to your Dashboard.
Click “Create” to start setting up a new virtual machine.
Select “Instances” from the menu to configure your server.

Choose a Data Center Location that is closest to your users for faster performance.

Pick a Server Plan that fits your needs, such as Standard or CPU-Optimized.
Choose Debian 12 as your operating system.

Launch the Instance by selecting either SSH keys or a password for authentication. Click Create Instance to complete the process.

Find your instance’s IP address under the Resources section and use it to access your server.

Step 2: Connect to Your Server
Once your Debian 12 server is up and running, connect to it using SSH.
If you’re using Linux/macOS, run:
ssh root@<your_server_ip>If you’re on Windows, use PuTTY:
Open PuTTY.
Enter your server’s IP address, select SSH, and click Open to connect.
Step 3: Update Your System
Before installing any software, make sure your system is updated. Run the following command:
apt update && apt upgrade -y
This will update all installed packages to their latest versions, ensuring you don’t run into compatibility issues.

Step 4: Install Required Dependencies
To install Resilio Sync, we need to install some essential tools first. Run the command below to install curl, gnupg2, software-properties-common, and gpg:
apt install curl gnupg2 software-properties-common gpg
These tools help in downloading and verifying software packages securely.

Step 5: Install Resilio Sync
Step 5.1: Add Resilio Sync GPG Key
To ensure we are downloading an authentic package, we need to add Resilio Sync’s GPG key:
curl -sL https://linux-packages.resilio.com/resilio-sync/key.asc | gpg --dearmor -o /usr/share/keyrings/resilio-sync-keyring.gpg
Step 5.2: Add the Resilio Sync Repository
Now, we’ll add the official Resilio Sync repository to our system:
echo "deb [arch=amd64 signed-by=/usr/share/keyrings/resilio-sync-keyring.gpg] https://linux-packages.resilio.com/resilio-sync/deb resilio-sync non-free" > /etc/apt/sources.list.d/resilio-sync.list

Step 5.3: Update Package List
apt update
Step 5.4: Install Resilio Sync
apt install resilio-sync

Step 6: Start and Enable Resilio Sync
Once installed, we need to enable and start the Resilio Sync service.
Step 6.1: Enable Resilio Sync to Start at Boot
systemctl enable resilio-sync
Step 6.2: Start Resilio Sync
systemctl start resilio-sync
Step 6.3: Check Service Status
systemctl status resilio-sync
If the service is active and running, you are on the right track!

Step 7: Configure Resilio Sync
Resilio Sync’s settings can be modified through its configuration file. Let’s open it for editing:
nano /etc/resilio-sync/config.json
Update the “webui” section as follows:
"webui" : {
    "listen" : "0.0.0.0:8888"
}
Once done, restart the service for the changes to take effect:
systemctl restart resilio-sync
Step 8: Set Up Firewall Rules
To allow access to Resilio Sync’s web interface, you need to open port 8888 on the firewall.
Step 8.1: Install UFW Firewall (If Not Installed)
apt install ufw

Step 8.2: Allow Port 8888 for Resilio Sync
ufw allow 8888/tcp
Step 8.3: Allow SSH Access
To prevent being locked out of your server, allow SSH access:
ufw allow ssh
Step 8.4: Enable UFW
ufw enable

Step 9: Access Resilio Sync Web UI
Now that everything is set up, you can access Resilio Sync’s web interface from your browser.
Open your browser and go to: http://<your_server_ip>:8888

You will see the Resilio Sync Setup Page. Follow the on-screen instructions to configure your sync folders and devices.


For a high-performance hosting solution optimized for file synchronization and cloud applications, check out Shape.Host Cloud VPS. It provides reliable, scalable, and secure infrastructure for all your hosting needs.