What is WordPress?
WordPress is a free and open-source content management system (CMS) used to build and manage websites. It powers millions of sites, from personal blogs to large-scale business portals and e-commerce stores.
WordPress is known for:
- An intuitive admin dashboard
- Thousands of plugins and themes
- SEO-friendly architecture
- A vast developer and support community
What is the LAMP Stack on Debian 12?
The LAMP stack is a foundational web server setup made of:
- Linux: Debian 12 “Bookworm” as the operating system
- Apache: HTTP server software used to serve the WordPress files
- MariaDB: An open-source drop-in replacement for MySQL, used to store WordPress data
- PHP 8.3: Server-side scripting language that runs WordPress code
This stack is ideal for running dynamic PHP applications like WordPress.
Why Use Debian 12 for WordPress Hosting?
Debian 12 is a stable and long-term supported Linux distribution, making it a reliable choice for servers. Benefits include:
- Long-term security updates and community support
- Compatibility with newer software via Debian Backports or SURY repository
- Efficient resource usage, ideal for small to large deployments
- Consistent package behavior and strict quality control
Software Versions Used
- Apache 2.4.x – default in Debian 12
- MariaDB 10.11+ – available via official Debian repos
- PHP 8.3 – available from the SURY PHP repository
- WordPress – latest stable version from wordpress.org
Typical Use Cases
- Blogging platforms and news sites
- Portfolio websites and company landing pages
- E-commerce stores with WooCommerce
- Membership and subscription sites
- Multilingual websites with Polylang or WPML
Key Advantages
✅ Debian 12 Stability
- Proven reliability and long-term updates
- Supported across cloud, VPS, and bare-metal servers
✅ Apache Compatibility
- Supports
.htaccessfor URL rewrites, security, and caching - Easily integrates with SSL and virtual hosts
✅ MariaDB over MySQL
- Fully compatible with WordPress
- Often faster and more open in terms of licensing
✅ PHP 8.3 Support
- Greatly improved performance and memory usage
- Compatible with most modern WordPress themes and plugins
- Enables JIT (Just-in-Time) compilation for faster execution
Best Practices for WordPress on Debian 12
- Use Let’s Encrypt via Certbot for free HTTPS
- Enable UFW (Uncomplicated Firewall) for secure traffic control
- Regularly update WordPress, plugins, and themes
- Set proper file permissions (
755for folders,644for files) - Use strong MariaDB credentials and restrict access to
localhost - Configure Apache VirtualHosts for multiple domain management
- Monitor performance with tools like htop, glances, or Netdata
Performance Optimization Tips
- Enable Apache modules:
mod_rewrite,expires,headers,http2 - Enable OPcache (comes with PHP 8.3)
- Use caching plugins like WP Super Cache or LiteSpeed Cache
- Offload media and static assets to a CDN
- Optimize the database periodically (e.g., with WP-Optimize)
Security Recommendations
- Install Fail2Ban to block brute-force login attempts
- Use Two-Factor Authentication (2FA) plugins
- Disable XML-RPC if not needed
- Restrict
/wp-adminaccess by IP or password - Back up regularly with plugins like UpdraftPlus or via cron jobs
Running WordPress on Debian 12 with Apache, MariaDB, and PHP 8.3 offers a secure, high-performance, and open-source environment ideal for both personal and business websites. Debian’s long-standing reputation for stability, paired with the modern speed of PHP 8.3 and the flexibility of Apache and MariaDB, makes this a powerful stack for any production-grade WordPress deployment.
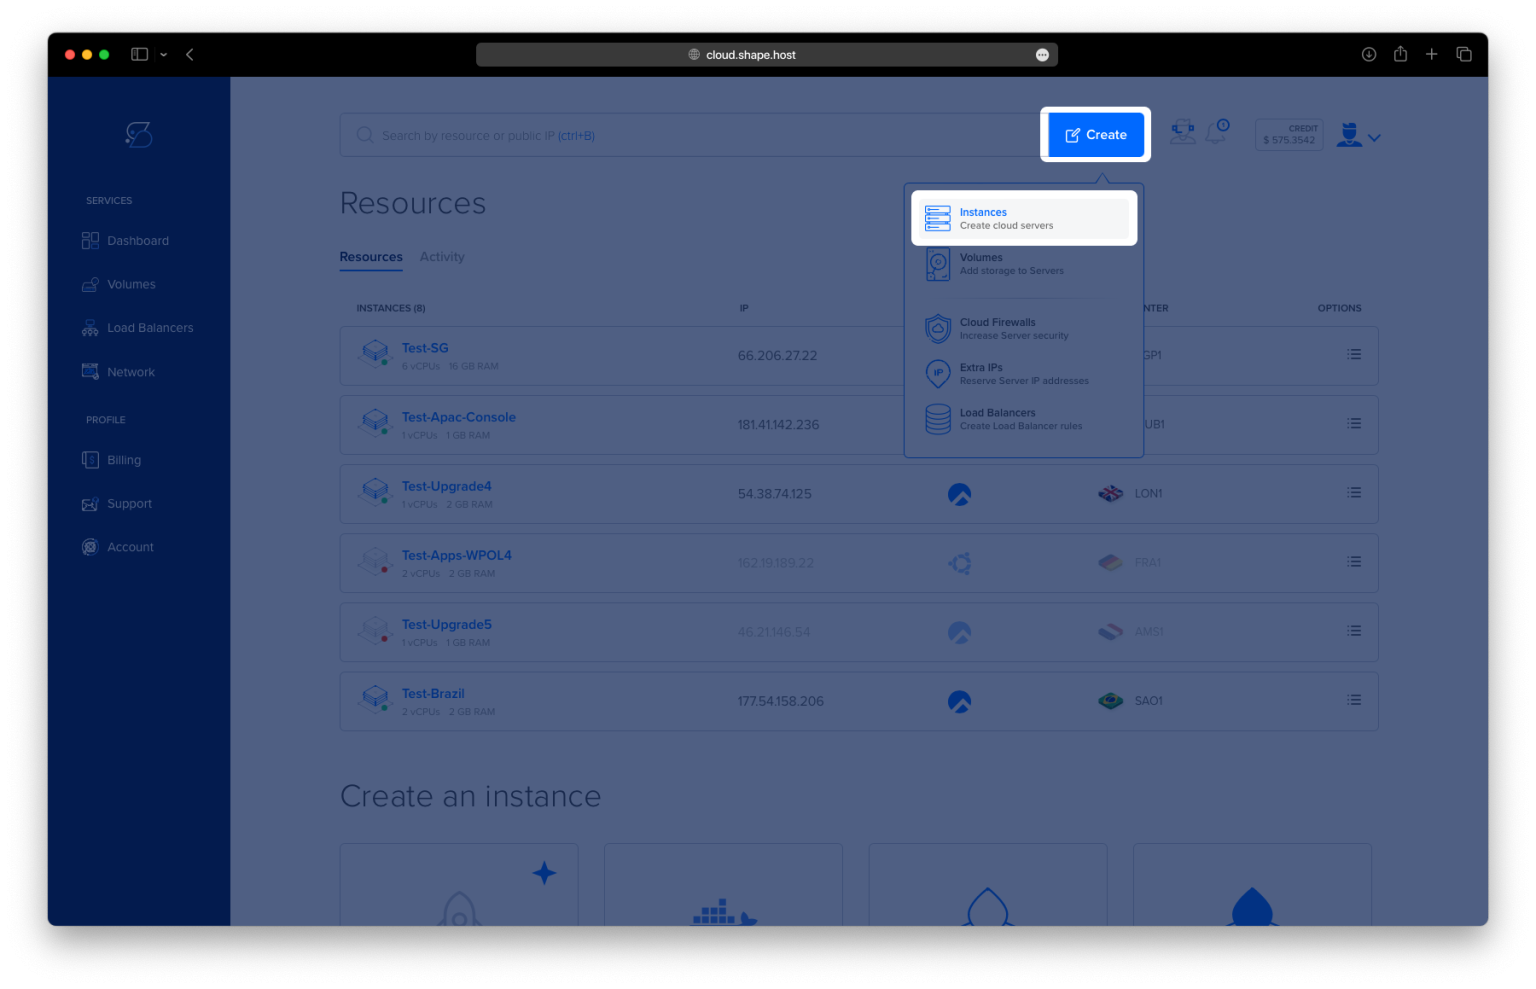
Step 1: Set Up a Server Instance on Shape.Host
Before anything, you need a VPS with Debian 12. Here’s how to do it using Shape.Host:
Visit https://shape.host and log in.
Click “Create” in the top navigation bar.
Choose “Instance”.

Select a data center near your customers or target audience.

For Operating System, pick: Debian 12 (64-bit).
Choose a VPS plan with at least 2 vCPU, 4 GB RAM, and 20 GB SSD.

Click “Create Instance” to launch the server.

After the instance is ready, note the IP address from the dashboard.
This instance will be your private server where you install and host WordPress.

Step 2: Connect to Your Instance
On Linux/macOS:
ssh root@your_server_ip
🔹 Replace your_server_ip with your actual server’s public IP. This connects to your VPS as the root user.
On Windows:
- Download PuTTY.
- Open it and paste your server’s IP in the “Host Name” field.
- Click Open to start the SSH session.
- Log in with the username:
root.
Step 3: Install WordPress on Debian 12 (LAMP Stack)
1. Update and Upgrade the System
apt update
🔹 Updates the package list from all configured sources.
apt upgrade -y
🔹 Installs available updates for your system.

2. Install Apache Web Server
apt install apache2
🔹 Installs the Apache web server package.

systemctl enable apache2
🔹 Enables Apache to start on boot.
systemctl start apache2
🔹 Starts the Apache web server now.

3. Install MariaDB (MySQL-compatible Database)
apt install mariadb-server mariadb-client
🔹 Installs MariaDB server and client tools.

systemctl enable mariadb
🔹 Ensures MariaDB starts on system boot.
systemctl start mariadb
🔹 Starts the MariaDB service immediately.

4. Secure MariaDB Installation
mysql_secure_installation
🔹 A script that helps secure MariaDB (e.g., set root password, remove test DB, disable remote root access).

5. Create WordPress Database and User
mysql -u root
🔹 Opens the MariaDB shell.
Now run these commands one by one in the MySQL shell:
CREATE DATABASE wordpress DEFAULT CHARACTER SET utf8mb4 COLLATE utf8mb4_unicode_ci;
🔹 Creates a new database named wordpress with recommended character encoding.
CREATE USER 'wpuser'@'localhost' IDENTIFIED BY '3vrUB8ngQH';
🔹 Creates a database user wpuser with a strong password.
GRANT ALL PRIVILEGES ON wordpress.* TO 'wpuser'@'localhost';
🔹 Gives full access on the wordpress database to the user.
FLUSH PRIVILEGES;
🔹 Reloads the privilege tables.
EXIT;
🔹 Exits the MariaDB shell.

6. Add PHP 8.3 Support via Sury Repository
apt install apt-transport-https lsb-release ca-certificates curl gnupg2
🔹 Installs tools required to add external repositories and HTTPS transport.

curl -fsSL https://packages.sury.org/php/apt.gpg | gpg --dearmor -o /etc/apt/trusted.gpg.d/sury.gpg
🔹 Downloads and installs the GPG key for the PHP repository.
echo "deb https://packages.sury.org/php/ $(lsb_release -sc) main" > /etc/apt/sources.list.d/sury.list
🔹 Adds the Sury PHP 8.3 repository to APT sources.
apt update
🔹 Refreshes APT sources to include the new PHP packages.

7. Install PHP 8.3 and Extensions
apt install -y php8.3 libapache2-mod-php8.3 php8.3-mysql php8.3-curl php8.3-xml php8.3-mbstring php8.3-zip php8.3-gd php8.3-soap php8.3-intl
🔹 Installs PHP 8.3, Apache PHP module, and all required extensions for WordPress.

systemctl restart apache2
🔹 Restarts Apache to apply PHP support.
8. Download and Configure WordPress
cd /var/www/html
🔹 Changes directory to Apache’s default web root.
rm index.html
🔹 Removes the default Apache page.
wget https://wordpress.org/latest.tar.gz

🔹 Downloads the latest version of WordPress.
tar -xvzf latest.tar.gz
🔹 Extracts the downloaded archive.
mv wordpress/* .
🔹 Moves all WordPress files to the web root.
rm -rf wordpress latest.tar.gz
🔹 Cleans up unneeded files.

chown -R www-data:www-data /var/www/html
🔹 Sets ownership so Apache can read/write files.
find /var/www/html -type d -exec chmod 755 {} \;
🔹 Ensures all folders have correct permissions.
find /var/www/html -type f -exec chmod 644 {} \;
🔹 Ensures all files have correct permissions.

9. Configure wp-config.php
cp wp-config-sample.php wp-config.php
🔹 Creates the main WordPress config file.
nano wp-config.php
🔹 Opens the file in the terminal for editing. Change the following lines:
define( 'DB_NAME', 'wordpress' );
define( 'DB_USER', 'wpuser' );
define( 'DB_PASSWORD', 'strongpassword' );
define( 'DB_HOST', 'localhost' );

10. Enable URL Rewriting in Apache
a2enmod rewrite
🔹 Enables Apache’s rewrite module (used for pretty permalinks).
nano /etc/apache2/apache2.conf
🔹 Edit the main config file and make sure this block exists:
<Directory /var/www/>
    AllowOverride All
</Directory>

systemctl restart apache2
🔹 Applies all changes.

11. Secure the Site with HTTPS (SSL)
apt install certbot python3-certbot-apache
🔹 Installs Certbot and its Apache plugin.

certbot --apache -d your-domain.com
🔹 Automatically installs a Let’s Encrypt SSL certificate for your domain.

certbot renew --dry-run
🔹 Tests the auto-renewal system to make sure your certificate will be updated.

Step 4: Verify Installation
Open your browser and go to:
https://your-domain.com/
You should see the WordPress setup wizard. Complete it by selecting language, site name, admin user, and password.

Create an admin account and click the Install WordPress button.


You’ve now deployed a secure WordPress website on Debian 12 with Apache, MariaDB, PHP 8.3, and HTTPS enabled — fully ready for production.
For consistent performance and excellent scalability, use Shape.Host Linux SSD VPS — a trusted solution for developers, startups, and content creators alike.