The LAMP stack is a popular open-source web server stack that consists of Linux, Apache, MySQL (or MariaDB), and PHP. It provides a robust, secure, and scalable environment for hosting websites, dynamic applications, and databases. Running a LAMP server on Debian 12 ensures stability, security, and high performance, making it a preferred choice for developers, businesses, and enterprises.
Key Components of LAMP on Debian 12
1. Linux (Debian 12)
- The foundation of the stack, providing stability, security, and package management.
2. Apache (HTTP Server)
- A powerful, flexible, and widely used web server that handles incoming HTTP requests.
3. MySQL / MariaDB (Database Server)
- A relational database management system (RDBMS) for storing and managing application data.
- MariaDB is a popular, drop-in replacement for MySQL, offering better performance and open-source community support.
4. PHP (Hypertext Preprocessor)
- A server-side scripting language that processes dynamic web pages and connects applications to databases.
- Supports PHP modules, frameworks, and CMS platforms like WordPress, Joomla, and Drupal.
Advantages of Using LAMP on Debian 12
- Stable and Secure: Debian 12 provides long-term support (LTS), making it ideal for production servers.
- Open-Source and Cost-Effective: No licensing fees, making it an affordable solution for web hosting.
- Highly Scalable: Can handle small personal websites to large enterprise applications.
- Wide Compatibility: Supports PHP frameworks (Laravel, Symfony, CodeIgniter) and CMS platforms (WordPress, Magento, Drupal).
- Performance Optimization: Apache’s mod_rewrite, MySQL’s query caching, and PHP opcache improve efficiency.
- Community Support: Strong developer community for troubleshooting and updates.
Use Cases for LAMP on Debian 12
1. Hosting Websites and Blogs
- Run WordPress, Joomla, Drupal, and other CMS platforms.
2. Web Application Development
- Deploy custom PHP web applications and RESTful APIs.
3. E-Commerce Platforms
- Power online stores using Magento, WooCommerce, or OpenCart.
4. Database-Driven Applications
- Store and manage structured data with MySQL or MariaDB.
5. Enterprise Web Solutions
- Deploy customer portals, CRMs, and business management tools.
6. Internal Intranet Applications
- Host internal company websites, file management systems, and analytics dashboards.
7. Cloud and VPS Deployments
- Ideal for AWS, DigitalOcean, Linode, and on-premises VPS hosting.
LAMP vs. Other Web Server Stacks
| Feature | LAMP (Linux, Apache, MySQL, PHP) | LEMP (Linux, Nginx, MySQL, PHP) | MEAN (MongoDB, Express, Angular, Node.js) | XAMPP (Local Dev Stack) |
|---|---|---|---|---|
| Performance | ✅ Good | ✅ Faster (Uses Nginx) | ⚠️ Moderate (Depends on Node.js) | ❌ Local Development Only |
| Ease of Use | ✅ Simple Configuration | ✅ Moderate | ⚠️ Requires JavaScript Knowledge | ✅ Easy for Beginners |
| Best for | ✅ PHP & MySQL Applications | ✅ High-Traffic Websites | ✅ Full-Stack JavaScript Apps | ✅ Local Testing |
| Database Support | ✅ MySQL / MariaDB | ✅ MySQL / MariaDB | ✅ MongoDB | ✅ MySQL (For Local Use) |
| Scalability | ✅ Highly Scalable | ✅ More Scalable than LAMP | ✅ Good for Cloud Apps | ❌ Not for Production |
Why Use LAMP on Debian 12?
- Optimized for Production Use: Debian 12 provides a stable, secure, and resource-efficient environment for web hosting.
- Flexible and Customizable: LAMP supports custom configurations, modules, and extensions.
- Enterprise-Grade Security: Regular security updates and firewall configurations keep applications safe.
- Ideal for Developers: Works seamlessly with PHP, MySQL, and Apache development tools.
- Cost-Effective: Fully open-source, with no licensing fees for hosting applications.
LAMP on Debian 12 is a powerful, stable, and widely used web server stack that supports dynamic websites, databases, and enterprise applications. Whether you’re hosting a personal blog, business website, or a large-scale web application, LAMP provides performance, scalability, and security for a seamless hosting experience.
Step 1: Set Up a Debian 12 Server
Before installing LAMP, you need a Debian 12 server. If you don’t have one yet, follow these steps to create an instance on Shape.Host:
Log into Shape.Host and access your Dashboard.
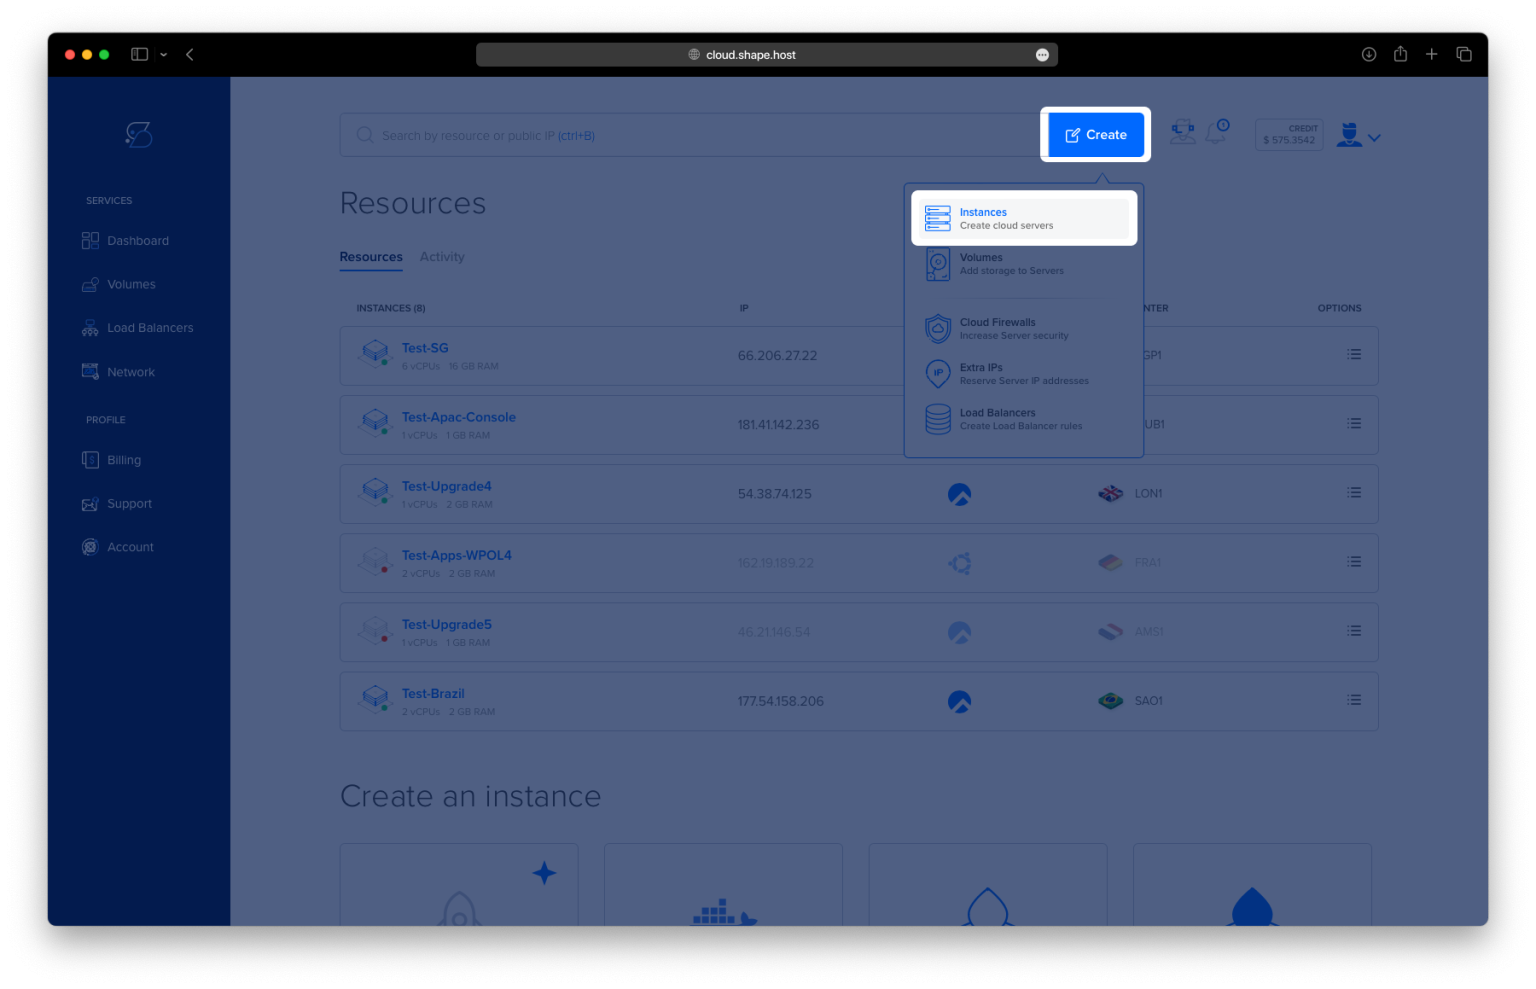
Click “Create” to begin setting up a new virtual machine.
Choose “Instances” to proceed with the server configuration.

Select a Data Center Location closest to your target audience for better performance.

Pick a Hosting Plan that suits your project’s needs, such as Standard or High-Performance.
Choose Debian 12 as the Operating System and finalize the setup.

Launch the Server by selecting an authentication method (SSH keys or password authentication) and clicking Create Instance.

Once the instance is created, go to the Resources section to find the public IP address of your instance. You’ll need this to connect to the instance remotely.

Step 2: Connect to Your Server
Once your Debian 12 instance is running, connect to it using SSH.
- For Linux/macOS Users:
ssh root@<your_server_ip> - For Windows Users: Use PuTTY, enter your server’s IP address, and establish the connection.
Step 3: Update Your System
Before installing LAMP, ensure your system is updated with the latest packages:
apt update && apt upgrade -y
This ensures that your software repositories are current and that all installed packages are up to date.

Step 4: Install Apache Web Server
Apache is the web server component of the LAMP stack, responsible for handling incoming web requests.
Step 4.1: Install Apache
apt-get install apache2 gnupg wget lsb-release

Step 4.2: Start and Enable Apache
systemctl start apache2
systemctl enable apache2
Step 4.3: Verify Apache Status
To confirm that Apache is running correctly, execute:
systemctl status apache2

You can also check if Apache is working by opening your web browser and entering:
http://<your_server_ip>
If Apache is correctly installed, you should see its default welcome page.
Step 5: Install MySQL Database Server
MySQL is the database management system that stores and manages your website’s data.
Step 5.1: Download and Install MySQL Repository
wget https://dev.mysql.com/get/mysql-apt-config_0.8.29-1_all.deb
dpkg -i mysql-apt-config_0.8.29-1_all.deb
Step 5.2: Update Packages and Install MySQL
apt update
apt install mysql-server

Step 5.3: Secure MySQL Installation
Run the security script to apply recommended security settings:
mysql_secure_installation

Step 5.4: Start and Enable MySQL
systemctl start mysql
systemctl enable mysql
systemctl status mysql

Step 6: Install PHP
PHP is the programming language that allows your website to display dynamic content.
Step 6.1: Add the PHP Repository
To install the latest PHP version, add the Sury PHP Repository:
apt install -y lsb-release ca-certificates apt-transport-https software-properties-common wget
wget -O /etc/apt/trusted.gpg.d/php-sury.gpg https://packages.sury.org/php/apt.gpg
echo "deb https://packages.sury.org/php $(lsb_release -sc) main" | tee /etc/apt/sources.list.d/sury-php.list
Step 6.2: Install PHP and Required Extensions
apt update
apt install php8.3 libapache2-mod-php8.3 php8.3-mysql php8.3-gd php8.3-curl php8.3-xml

Step 6.3: Restart Apache
systemctl restart apache2
Step 6.4: Verify PHP Installation
php --version
This should return the installed PHP version, confirming that it is ready for use.
Step 7: Verify the LAMP Stack
To ensure everything is correctly installed, let’s test PHP processing on the server.
Step 7.1: Create a Test PHP File
echo "<?php phpinfo(); ?>" > /var/www/html/info.php
Step 7.2: Open the PHP Info Page
Go to your browser and visit:
http://<your_server_ip>/info.php
This should display a PHP configuration page, listing all installed modules and settings.

Step 7.3: Remove the Test File
For security reasons, delete the test file once you’ve confirmed that PHP is working:
rm /var/www/html/info.php
If you’re looking for fast, reliable, and optimized hosting, check out Shape.Host Cloud VPS, which offers performance-tuned solutions for LAMP-based applications.