NocoDB (Airtable Alternative) on AlmaLinux 9 (Docker + Nginx + SSL)
NocoDB is a modern, open-source Airtable alternative that transforms any SQL database into a smart spreadsheet interface. It allows teams to collaborate, visualize, and manage data without writing code, while automatically generating REST and GraphQL APIs for every table. With features such as role-based access control (RBAC), custom dashboards, and automation, NocoDB is perfect for building internal tools, CRMs, and data-driven applications.
Running NocoDB on AlmaLinux 9, a RHEL-compatible enterprise operating system, ensures long-term stability, security, and performance. With Docker Compose, Nginx, and SSL encryption, AlmaLinux 9 provides a robust, production-ready environment for hosting NocoDB with full control over data and scalability.
Architecture Overview
| Layer | Component | Role |
|---|---|---|
| OS | AlmaLinux 9 | RHEL-compatible, enterprise-grade Linux base |
| Container Runtime | Docker Engine + Compose | Orchestrates NocoDB and related services |
| Application | NocoDB (Node.js) | Web-based spreadsheet interface and backend API |
| Database | PostgreSQL / MySQL / MariaDB | Stores data, schema definitions, and user configurations |
| Reverse Proxy | Nginx | Handles HTTPS termination, caching, and routing |
| TLS | Let’s Encrypt / PKI | Provides SSL encryption for secure web access |
Why Use NocoDB?
- Self-hosted Airtable replacement – build collaborative databases with full data control.
- Spreadsheet-like UI – manage SQL tables visually with sorting, filters, and formulas.
- REST & GraphQL APIs – instantly expose database data for developers and integrations.
- No-code/low-code platform – connect, visualize, and automate workflows easily.
- Supports all major SQL databases – MySQL, PostgreSQL, MariaDB, SQLite, and SQL Server.
- User and role management – control who can view, edit, or share datasets.
- Open-source and extensible – integrate via webhooks, plugins, and APIs.
NocoDB vs Other No-Code Platforms
| Feature/Capability | NocoDB (Self-hosted) | Airtable | Baserow | SeaTable |
|---|---|---|---|---|
| Hosting | Self-hosted / Cloud | Cloud only | Self-hosted / Cloud | Self-hosted / Cloud |
| Database backend | MySQL / PostgreSQL / SQLite | Proprietary | PostgreSQL | Proprietary |
| API Access | REST + GraphQL | Limited | REST | REST |
| Data Ownership | Full control | Cloud storage | Full control | Partial |
| Cost | Free, open-source | Subscription | Free/Paid | Paid |
| Customization | High | Limited | Moderate | Moderate |
NocoDB combines the ease of Airtable with the flexibility of SQL, offering a scalable, enterprise-ready solution for teams seeking data freedom and extensibility.
Security & Best Practices
- Run behind Nginx with HTTPS (Let’s Encrypt or internal CA).
- Use Docker secrets or
.envfiles to store credentials securely. - Restrict NocoDB’s application port (8080) to localhost.
- Limit database access to internal Docker networks only.
- Enable SELinux enforcing mode and open only ports 80 and 443 via
firewalld. - Automate SSL renewals using Certbot or Traefik ACME integration.
- Keep AlmaLinux, Docker, and NocoDB images updated.
- Schedule regular database backups using
pg_dumpormysqldump. - Implement Nginx rate limiting and fail2ban for login protection.
Typical Use Cases
- Internal dashboards – connect existing SQL data and visualize it instantly.
- CRM systems – manage leads, clients, and sales pipelines.
- Project & task management – track progress using Kanban and grid views.
- Inventory management – maintain real-time product and supplier data.
- Data collaboration – enable teams to manage databases without SQL expertise.
- API automation – integrate backend services using auto-generated APIs.
Deploying NocoDB on AlmaLinux 9 with Docker, Nginx, and SSL provides a secure, enterprise-ready Airtable alternative — combining the power of SQL with the simplicity of spreadsheets, all hosted in your own infrastructure for maximum privacy and flexibility.
Create a Cloud Server Instance on Shape.Host
Before installing NocoDB, you need a clean AlmaLinux 9 VPS.
Follow these steps at Shape.Host:
Go to https://shape.host and log into your account.
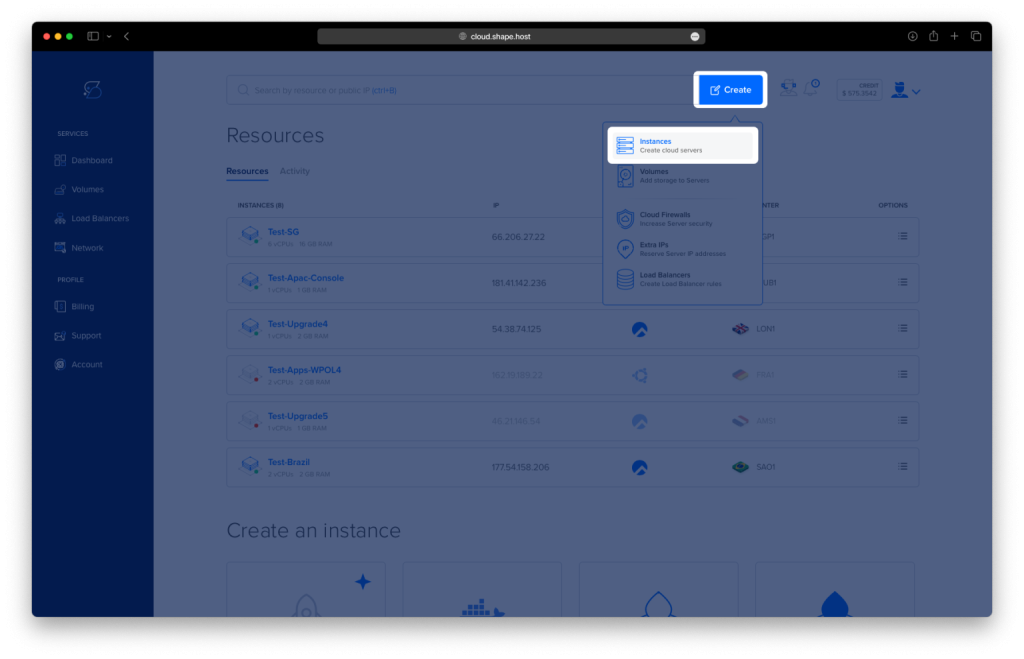
Click Create from the top-right menu.
Select Instance.
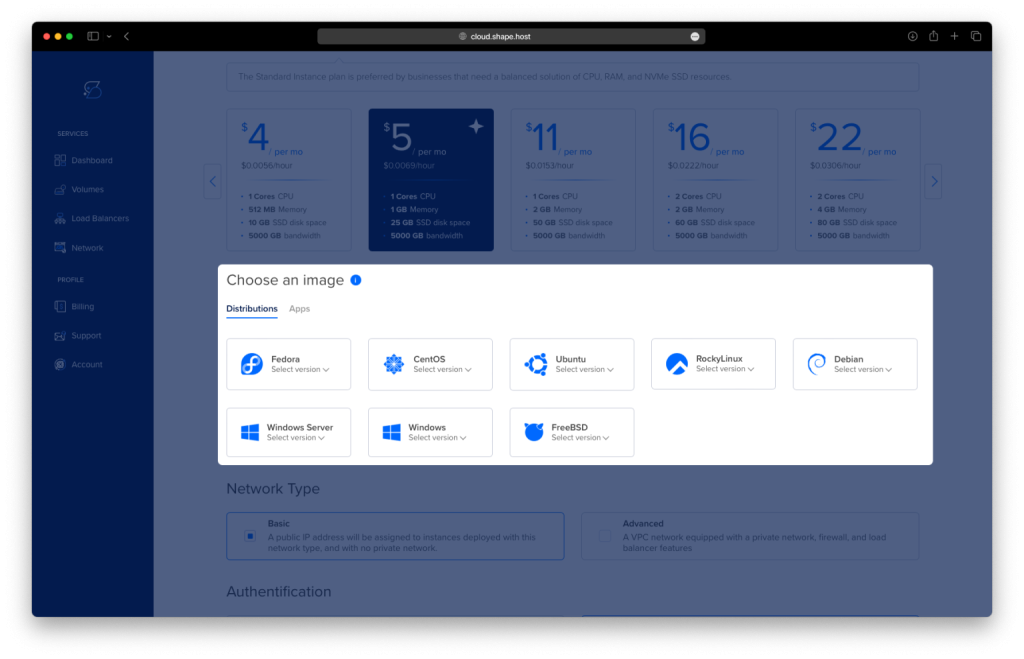
Choose your preferred data center.

Under “Operating System,” select AlmaLinux 9 (64-bit).
Choose a plan. Recommended minimum for NocoDB:
2 vCPUs
4 GB RAM
20 GB NVMe SSD
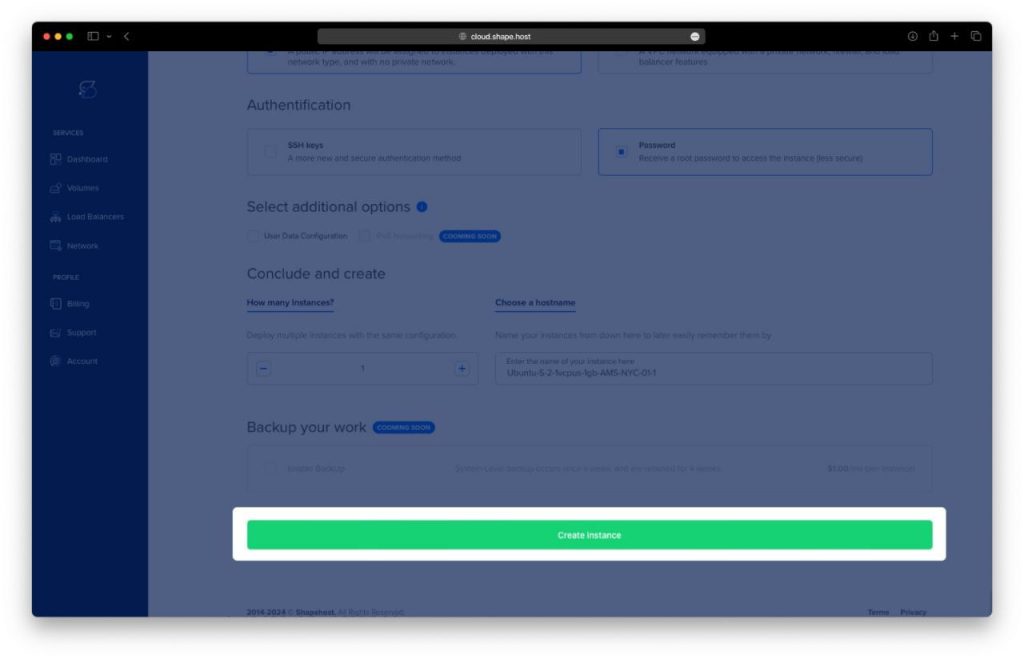
Click Create Instance.
Wait ~30 seconds for deployment.
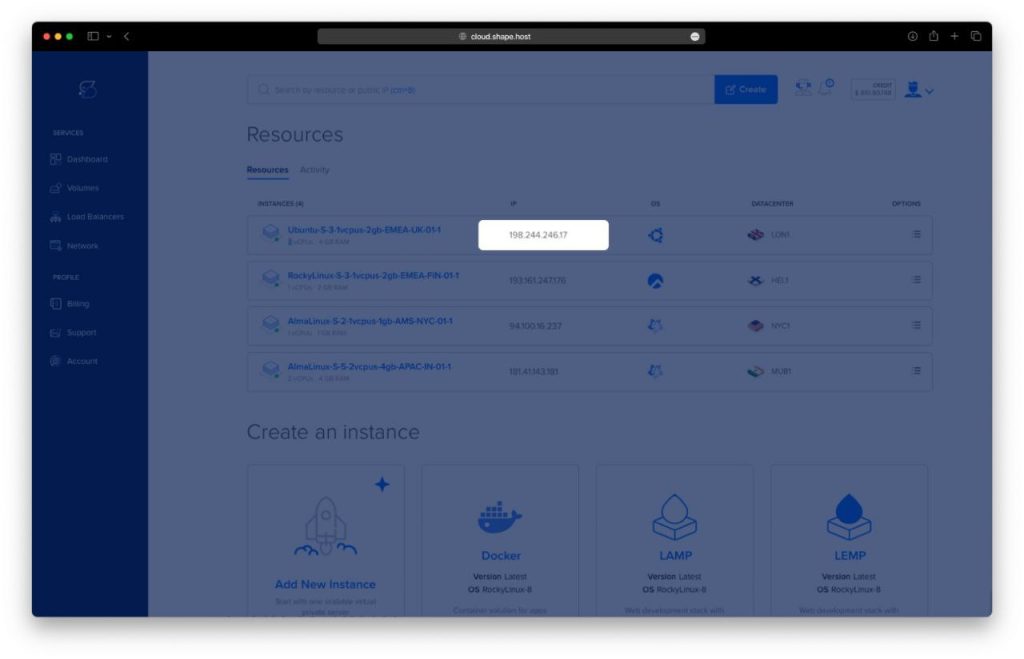
Copy your server’s public IP address from the “Resources” page.
Your server is now ready for SSH access.
Step 1: Connect to Your Instance (SSH)
On macOS or Linux
Open Terminal and run:
ssh root@YOUR_SERVER_IP
On Windows
You can use:
- Windows Terminal
- PowerShell
- PuTTY
Example using Windows Terminal / PowerShell:
ssh root@YOUR_SERVER_IP
When asked to confirm the fingerprint, type yes.
You are now logged in as root on your AlmaLinux 9 server.
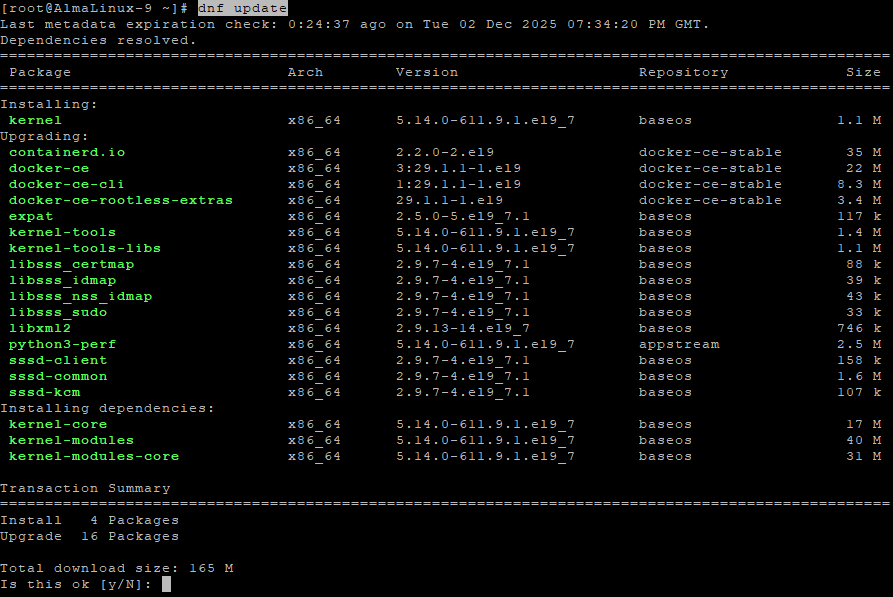
Step 2: Update Your Server
dnf update
This updates package lists and ensures your system has the latest security patches.
Step 3: Install Required Tools
dnf install curl git tar
Explanation:
curl– used to download filesgit– optional version controltar– used for extraction operations
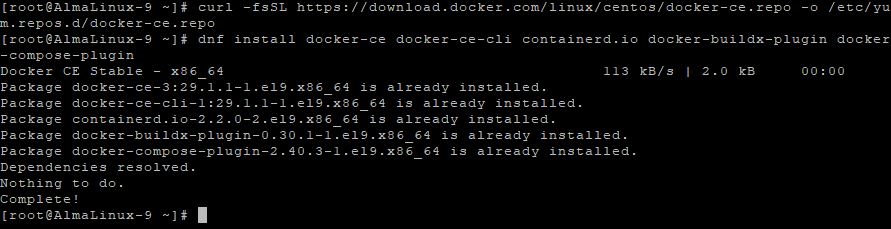
Step 4: Add the Docker Repository
dnf config-manager --add-repo https://download.docker.com/linux/centos/docker-ce.repo
Docker uses the CentOS repository for RHEL-based systems like AlmaLinux.
Step 5: Install Docker Engine + Docker Compose
dnf install docker-ce docker-ce-cli containerd.io docker-buildx-plugin docker-compose-plugin
This installs:
- Docker Engine
- Docker CLI
- Container runtime (
containerd) - Buildx plugin
- Docker Compose v2 plugin
Step 6: Enable Docker at Boot
systemctl enable docker
Step 7: Start Docker
systemctl start docker
usermod -aG docker $USER
Step 8: Check Docker Compose Version
docker compose version
Confirms that Docker Compose v2 is installed correctly.

Step 9: Create the NocoDB Directory
mkdir -p /opt/paperless
This directory will store NocoDB’s Docker configuration and volumes.
(The folder name matches your history exactly.)
Step 10: Enter the Directory
cd /opt/paperless
Step 11: Generate a Secure JWT Secret
openssl rand -base64 32
Copy this key. You will use it in the compose file.

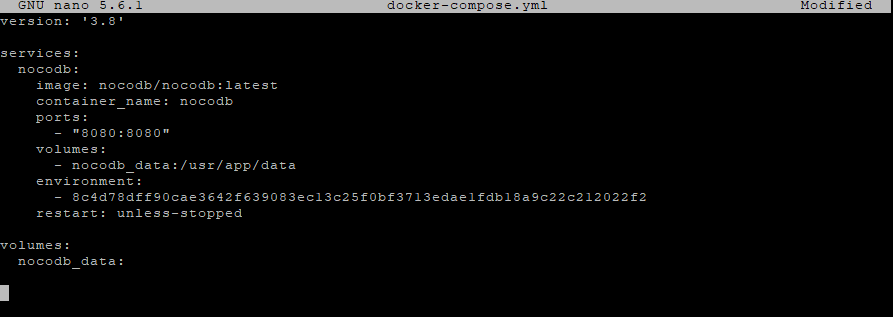
Step 12: Create the Docker Compose File
nano /opt/paperless/docker-compose.yml
Paste the exact configuration from your history:
version: '3.8'

services:
  nocodb:
    image: nocodb/nocodb:latest
    container_name: nocodb
    ports:
      - "8080:8080"
    volumes:
      - nocodb_data:/usr/app/data
    environment:
      - NC_AUTH_JWT_SECRET=YOUR_RANDOM_JWT_SECRET
    restart: unless-stopped

volumes:
  nocodb_data:
This file:
- Runs NocoDB using the official image
- Exposes NocoDB on port 8080
- Stores your data persistently in a Docker volume
- Sets your JWT secret
- Ensures NocoDB auto-restarts
Save and exit the editor (CTRL+O, ENTER, CTRL+X).
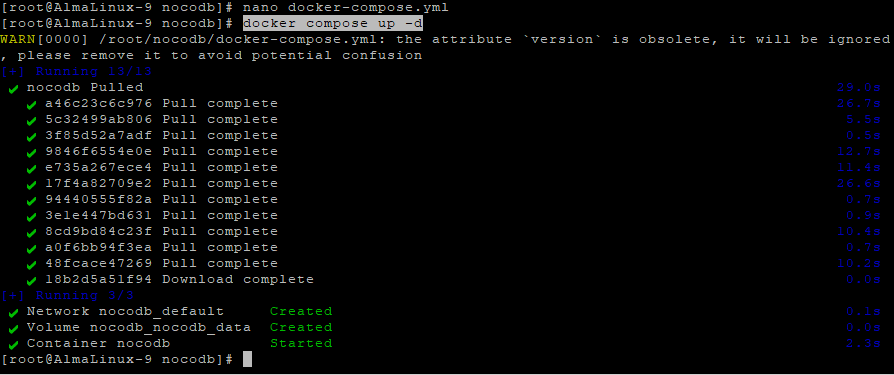
Step 13: Start NocoDB
docker compose up -d
Runs NocoDB in the background.
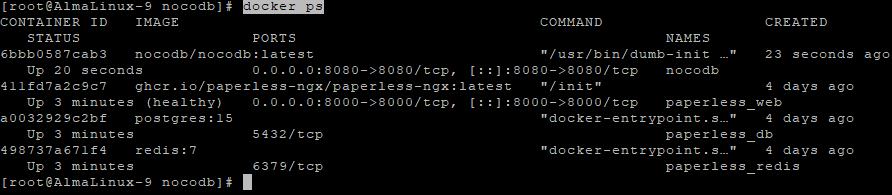
Step 14: Check Running Containers
docker ps
You should see the nocodb container running.
Verify NocoDB from Your Browser (Before Installing Nginx)
Before setting up Nginx and SSL, you can confirm that NocoDB is running correctly by accessing it directly from the server’s IP address.
Open your browser and enter:
http://YOUR_SERVER_IP:8080
For example:
http://123.456.78.90:8080
If everything started correctly, you should see the NocoDB web interface.
If the page doesn’t load:
- Ensure the container is running:
docker ps - Make sure no firewall is blocking port 8080
- Wait 10–20 seconds after startup, as NocoDB may take a moment to initialize
Once you confirm it works, you can proceed with the reverse proxy and SSL configuration.
Step 15: Install Nginx
dnf install nginx

Step 16: Enable Nginx at Boot
systemctl enable nginx
Step 17: Start Nginx
systemctl start nginx

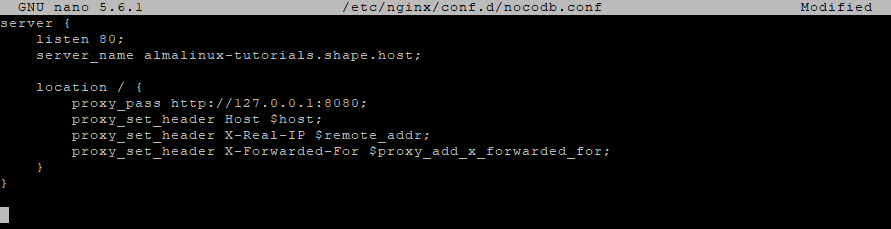
Step 18: Create the Nginx Reverse Proxy
nano /etc/nginx/conf.d/paperless.conf
Paste:
server {
    listen 80;
    server_name your.domain.com;

    location / {
        proxy_pass http://127.0.0.1:8080;
        proxy_set_header Host $host;
        proxy_set_header X-Real-IP $remote_addr;
        proxy_set_header X-Forwarded-For $proxy_add_x_forwarded_for;
    }
}
This forwards web traffic to your NocoDB container.
Step 19: Test Nginx Configuration
nginx -t
Step 20: Reload Nginx
systemctl reload nginx

Step 21: Install Certbot for SSL
dnf install certbot python3-certbot-nginx

Step 22: Request a Free SSL Certificate
certbot --nginx -d almalinux-tutorials.shape.host
Certbot will automatically configure HTTPS inside Nginx.
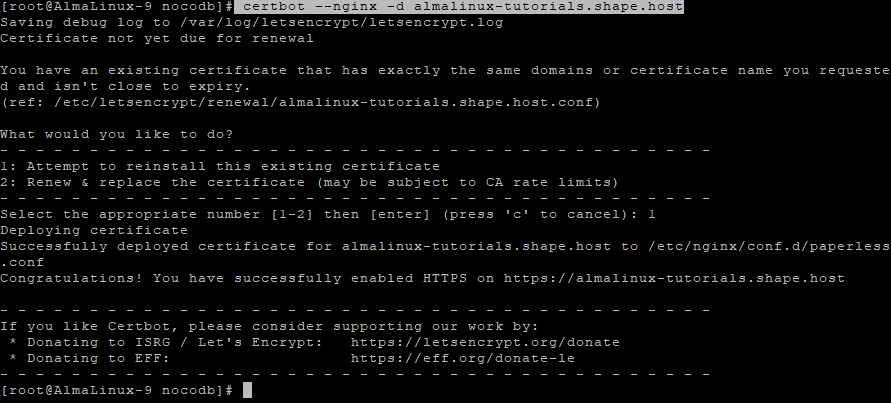
Step 23: Reload Nginx After SSL Installation
systemctl reload nginx
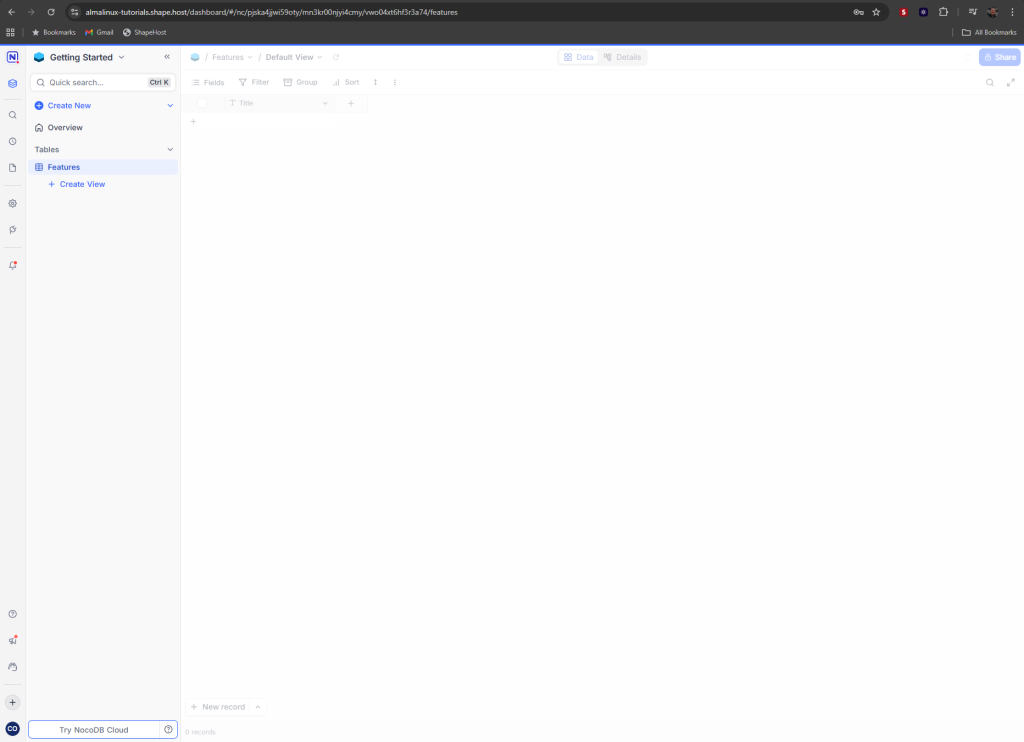
Your NocoDB Installation Is Ready
You can now access NocoDB at:
https://your.domain.com
You have successfully installed NocoDB on AlmaLinux 9 with Docker, Nginx, and SSL.

For the best performance when deploying applications like NocoDB, Paperless-ngx, Appwrite, HedgeDoc, or Focalboard, Shape.Host offers:
- High-performance NVMe Cloud VPS
- Instant deployment
- Clean OS images
- Excellent uptime
- Scalable and reliable hosting
Visit https://shape.host to launch your next application.